For many customers, running Red Hat OpenShift on Alibaba Cloud can be the architecture of choice for efficient hybrid cloud solutions. However, automating the deployment of clusters can be troublesome, as there are many alternatives to consider and some development required. This article offers a reference implementation to help you deploy Red Hat OpenShift clusters on Alibaba Cloud infrastructure using the Assisted Installer.
All code referenced in this article may be found here. Please review the code and configuration before executing, as described in this document.
Disclaimer
This repository is maintained exclusively by its contributors as a community effort. It is not supported by Red Hat or Alibaba.
Deployment guide
Follow this process to provision your cloud resources and install an OpenShift Cluster automatically on Alibaba Cloud. Here’s a recorded demonstration of the entire process: Create an OpenShift cluster on Alibaba Cloud.
Account creation
Make sure you have access to the following cloud services:
Workspace setup
The lab-aliyun repository on GitHub includes an example GitPod configuration, so you can start a workspace with all tools ready to work.
If you prefer, you're welcome to clone this repository and set up your own machine. The exact dependencies and commands can be found in the GitPod container file (.gitpod.Containerfile).
Configure the Assisted Installer CLI
The Assisted Installer service provides us the image for our cluster pre-configured. However, instead of using the web console, we’ll automate the process using the command-line interface (CLI).
Configure the offline token
Obtain your Assisted Installer offline token at here and set as an environment variable named AI_OFFLINETOKEN:
export AI_OFFLINETOKEN="YOUR_TOKEN"You can also use dotfiles, DirEnv, or your preferred mechanism to set up environment variables.
Configure the pull secret
Log in to the OpenShift Cluster Manager portal, and download your pull secret to a file named openshift_pull.json.
Verify access to the Assisted Installer Service by listing your clusters with the following command:
aicli list clustersConfigure the Alibaba CLI
Set up authentication of Alibaba CLI as described in Configure Identity Credentials. Make sure your user has access to all resources necessary for the cluster, or assign an administrator-level policy.
Verify access to Alibaba services by checking your identity:
aliyun sts GetCallerIdentitySet up Alibaba resources
The file my_cluster_configurations.json contains settings that are going to be used by the scripts.
Review every setting according to your environment:
{
    "region": "us-east-1",
    "base_domain": "devcluster.mycompany.com",
    "cluster_name_prefix": "someone-",
    "openshift_version": "4.16.2",
    "ssh_public_key_file": "/home/gitpod/.ssh/id_rsa.pub",
    "control_plane_instance_type": "ecs.g6.xlarge",
    "compute_instance_type": "ecs.g6.large",
    "create_sno_cluster": false,
    "create_compact_cluster": false,
    "create_bastion_host": false,
    "bastion_host_image_id": "m-0xi1wndcxhwnxavcodzz",
    "bastion_host_ssh_key_pair": "openshift-dev",
    "resource_group_id": "rg-aek4mzon3le3dse"
}
The table below provides a brief description of each setting.
Setting | Description |
| Alibaba Cloud region where resources will be provisioned. |
| DNS zone name where cluster will be created. |
| Name prefix for the cluster and its resources. |
| OpenShift version to use. |
| Key file location for server access. |
| ECS instance type for control plane instances. |
| ECS instance type for worker nodes. |
| Create a cluster with control plane and worker in a single node. |
| Create a cluster with contro-plane and workersl in the same nodes, of a three-node cluster. |
| Create an extra instance outside of the cluster. |
| Image to be used for bastion host. |
| Keypair name for bastion host. |
| Alibaba Resource Manager group ID. |
Code review
The example scripts in this repository help you provision the cluster, download and convert the image, provision the cloud resources, and install the software. The entrypoint is the lab-aliyun.sh.aliyun script, which invokes each other in turn. The resources are created using Alibaba Resource Orchestration service (ROS), from the template infra/ros/template.ros.yaml. You may want to change that template to include other services, or add that template to your own solution.
Cluster provisioning
The entrypoint script lab-aliyun.sh.aliyun can be executed, and all steps should follow automatically. In the end, your cluster will be installed and set up correctly. The scripts create temporary files with logs, images, and resource identities in the root of this repository, where it's expected to execute.
The first step is to create the cluster in the Assisted Installer service and to obtain the cluster image, so it can be uploaded to Alibaba Cloud and converted to the expected qcow2 format.
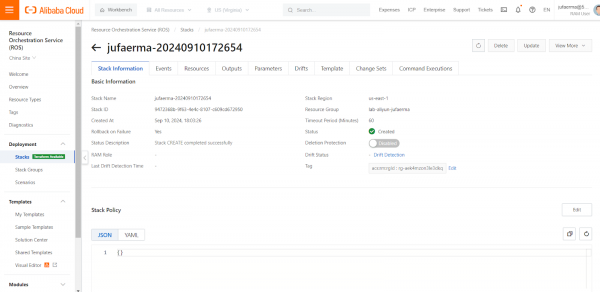
With the image created, the networking and compute infrastructure are provisioned using the Resource Orchestration Service. You can use the Resource Orchestration Service console to verify the provisioning progress. See Figure 1.

Cluster installation
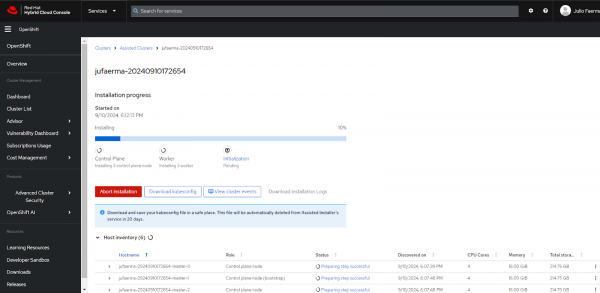
After the resources are provisioned, the lab script starts the cluster installation on the Assisted Installer. This process can take around an hour to complete. You can verify the progress of the installation in each node in the Red Hat Hybrid Cloud Console, as shown in Figure 2.

Troubleshooting
Although this code was tested and reviewed, it’s possible that some things that may go wrong—do check the logs and console for errors.
The first checkpoint is to verify that the stack is properly created in Alibaba Cloud Resource Orchestration Service (ROS). If the stack is rolled back, you'll find the reason in the Events tab.
After that, the cluster will be provisioned in the assisted installer service. You can download the installer logs from the web console.
Cleanup resources
If you're no longer using the provisioned cluster, remember to delete the ROS stack (on the Alibaba Cloud Console) and OpenShift Cluster (on the Red Hat Hybrid Cloud Console) to avoid wasting resources or incurring costs.
Send us your feedback!
Let us know if this reference implementation was helpful and how it could be improved. Your discussions and contributions are more than welcome in our GitHub Repository.
