Istio has long been a popular choice for managing microservices, offering traffic management, security, and observability in Kubernetes. But as powerful as it is, the traditional sidecar-based approach comes with its own challenges, which can be complex and resource intensive. With ambient mode, Istio removes the need for sidecars, making service mesh deployments lighter, more flexible, and easier to manage.
In this article, we’ll review the ambient architecture, how it works, and why it’s important. We’ll also look at its benefits, compare it to the traditional sidecar model, and how to deploy ambient mode using the Red Hat OpenShift Service Mesh 3.0 operator.
Istio ambient mode architecture
Istio ambient mode introduces a new way to manage service mesh without using traditional sidecar proxies. The biggest change is how it separates network traffic processing into two distinct layers, which is the core architectural difference. This architecture simplifies networking, reduces resource usage, and improves security while supporting the same service mesh use cases.
Ambient mode uses a different data plane architecture that splits traffic processing between a per-node Layer 4 (L4) proxy called Ztunnel (Zero-Trust Tunnel) and an optional Layer 7 (L7) proxy called waypoint proxy. In the following sections, we will break down how ambient mode works, focusing on the key components.
Ztunnel proxy
Ztunnel is a lightweight, shared L4 node level proxy that handles basic networking functions like connection security and authorization. It ensures security with mutual transport layer security (mTLS) encryption, authentication, telemetry, and simple L4 authorization while reducing resource overhead by eliminating the need for separate sidecars in each pod. It runs as a Kubernetes DaemonSet with an instance deployed per node and is written in Rust for high performance and low resource consumption.
When a pod is added to the mesh, the Istio CNI node agent configures traffic redirection rules and instructs Ztunnel to create listening sockets inside the pod’s network namespace. This enables the local Ztunnel to intercept traffic. The Ztunnel also fetches certificates from the Istio controller using the xDS APIs for all service accounts of all pods that are part of the mesh and scheduled on that node.
When the pod communicates with other pods or services in the mesh, the Ztunnel establishes HTTP-Based Overlay Network Encapsulation (HBONE) tunnels with remote Ztunnels or waypoint proxies, as shown in Figure 1. During this process, the source Ztunnel uses the identity of the source workload, while the destination Ztunnel uses the identity of the destination workload. This ensures that Layer 4 authorization policies are correctly applied to the traffic.
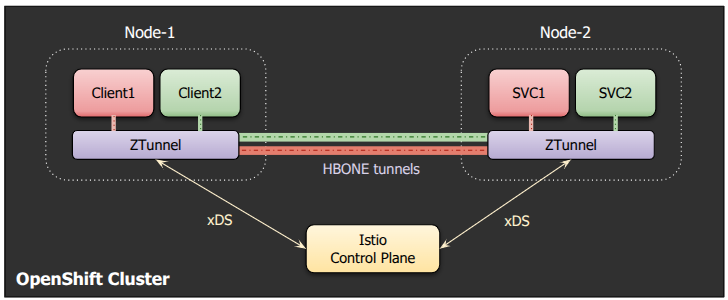
HBONE, a term specific to Istio, is a secure tunneling protocol used between Istio components. It allows multiple transmission control protocol (TCP) streams from the application to be transmitted over a single, mTLS-encrypted connection. The tunnel is established using HTTP CONNECT, while HTTP/2 is used to multiplex application connections over it.
A separate HBONE tunnel is created for each unique source and destination pair, but the same tunnel can handle multiple application-level connections. HBONE allows original application traffic to be forwarded over the tunnel without modifications while still supporting additional stream-level metadata.
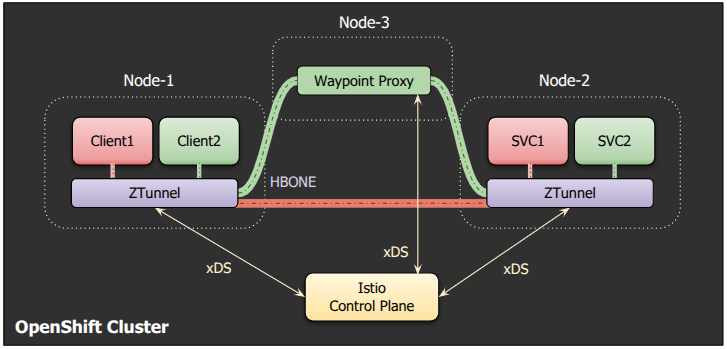
Note that even if the client and the service are on the same node, the traffic still goes through the local Ztunnel instead of bypassing it, as shown in Figure 2. This ensures that L4 auth policies are always applied on the traffic irrespective of where the client/server are present.

Waypoint proxy
Waypoint proxy is an optional envoy-based component that manages L7 traffic for applications requiring advanced features. You can create a waypoint proxy if the application requires any of the following features:
- Traffic management: HTTP routing and load balancing, retries, timeouts, circuit breaking, rate limiting, and fault injection.
- Security: Rich authorization policies based on L7 primitives, such as request type or HTTP header.
- Observability: HTTP metrics, access logging and tracing.
Unlike sidecar proxies, waypoint proxies operate independently from application pods, as shown in Figure 3. They are deployed as Kubernetes Deployments and scaled horizontally based on demand. This design allows for more efficient resource utilization and easier management. For more details on how to create and use waypoints, you can refer to the Istio documentation.
Ambient mode optimizes each layer
Ambient mode allows users to begin with a secure L4 overlay via the Ztunnel proxies. For more advanced L7 use-cases, users can create waypoint proxies as needed. By separating L4 and L7 processing into distinct layers, applications requiring only basic security can utilize the secure L4 overlay mode, while those needing advanced features can opt in for L7 processing. This separation allows ambient mode to optimize each layer independently.
Apart from Ztunnel and waypoint proxies, which are the data plane components, the control plane components of an ambient deployment include Istiod and Istio CNI:
Istiod: The core Istio control plane component that interacts with Ztunnel and waypoint proxies using xDS APIs, but with a simplified set of resources compared to the sidecar model. This reduces the amount of data transmitted and processed, thereby improving the performance.
- Istio CNI: This component handles network setup for pods in the mesh. In the sidecar mode, it’s an optional component used instead of privileged init containers in each pod. However, in ambient mode, it's a mandatory component that works together with Ztunnel proxies to manage traffic. The Istio CNI agent runs as a DaemonSet on every node in the cluster with elevated privileges. Its main job is to configure the traffic redirection rules in the pods network namespace that belong to the mesh, and to pass details about the pod network namespace to the node local Ztunnel for further processing. For more details, you can refer to the Istio documentation.
Benefits of ambient mode vs. sidecars
With an understanding of the ambient architecture, now we can appreciate the following benefits of ambient mode over the traditional sidecar mode:
- Lower resource consumption: Since ambient mode uses a single Ztunnel proxy per node rather than a sidecar proxy for every pod, it drastically reduces the number of proxy instances; thereby leading to significant savings in CPU and memory. Additionally, the Ztunnel proxy is designed to be lightweight and efficient, further minimizing the resource consumption compared to the more feature-rich Envoy proxy used in the sidecar mode.
- Improved performance and scalability: As mentioned earlier, the load on the Istiod control plane is significantly lower due to the optimized xDS APIs for ambient and the reduced number of proxies. Additionally, when a waypoint is deployed, Layer 7 processing occurs only once in the connection path, rather than twice (i.e., traffic shaping at the source sidecar and policy enforcement at the destination sidecar) when using sidecar proxies, improving the overall performance and scalability.
- Improved security posture in secure L4 overlay mode: For applications primarily interested in a secure L4 overlay without any L7 features, Ztunnel limits exposure to CVEs, as L7 proxies are typically more prone to vulnerabilities than L4 proxies.
- Improved operational experience: In ambient mode, application pods do not require restart during upgrades or when adding/removing them from the mesh. This helps improve the overall operational experience.
- Improved startup time: Since there is no need to set up proxies every time a pod starts, we can expect some improvement in startup times. The architecture also helps avoid race conditions that sometimes occur in a sidecar mesh between the application and sidecar proxy startup.
Trade-offs with ambient mode
It is worth noting that there are a few trade-offs that come with ambient mode:
- Limited adoption: Ambient mode is still a new feature not as established or tested as the traditional sidecar mode. But, as more users try it out and share feedback, it will keep evolving, becoming more stable and reliable over time.
- Feature parity: Ambient mode aims to offer the same functionality as the sidecar model, but it doesn’t yet support all the features available in sidecar mode.
- Administrative overhead: While the initial setup with Ztunnel proxies is relatively simple, administrative complexity will increase once we start considering waypoints. Since ambient L7 features depend on waypoints, deciding when to use them and how many to deploy can further add to operational workload.
- Security trade-offs with shared Ztunnel: Sidecar mode provides strong security by isolating each service instance with its own proxy. In contrast, ambient mode simplifies operations, but since Ztunnel is shared across multiple workloads on the same node, it may introduce additional security risks compared to the sidecar mode.
- Upgrade considerations: Upgrading Ztunnel in ambient mode can briefly disrupt the ambient data plane traffic on a node, mainly affecting long-running connections. Unlike L7 proxies, Ztunnel has no way to inform applications to gracefully close the connections. To reduce risk, node cordoning and blue/green node pools are recommended, making upgrades more involved than in a sidecar mode.
Deploy ambient using OpenShift Service Mesh 3.0
Now that we've explored how ambient mode works, let's look at how to deploy it on Red Hat OpenShift using the OpenShift Service Mesh 3.0 operator. The OpenShift Service Mesh 3.0 operator is based on the open source Sail Operator project, which is maintained as part of the istio-ecosystem organization. Instead of creating a new configuration schema, its APIs are built around Istio’s Helm chart APIs.
Note:
Istio ambient mode in OpenShift Service Mesh 3.0 is a Developer Preview feature and should not be used in production environments.
To install Istio using the ambient profile, the following resources (cluster-wide resources) must be created either using the OpenShift web console or command-line interface (CLI):
- Istio: Used for installation of Istio control plane that internally manages the data plane components.
- IstioCNI: Manages the Istio CNI DaemonSet, which is responsible for configuring traffic redirection for pods in the mesh.
- ZTunnel: Manages the Ztunnel DaemonSet for ambient mode.
We will use the CLI instructions.
Note:
As a prerequisite, ensure you have access to an OpenShift cluster (version 4.14 or above) with the cluster-admin role.
Follow the steps below to install Istio using the ambient profile:
- Install the OpenShift Service Mesh 3.0 operator using the CLI or through the OpenShift web console by following the steps provided here.
The operator expects the namespaces to exist before installing the respective components. So, let's create the namespace first:
$ oc create namespace istio-systemCreate the
Istioresource with theprofileset toambientandspec.values.pilot.trustedZtunnelNamespacepointing to the namespace in which ZTunnel would be deployed:$ cat <<EOF | oc apply -f - apiVersion: sailoperator.io/v1 kind: Istio metadata: name: default spec: version: v1.24.2 namespace: istio-system profile: ambient values: pilot: trustedZtunnelNamespace: "ztunnel" EOFConfirm that the Istiod installation was successful:
$ oc get istio
NAME  REVISIONS READY IN USE ACTIVE REVISION STATUS   VERSION  AGE
default 1        1     0      default        Healthy  v1.24.2  23s
Create the
istio-cninamespace followed by theIstioCNIresource:$ oc create namespace istio-cni $ cat <<EOF | oc apply -f - apiVersion: sailoperator.io/v1 kind: IstioCNI metadata: name: default spec: version: v1.24.2 profile: ambient namespace: istio-cni EOFCreate the
ztunnelnamespace followed by theZTunnelresource:$ oc create namespace ztunnel $ cat <<EOF | oc apply -f - apiVersion: sailoperator.io/v1alpha1 kind: ZTunnel metadata: name: default spec: version: v1.24.2 namespace: ztunnel profile: ambient EOFConfirm that the Ztunnel deployment was successful:
$ oc get ztunnel
NAME      READY   STATUS    VERSION   AGE
default   True    Healthy   v1.24.2   16s
Note:
Unlike the Istio and IstioCNI resources which are v1 APIs, the ZTunnel resource is v1alpha1 resource in the OSSM 3.0 release.
Deploy the Bookinfo sample app
Next, follow the steps to deploy the Bookinfo app:
Let’s deploy the sample Bookinfo application to verify the ambient mode:
$ oc create namespace bookinfo
$ oc apply -n bookinfo -f https://raw.githubusercontent.com/istio/istio/release-1.24/samples/bookinfo/platform/kube/bookinfo.yaml
$ oc apply -n bookinfo -f https://raw.githubusercontent.com/istio/istio/release-1.24/samples/bookinfo/platform/kube/bookinfo-versions.yaml
Wait for all the pods in the
bookinfonamespace to come up. Next, add thebookinfonamespace to the ambient mesh:$ oc label namespace bookinfo istio.io/dataplane-mode=ambientNote that there is no need to restart or redeploy any of the
bookinfopods after adding them to the ambient mesh. Additionally, unlike sidecar mode, the number of containers in each pod stays the same even after they are added to the ambient mesh.Now, let's deploy a
bookinfogateway using the Kubernetes Gateway API so that we can access the product page from outside of the cluster:$ oc get crd gateways.gateway.networking.k8s.io &> /dev/null || \ { oc apply -f https://github.com/kubernetes-sigs/gateway-api/releases/download/v1.2.0/standard-install.yaml; } $ oc apply -n bookinfo -f https://raw.githubusercontent.com/istio/istio/release-1.24/samples/bookinfo/gateway-api/bookinfo-gateway.yamlOnce the
bookinfo-gatewayis up and an IPAddress is assigned to it, we can get theproductpageservice URL:$ export INGRESS_HOST=$(oc get -n bookinfo gtw bookinfo-gateway -o jsonpath='{.status.addresses[0].value}') $ export INGRESS_PORT=$(oc get -n bookinfo gtw bookinfo-gateway -o jsonpath='{.spec.listeners[?(@.name=="http")].port}') $ export GATEWAY_URL=$INGRESS_HOST:$INGRESS_PORT $ echo "http://${GATEWAY_URL}/productpage"- Open your browser and navigate to http://${GATEWAY_URL}/productpage to view the Bookinfo application. Refresh the page a couple of times to see that book ratings are changing, as requests are distributed across different versions of the reviews service.
Verify that ambient mode is enabled and Istio uses HBONE protocol for the pods in the
bookinfonamespace:$ istioctl -n ztunnel ztunnel-config workloads NAMESPACE POD NAME ADDRESS NODE WAYPOINT PROTOCOL bookinfo details-v1-6cd6d9df6b-mddv2 10.129.0.43 ip-10-0-0-241.ec2.internal None HBONE bookinfo productpage-v1-57ffb6658c-vmb6z 10.129.0.48 ip-10-0-0-241.ec2.internal None HBONE bookinfo ratings-v1-794744f5fd-wm798 10.129.0.44 ip-10-0-0-241.ec2.internal None HBONE ...
Visualizing the traffic
An OpenShift deployment comes with a preconfigured and preinstalled monitoring stack that monitors the core platform components and can be extended to monitor user-defined projects. Follow these steps to configure the monitoring stack.
After configuring the OpenShift monitoring stack, we can install the Kiali operator provided by Red Hat. The Kiali operator helps in visualizing the traffic, viewing the configuration, and analyzing the traces from a single dashboard. To install the Kiali operator, follow these steps.
Kiali supports its own dedicated console, but for this article let's explore the OpenShift Service Mesh Console (OSSMC) plug-in, which is an extension of the OpenShift Console that provides visibility into the Service Mesh. To install the OSSMC plug-in, follow the steps here.
Once the OSSMC plug-in is installed, we can view the Service Mesh Overview and Traffic Graph directly from the OpenShift web console. Log in to the OpenShift web console and you should see the Service Mesh tab on the left hand panel.
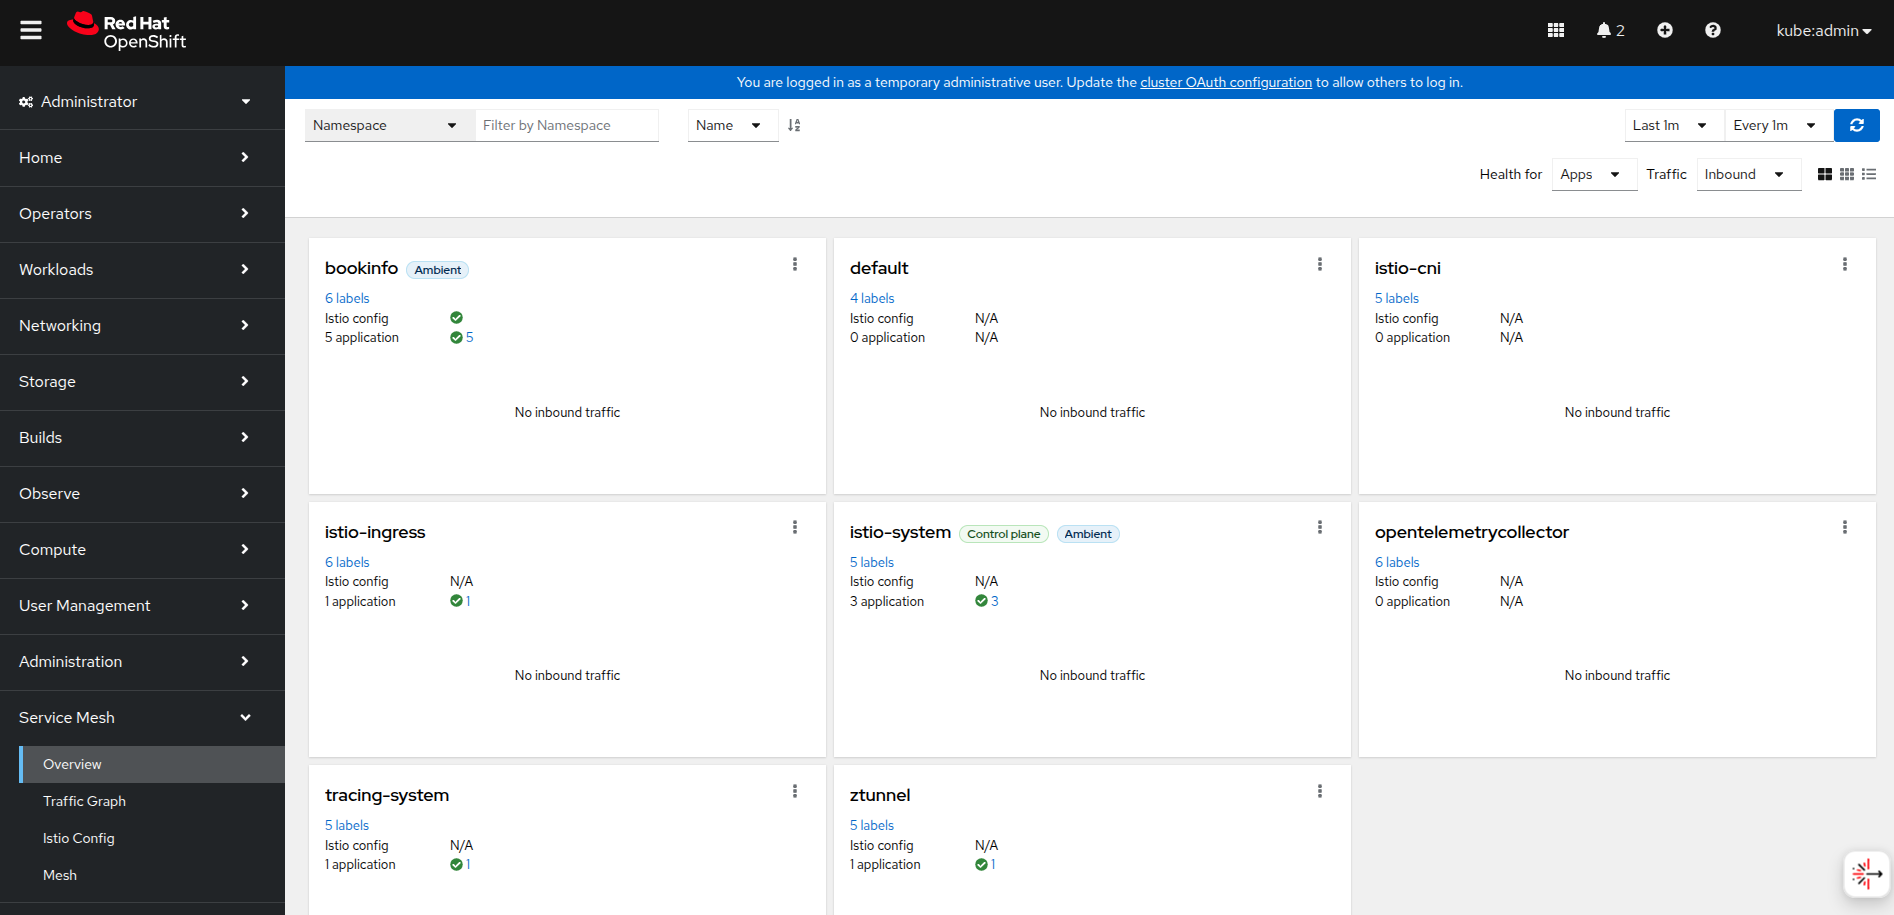
The Overview page for the bookinfo namespace that is part of the ambient mesh would appear as shown in Figure 4.
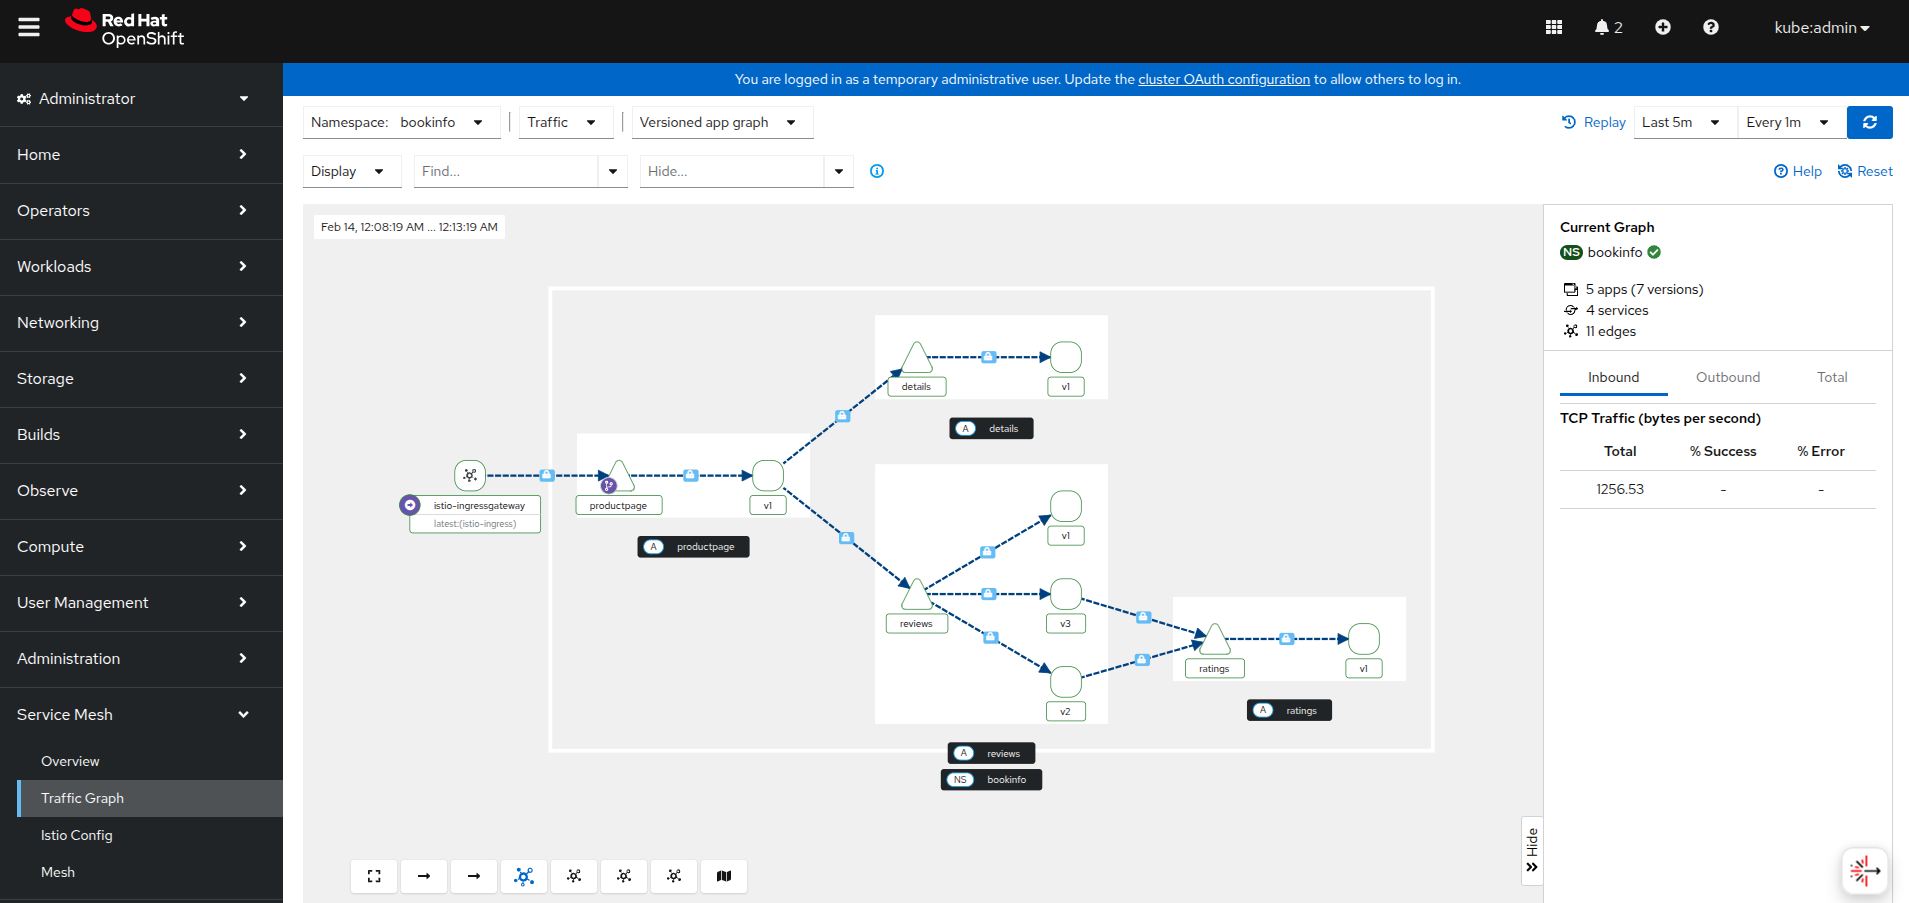
Access the product page of the Bookinfo app a couple of times to generate some metrics, and you should see a traffic graph in Kiali. Notice that all communication between the Bookinfo apps is secured using mTLS. For more details, refer to the Kiali documentation for a list of supported features in ambient mode (Figure 5).
Wrap up
We’ve heard that many users avoid implementing mesh technologies, particularly Istio, due to the overhead and perception of sidecars. Istio ambient mode offers a sidecar-less service mesh that reduces resource usage, simplifies operations, and enables gradual adoption without requiring changes to applications. We believe ambient mode has the potential to redefine the Istio data plane, reducing current barriers and making mesh adoption more appealing.
In this article, we covered key components of ambient and provided guidelines for seamlessly deploying it on OpenShift using the OpenShift Service Mesh 3.0 operator. While this is a developer preview feature at the moment, we’d appreciate it if you’d give it a test run and let us know what you think. Your feedback helps us improve the feature, ensuring it's ready for prime time so you can confidently use it in production environments and realize its benefits.
You can provide feedback through the #sail-operator channel on Istio Slack or by starting a discussion in the Sail operator GitHub repo. For more information on how to engage and contribute, please refer to the guidelines.
