The use of long-lived credentials, such as access keys, is a common method for accessing protected resources. However, they represent potential security concerns, especially once a compromise occurs. Assets that have become compromised can continue to be accessed indefinitely, and in many cases, without the owner's knowledge. As a result, many systems and frameworks now support the use of short-lived, or just-in-time (JIT), methods for accessing sensitive resources.
This is the first installment of a three-part series that explores how to implement zero-trust methodologies by leveraging short-lived credential support in Quay. This article will provide an overview of the robot account federation feature within Quay and how it can be used to enable secure access to Quay content.
Red Hat Quay and robot accounts
Red Hat Quay is a highly scalable registry platform and offers several different ways to access content. One such option is robot accounts, which are non-human accounts used to enable automated processes to access repository content. This alleviates the need to store passwords of human users in environments, like CI pipelines. By default, when a robot account is created, a long-lived credential is generated and provided as the primary method for accessing content granted to the account.
A feature released as part of Red Hat Quay version 3.13 along with the hosted service (quay.io) is the ability to utilize short-lived credentials by federating with an existing OpenID Connect (OIDC) provider, thus mitigating the concerns inherent with long-lived credentials. In this scenario, "federation" means that Quay can be configured to accept JSON Web Tokens (JWT) from a trusted issuer to authenticate to Quay.
OIDC federation is an extension of OIDC authentication where a JWT obtained from an OIDC provider is exchanged for a set of short-lived credentials, which in turn can be used to authenticate against the target resource. This architectural pattern is becoming more prominent, especially in the hybrid cloud, for enabling systems and services to communicate securely. Quay leverages OIDC federation at an individual robot account level, and once enabled, one or more configurations can be applied to obtain credentials for the account. Let’s describe how this feature can be leveraged.
Configure the Red Hat build of Keycloak
First, in order to utilize the Robot Account Federation feature within Quay, a compatible OIDC provider must be available to enable the configuration. For the purpose of this guide, we will showcase how to configure and utilize an instance of the Red Hat build of Keycloak as the reference implementation.
All that is needed within the Red Hat build of Keycloak to enable this integration is a new realm for segregation purposes, a user to act as the entity granted access to exchange credentials with Quay, and a client used for the purpose of authenticating users. Navigate to the Red Hat build of Keycloak web console and log in with a user that has sufficient privileges to create and manage realms, users, and clients.
Once authenticated, create a new realm by selecting the Realm dropdown on the top of the lefthand navigation bar and select Create Realm. Enter "quay" as the name of the realm and select Create.
With the quay realm created, create a new user by first selecting Users on the lefthand navigation bar and then selecting Create new user.
Enter the following details to associate with the new user:
- Username: jdoe
- Email: jdoe@redhat.com
- First Name: John
- Last Name: Doe
Click Save to create the user.
Set a password for the newly created user by selecting the Credentials tab and clicking the Set Password button. Enter and confirm a desired password for the account. For the purpose of this walkthrough, set the password as "redhat123."
Untoggle Temporary and click Save to set the password.
Now, create a new Red Hat build of Keycloak client to allow our newly created user to authenticate for the purpose of obtaining a JWT.
On the left navigation bar, select Clients, and then select the Create Client button to begin the process of creating a new Red Hat build of Keycloak client.
Enter "quay-access" as the ClientID and then select Next. On the Capability Config page, accept the default values which will configure the new Red Hat build of Keycloak client as a public client (no authentication required to leverage the client).
Then click Next. Since the client will not be used within a browser context, there is no need to enter a define a redirect URL, as Red Hat build of Keycloak will set the default value for us. Click Save to create the client.
Now that a new realm, user, and client have been created within Red Hat build of Keycloak, we can leverage these new assets to obtain a JWT, which is the first step for leveraging OIDC federation.
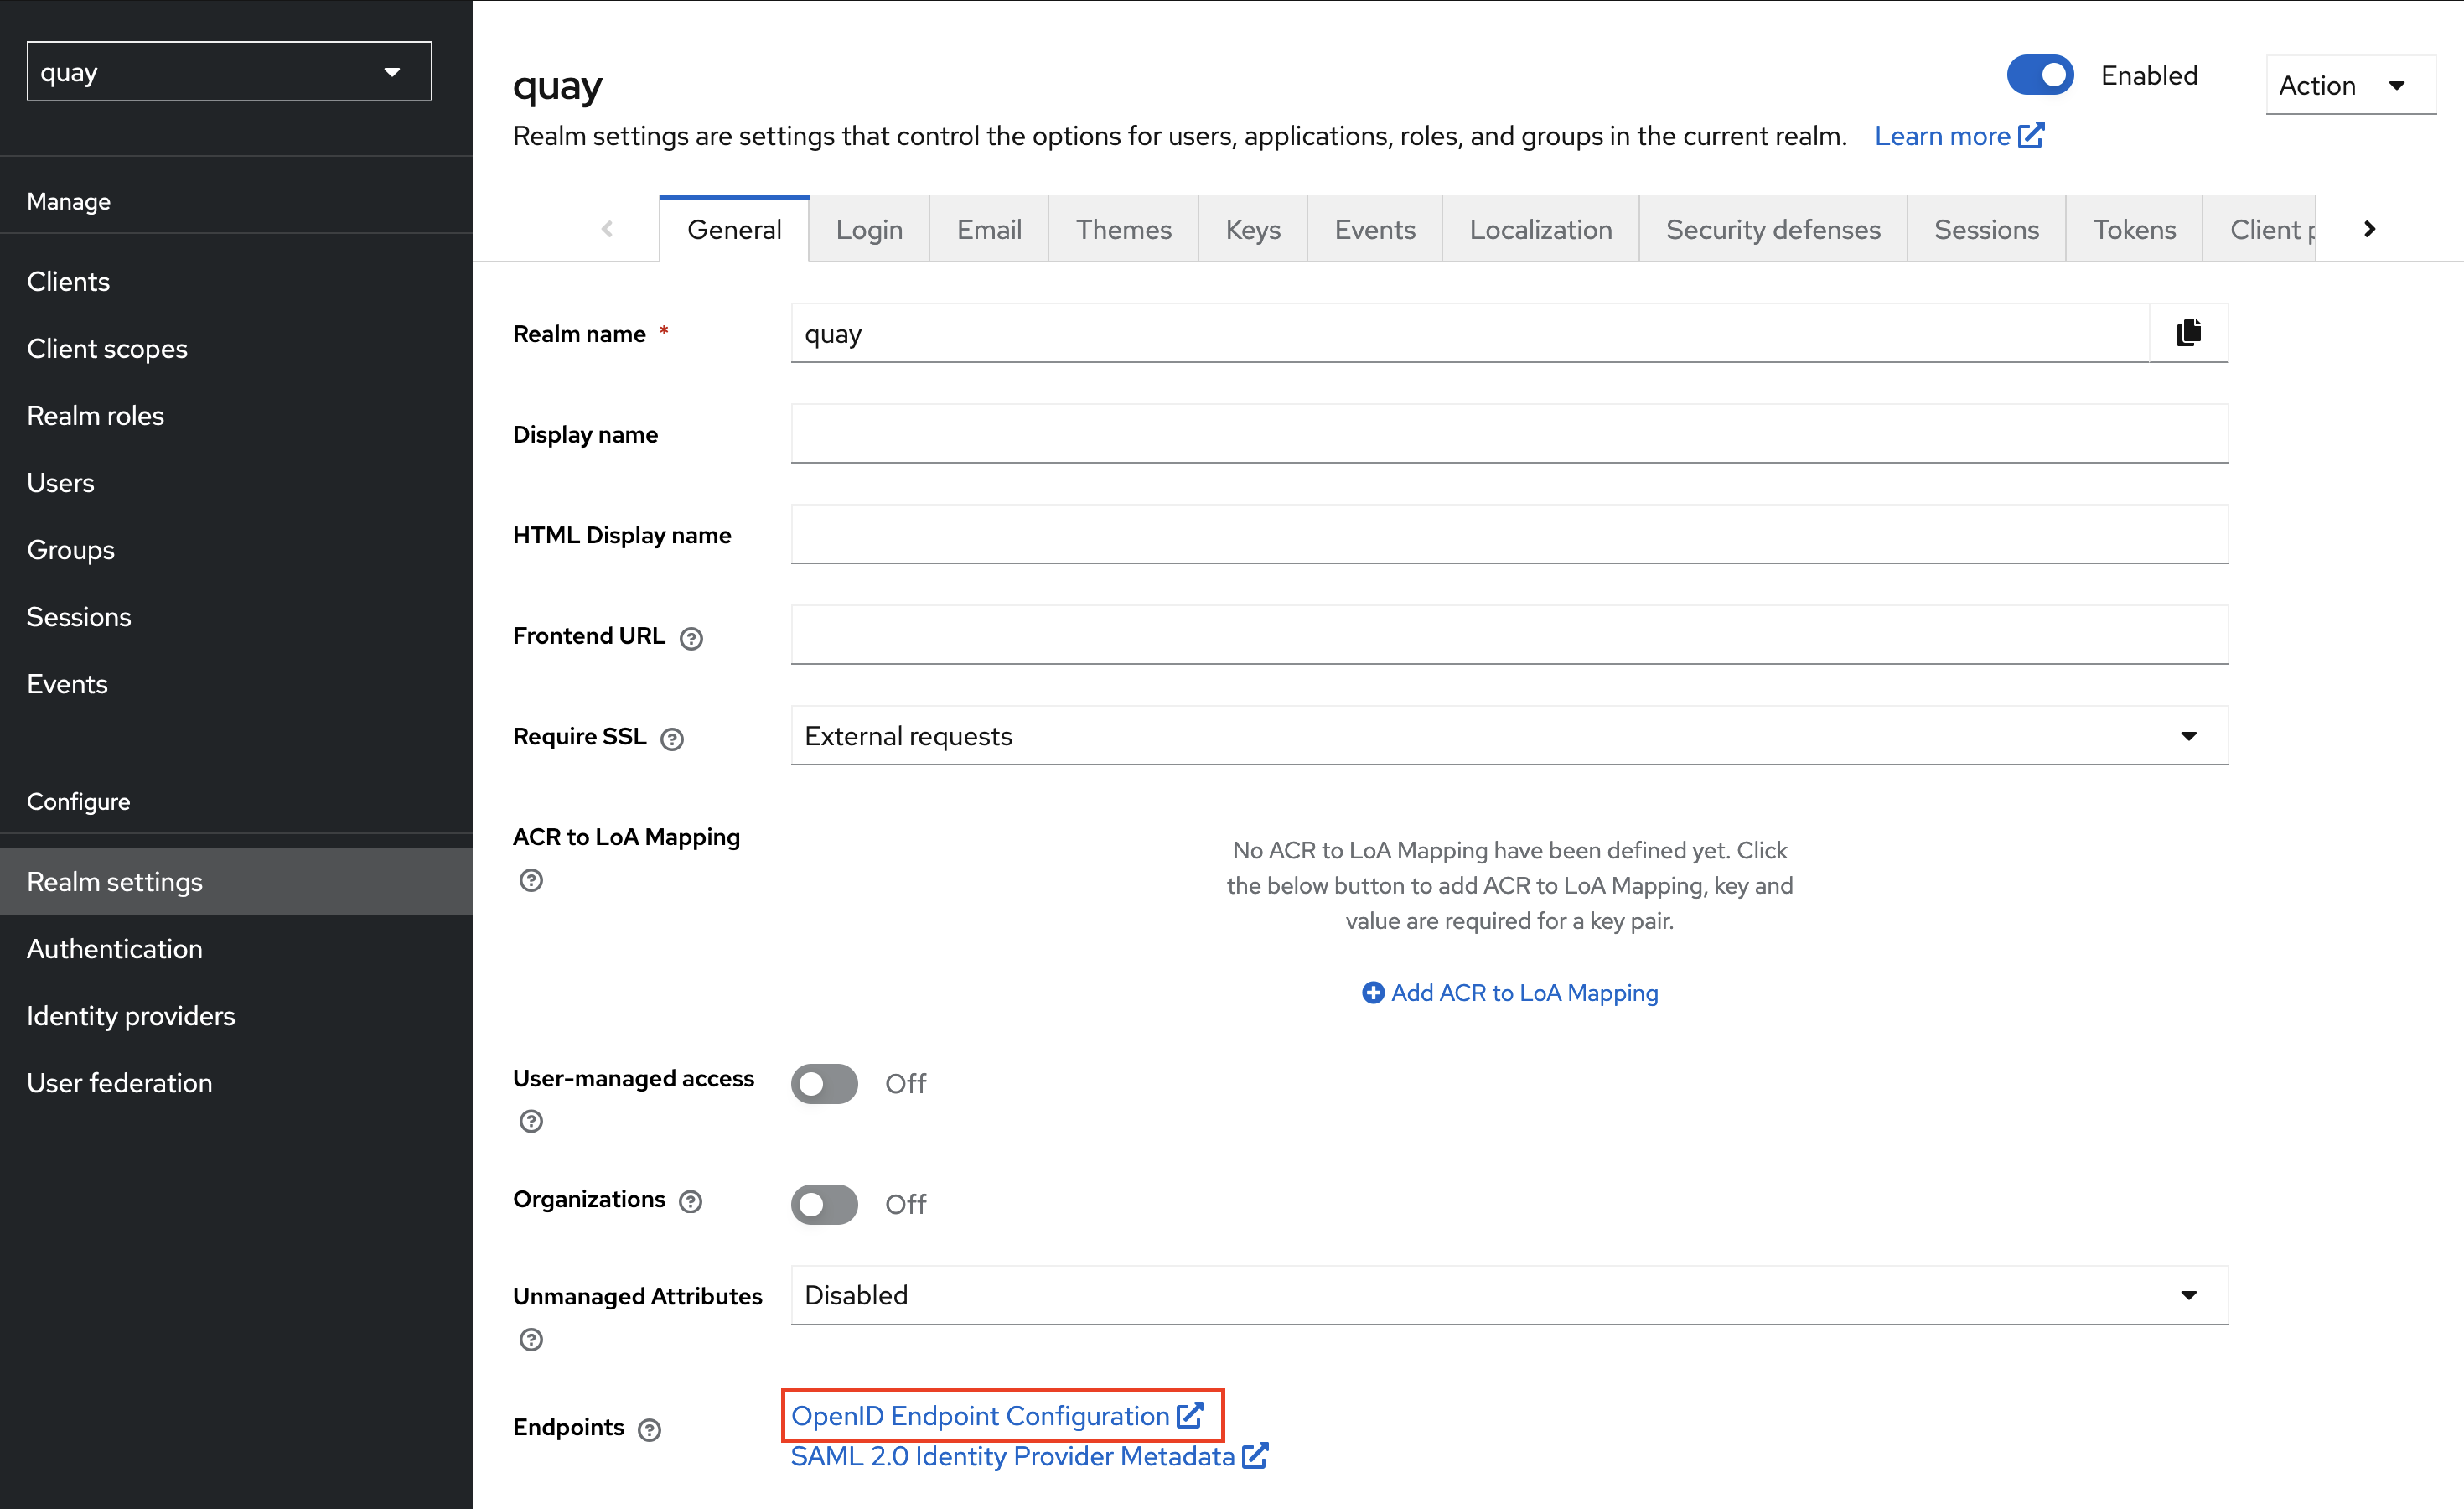
To obtain a JWT, we can invoke the token endpoint that Red Hat build of Keycloak exposes for the realm. The token endpoint is located at ${OIDC_ISSUER_URL}/protocol/openid-connect/token. The value of the OIDC_ISSUER_URL represents the location of the OIDC discovery endpoint and this value can be found by selecting the Realm Settings link on the lefthand navigation and then clicking the OpenID Endpoint Configuration link. Note the issuer field in the JSON document presented (Figure 1).
Open a terminal window where we will set a few environment variables and then request a JWT. The jq utility will be used throughout this discussion, so it needs to be installed and configured locally. You can review information related to the installation and configuration of jq on GitHub.
Set environment variables related to the Red Hat build of Keycloak environment as follows:
export OIDC_CLIENT_ID=quay-access
export OIDC_ISSUER_URL=<oidc_issuer_url>
export OIDC_USERNAME=jdoe
export OIDC_PASSWORD=redhat123
Now perform a token request and pipe the output to jq so that that result is formatted:
curl -s -X POST ${OIDC_ISSUER_URL}/protocol/openid-connect/token \
    -H 'Content-Type: application/x-www-form-urlencoded' \
    -d username=${OIDC_USERNAME} \
    -d password=${OIDC_PASSWORD} \
    -d grant_type=password \
    -d client_id=${OIDC_CLIENT_ID} \
    -d scope=openid \
    | jq -r
Notice that the OIDC scope with the value openid is being passed, which will enable the ID token to be returned in the response. To view the contents of the JWT, execute the following command which will request a token once again, and then decode the value of the ID token.
curl -s -X POST ${OIDC_ISSUER_URL}/protocol/openid-connect/token \
    -H 'Content-Type: application/x-www-form-urlencoded' \
    -d username=${OIDC_USERNAME} \
    -d password=${OIDC_PASSWORD} \
    -d grant_type=password \
    -d client_id=${OIDC_CLIENT_ID} \
    -d scope=openid \
    | jq -r '.id_token' \
    | cut -d '.' -f 2  \
    | base64 -d 2> /dev/null \
    | jq
A response similar to the following will be presented:
{
  "exp": 1739415133,
  "iat": 1739414833,
  "jti": "a5cb76ac-c363-4f39-8e15-e61b4299e8cb",
  "iss": "https://rhbk.example.com/realms/quay",
  "aud": "quay-access",
  "sub": "ceebf191-04a3-4f5a-b1db-7c5ecf840547",
  "typ": "ID",
  "azp": "quay-access",
  "sid": "81b5c119-08ff-4a7b-ac87-c061ef65e01e",
  "at_hash": "s1sxO6AUFXmTc4JOB7N11Q",
  "acr": "1",
  "email_verified": false,
  "name": "John Doe",
  "preferred_username": "jdoe",
  "given_name": "John",
  "family_name": "Doe",
  "email": "jdoe@redhat.com"
}
There are two values of note in the response to take note of:
iss: The entity that produced the JWT.sub: Identifies the principal that is the subject of the JWT. In Red Hat build of Keycloak, the sub field is the ID of the user. If another OIDC provider is used, consult with the applicable documentation associated with the value provided within this field.
Now that there is an understanding of the relevant fields of the JWT, store the JWT in a variable called JWT_TOKEN:
JWT_TOKEN=$(curl -s -X POST ${OIDC_ISSUER_URL}/protocol/openid-connect/token \
    -H 'Content-Type: application/x-www-form-urlencoded' \
    -d username=${OIDC_USERNAME} \
    -d password=${OIDC_PASSWORD} \
    -d grant_type=password \
    -d client_id=${OIDC_CLIENT_ID} \
    -d scope=openid \
    | jq -r '.id_token')
By default, Red Hat build of Keycloak JWTs have an expiry of 5 minutes. As a result, you may need to rerun the command to obtain a more up-to-date token if the time since the original retrieval extended beyond the expiration time.
Federate OIDC identity in Quay
With Red Hat build of Keycloak acting as the OIDC provider to support OIDC federation, the next step is to leverage the functionality within Quay to obtain a set of short-lived credentials. Since federation is achieved within each individual robot account, all necessary configurations are applied at that level.
The following steps describe the process on the Quay side and from a consumer point of view:
- On the Quay instance, determine the desired robot account to participate in federation.
- Specify one or more federation configurations. A federation configuration will include the OIDC issuer and the subject that the Quay server should validate prior to generating a set of short-lived credentials.
- A request is made by a consumer obtaining short-lived credentials against the Quay instance. The name of the target robot account and the JWT are included with this request.
- Once validated, the Quay server will return a token that is valid for 1 hour and can be used for authentication purposes.
With an understanding of the high-level steps involved, let’s walk through this process in detail. For the purpose of this demonstration, you will create a new organization and populate the newly created organization with a container image along with a robot account that has been granted access to the image. Once completed, you will then configure federation.
Navigate to Quay (whether it be a self-managed instance of Red Hat Quay or quay.io) and create a new organization called "quay_federation."
Publish an image to the newly created organization. This image can originate from a public registry, such as the Universal Base Image from the Red Hat Container Catalog, or from an image that you produced locally.
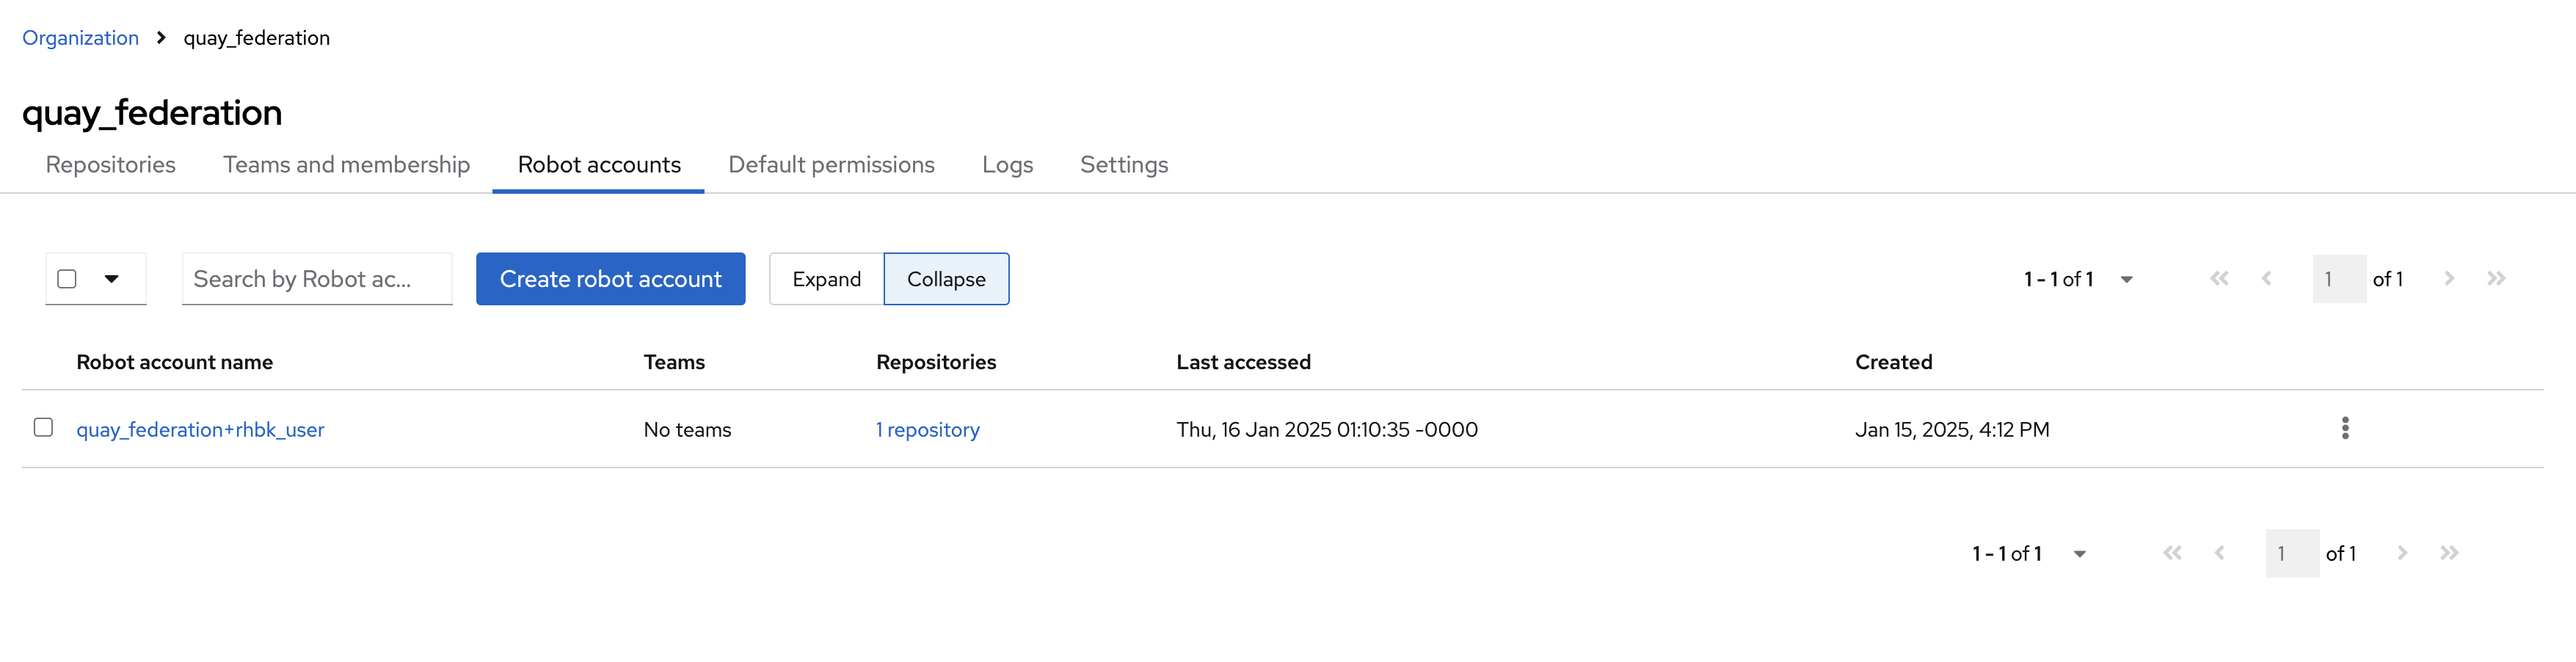
Next, create a new robot account within the quay_federation organization and associate the newly created robot account with the previously published image. Navigate to the quay_federation organization and select the Robot Accounts tab. Click the Create robot account button and enter "rhbk_user" as the name of the robot account. Once created, grant the robot account read permission with the repository associated with the previously published image. This is shown in Figure 2.
Now, with all of the aforementioned configurations in place, federation can be configured against the rhbk_user robot account.
It is important to note that the ability to specify robot federation within the user interface can only be achieved if the new Quay user interface is enabled and active. The quay.io supports the use of the new interface and it can be enabled by toggling on the New UI option at the top navigation bar.
However, similar to the majority of the configurations exposed within Quay, values related to robot account federation can be managed using the API by invoking the /api/v1/organization/{orgname}/robots/{robot_shortname}/federation endpoint. You can find more information on how to access the Quay API and the parameters specifically related to robot account federation within the Quay API documentation.
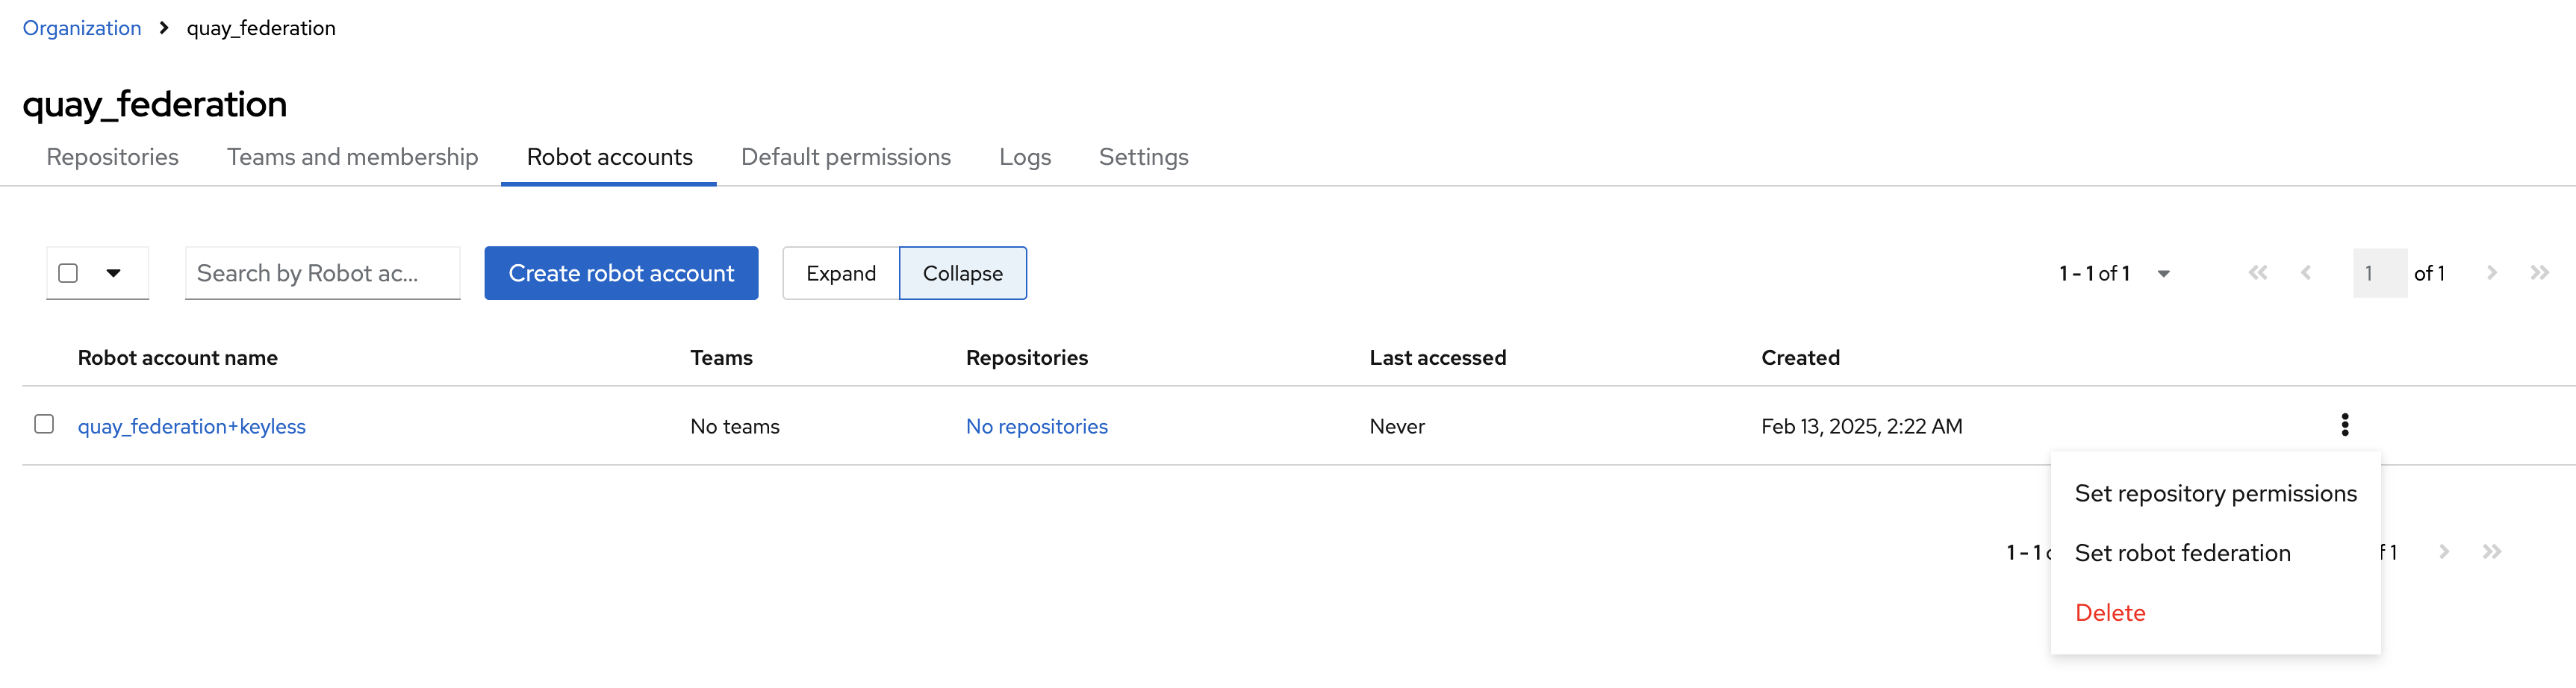
Once enabled and active, navigate to the robot accounts tab within the quay_federation organization and select the menu kebab next to the rhbk_user robot account and select Set robot federation, as shown in Figure 3.
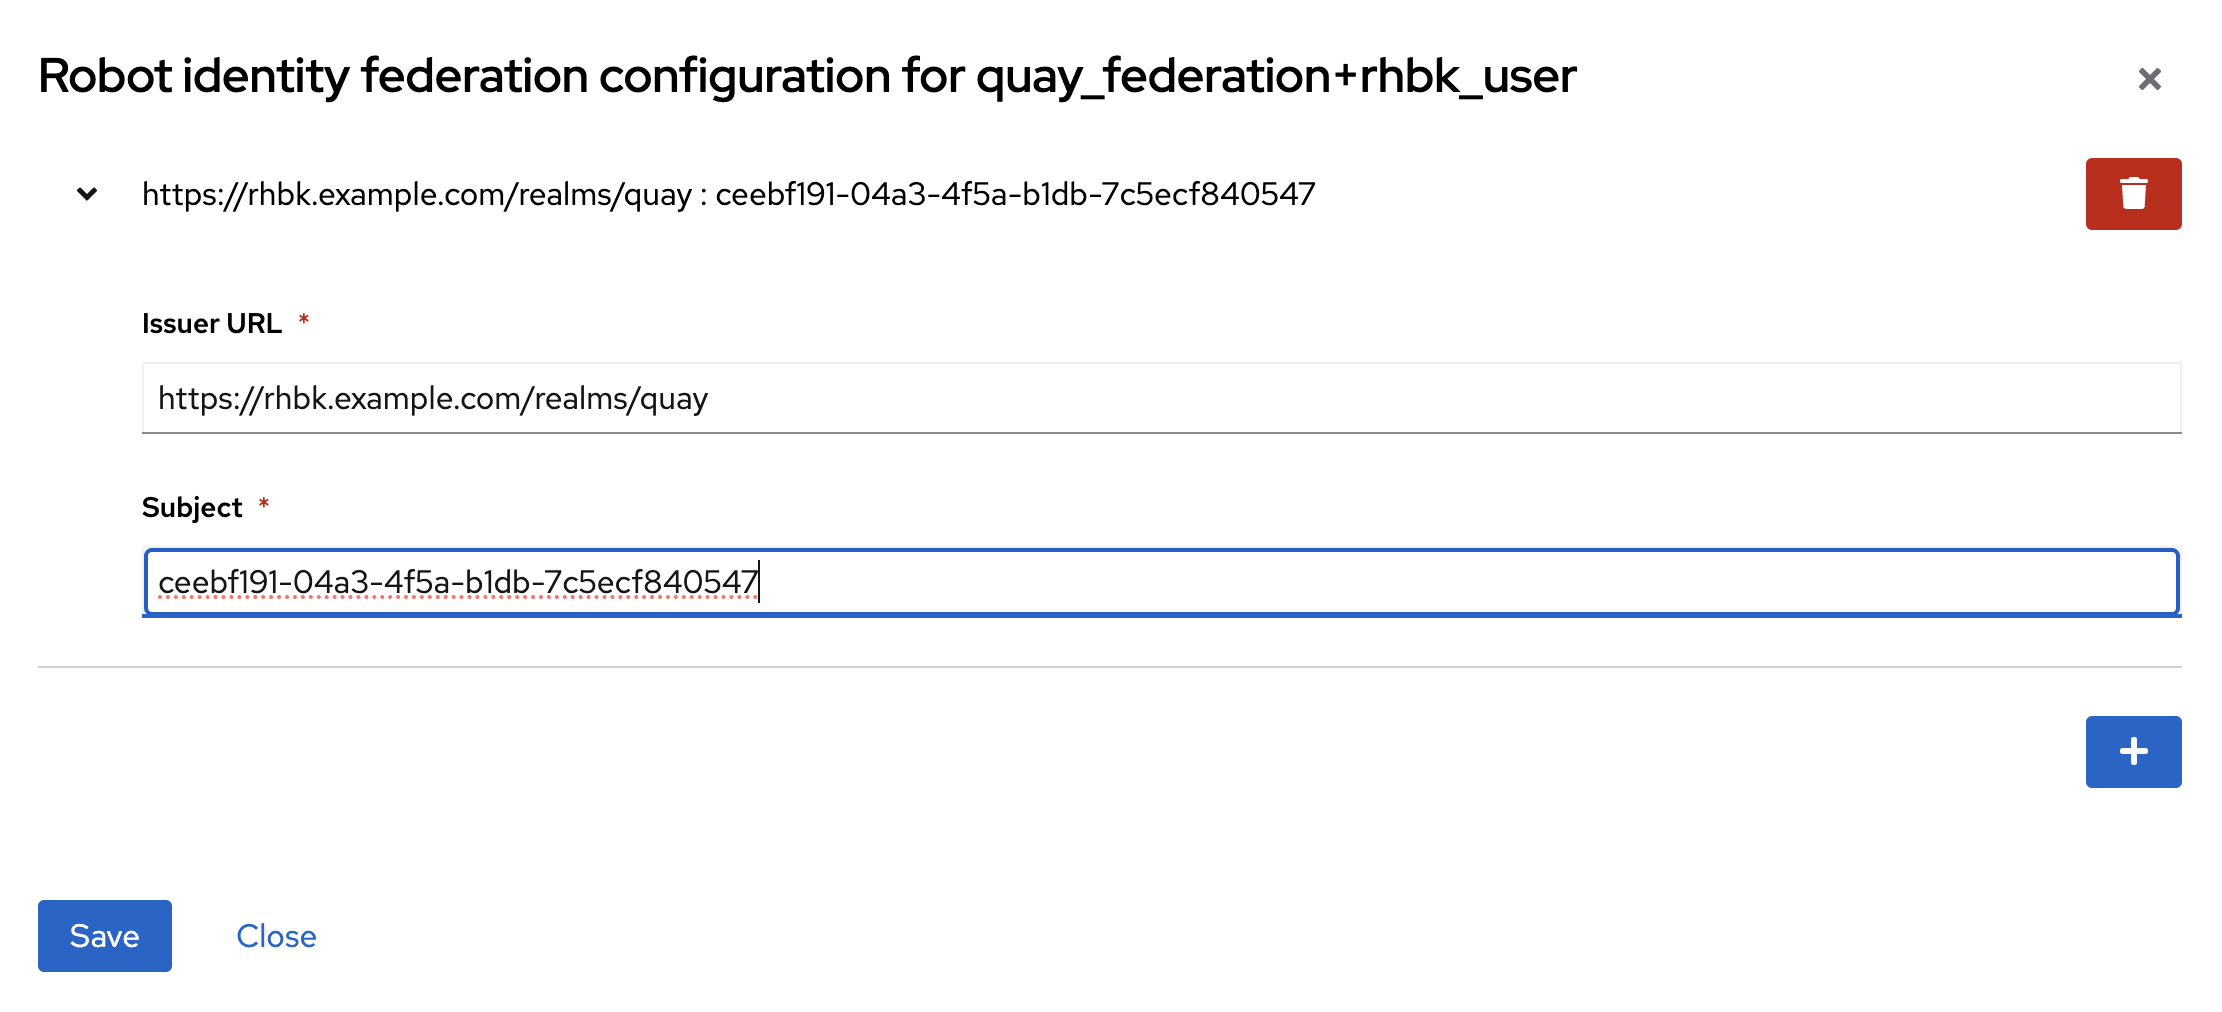
A dialog box appears listing all of the default federation configurations. Since none have been previously defined, the list is empty.
Add a new federation configuration by clicking the plus (+) button and entering the OIDC Issuer and Subject from the previously obtained Red Hat build of Keycloak JWT (Figure 4).
Click Save to apply the new federation configuration.
Request and utilize a Quay registry token
Now that Quay has been configured to federate the robot account with the Red Hat build of Keycloak user, exchange a JWT for a short-lived robot account token. The exchange is facilitated by performing a GET request against the /oauth2/federation/robot/token endpoint with the name of the robot account and the JWT from the OIDC provider included as basic authentication credentials.
Utilize the following steps to perform the token exchange to obtain a Quay registry token.
First, set the QUAY_REGISTRY environment variable representing the URL of the Quay registry instance. For example, if quay.io is the desired target instance, the value of the QUAY_REGISTRY variable would be https://quay.io:
export QUAY_REGISTRY=<quay_registry>Next, set the full name of the robot account in a variable called ROBOT_ACCOUNT. The full name of a robot account is represented by the organization for which the robot account is part of and the name of the robot account, separated by a plus (+) sign. For the robot account previously created, the full name is quay_federation+rhbk_user:
export ROBOT_ACCOUNT=<full_robot_account_name>Execute the exchange. The short-lived token associated with the robot account will be included within the token property of the response. Be sure to also obtain a fresh JWT from Red Hat build of Keycloak beforehand:
QUAY_TOKEN=$(curl -s --user ${ROBOT_ACCOUNT}:$JWT_TOKEN ${QUAY_REGISTRY}/oauth2/federation/robot/token | jq -r '.token')The Quay Registry token, too, is a JWT, and as such can be decoded in order to inspect the included properties.
Utilize the short-lived robot account credential in the same way as a standard long lived credential by authenticating to the registry with Podman:
podman login --username=${ROBOT_ACCOUNT} --password=${QUAY_TOKEN} $(echo ${QUAY_REGISTRY} | cut -d/ -f3)A “Login Succeeded!” message should have appeared indicating that the credentials were validated successfully and actions, such as pulling images from the registry, can be performed with the same permissions granted to the robot account. Keep in mind that since these credentials are short-lived, they will expire after 1 hour and a fresh set of credentials must be obtained in order to continue interacting with the registry.
With only a few simple steps, the use of long-lived robot account credentials for accessing Quay is eliminated and can transition to requesting short-lived credentials as needed. By leveraging the robot account federation feature, the security posture surrounding managing Quay content is improved, which simplifies the management of secure content and aligns with Zero Trust security principles.
Next steps
This article covered the fundamental flow of how to obtain short-lived credentials to access content in Quay. Based on a mutually trusted OIDC provider, scripts and applications can legitimize their requests for a short-lived robot token in Quay. Given the time-limited nature of these credentials, additional orchestration is required to continuously refresh/rotate these tokens to use them effectively in autonomous systems, like CI/CD environments or container orchestration platforms. For more on this topic, stay tuned for the next article in this three-part series.
