Page
Scan your system and assess compliance issues
In the first lesson, I showed you an easy method for building Red Hat Enterprise Linux images with a customized security compliance profile baked right into them. In this second lesson, I'll show you how to take a system built from one of these images, scan it against the compliance profile, and assess any issues the scan has identified.
To get full benefit from this lesson/prerequisites:
- Customize a security policy for a RHEL image as described in the first lesson.
- Mandatory: Deploy a new RHEL instance using that image into your chosen environment. This step cannot be skipped; you will not be able to complete the rest of this path without first deploying a new instance in your environment according to your own specific requirements.
- Register that system with Red Hat and Insights (if not already registered) following the instructions from the Insights Registration Assistant.
In this lesson, you will:
- Take a system built from a Red Hat Enterprise Linux image, scan it against the compliance profile, and assess any issues identified by the scan.
Generate a compliance report
Check the subscription status on the host (system) using the
rhccommand-line interface (CLI) commands. If you aren't usingrhcalready, you should. It takes care ofsubscription-managerandinsights-clientregistration in one command. Ensure the host is registered and reporting to Insights:[root@rhel9-cis-tailored ~]# insights-client Starting to collect Insights data for rhel9-cis-tailored.nuc.blasco.id.au Writing RHSM facts to /etc/rhsm/facts/insights-client.facts ... Uploading Insights data. Successfully uploaded report from rhel9-cis-tailored.nuc.blasco.id.au to account 5471870. View details about this system on console.redhat.com: https://console.redhat.com/insights/inventory/eade5763-f54a-4884-82a2-c909b090cc4c [root@rhel9-cis-tailored ~]#Associate the host with the correct compliance policy. I did it with the CLI via the unique compliance ID. I like this because I can automate this with Ansible Automation Platform if I want to. Alternatively, I can do this directly via the Insights compliance service:
[root@rhel9-cis-tailored ~]# insights-client --compliance-policies
Assigned     ID                                       Title
False        58ff84c1-5d8e-4e0c-b86b-a01169209651     Australian Cyber Security Centre (ACSC) ISM Official
False        7923b64e-6d02-4790-9b01-15e45d053339     Australian Cyber Security Centre (ACSC) Essential Eight - RHEL 9
False        9559737e-cffa-4d2c-9088-771e37a51bff     CIS Red Hat Enterprise Linux 9 Benchmark for Level 1 - Server
False        ff41251f-68cf-4edc-8ac9-49d86b589283     AcmeCo Tailored CIS Red Hat Enterprise Linux 9 Benchmark for Level 1 - Server     [root@rhel9-cis-tailored ~]# insights-client --compliance-assign ff41251f-68cf-4edc-8ac9-49d86b589283
Operation completed successfully.
[root@rhel9-cis-tailored ~]#
[root@rhel9-cis-tailored ~]# insights-client --compliance-assign ff41251f-68cf-4edc-8ac9-49d86b589283
Operation completed successfully.
[root@rhel9-cis-tailored ~]#
Run a compliance scan on the host using the following command:
insights-client --complianceThis contacts console.redhat.com, identifies which compliance profile(s) the host is associated with, downloads the tailoring file(s), runs the scan, and then uploads the results:
[root@rhel9-cis-tailored ~]# insights-client --compliance
Starting to collect Insights data for rhel9-cis-tailored.nuc.blasco.id.au
Saved tailoring file for xccdf_org.ssgproject.content_profile_cis_server_l1 to /var/tmp/oscap_tailoring_file-xccdf_org.ssgproject.content_profile_cis_server_l1.p8j6fu19.xml
Running scan for xccdf_org.ssgproject.content_profile_cis_server_l1... this may take a while
Writing RHSM facts to /etc/rhsm/facts/insights-client.facts ...
Uploading Insights data.
Successfully uploaded report for rhel9-cis-tailored.nuc.blasco.id.au.
[root@rhel9-cis-tailored ~]#
Review the compliance report for the host
View the compliance report at console.redhat.com following these steps:
- Navigate to console.redhat.com.
- Click Insights for RHEL.
- Click Security -> Compliance -> Systems.
- Select the host.
View all the compliance check failures (Figures 1 and 2).
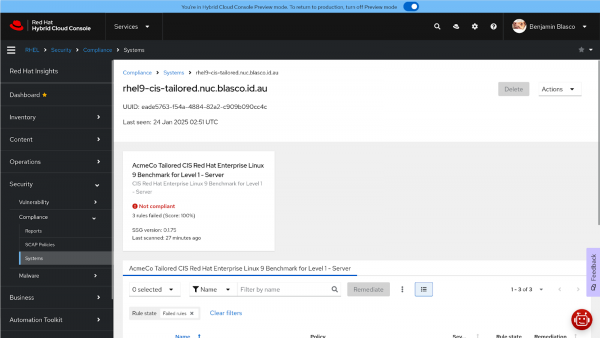
Figure 1: View the compliance check failures for the host. 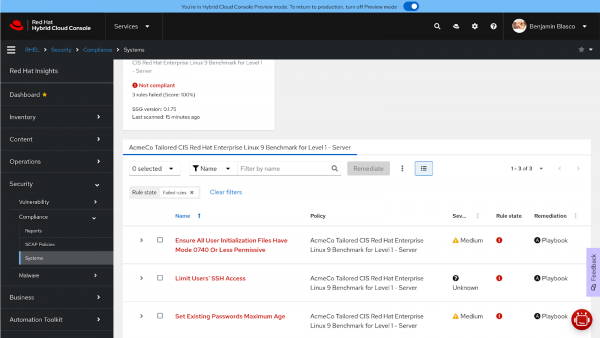
Figure 2: Review the individual compliance check failures for the host.
Looking at this report, I can see that I have three compliance check failures, even though the intention was to have no failures (e.g., 100% compliance). I'll dig into why this happened in a moment.
But first, I can share from my own testing that a regular RHEL 9.5 system scanned against the same compliance profile will have 101 failures. Even though I'm not yet 100% compliant for my host, the work done so far by deploying it using my custom-hardened image has reduced the number of failures by ~97%.
Review each failure and determine how to action them
The intention of building from my custom image is to attain 100% compliance, so why do I have three separate failures? Let’s go through them one by one. It's important to note that your results may differ slightly depending on the profile you select and what tailoring you perform, but this example is illustrative of the process you would need to go through.
Check 1: Ensure all user initialization files have mode 0740 or less permissive
Firstly, examining the check top level description for the check tells me that it is classified as medium severity, and has a remediation Ansible Playbook available to resolve the issue (Figure 3).
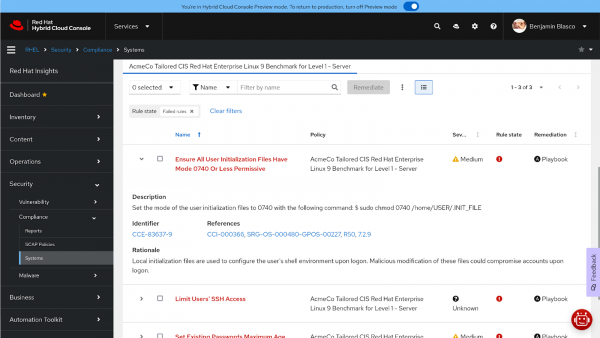
If I click the arrow to the left of the check to expand the view, it shows a description, a unique identifier, and a few references. The description in this instance is: "Set the mode of the user initialization files to 0740" with the following command:
$ sudo chmod 0740 /home/USER/.INIT_FILE"This means that the initialization files in a user's home directory (such as .bash_history, .bash_logout, .bash_profile, .bashrc) must have a mode no more permissive than 0740. How did this happen? In this instance, I booted my VM with cloud-init (Configuring and managing cloud-init for RHEL 9 | Red Hat Product Documentation), added a regular user (bblasco), and injected an SSH key, among a few other tasks. This user wasn’t present as part of the custom image build; hence it was not caught during the image build.
Dealing with this in the long term will require a change to the default mode for these files when creating a new user to prevent future compliance violations. However, for simplicity's sake, I am happy to use the Insights remediation to address this issue reactively with any new users created on the host.
Check 2: Limit users' SSH access
This check has Unknown severity and the remediation is manual (Figure 4). So I won't be able to take advantage of Ansible Automation Platform to remediate this issue.
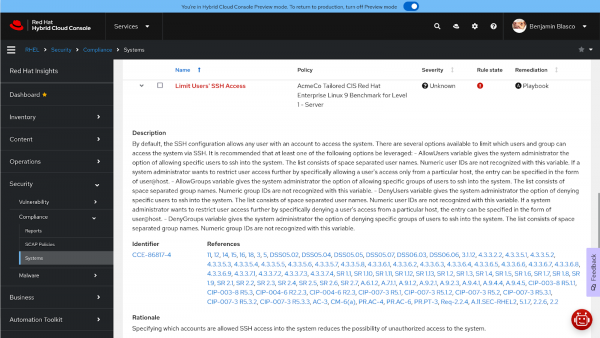
Once I expand the view and read the detailed description, it says:
“By default, the SSH configuration allows any user with an account to access the system. There are several options available to limit which users and groups can access the system via SSH. It is recommended that at least one of the following options be leveraged:
AllowUsersvariable gives the system administrator the option of allowing specific users to ssh into the system. The list consists of space-separated user names. Numeric user IDs are not recognized with this variable. If a system administrator wants to restrict user access further by specifically allowing a user's access only from a particular host, the entry can be specified in the form of user@host.AllowGroupsvariable gives the system administrator the option of allowing specific groups of users to ssh into the system. The list consists of space-separated group names. Numeric group IDs are not recognized with this variable.DenyUsersvariable gives the system administrator the option of denying specific users to ssh into the system. The list consists of space-separated user names. Numeric user IDs are not recognized with this variable. If a system administrator wants to restrict user access further by specifically denying a user's access from a particular host, the entry can be specified in the form of user@host.DenyGroupsvariable gives the system administrator the option of denying specific groups of users to ssh into the system. The list consists of space-separated group names. Numeric group IDs are not recognized with this variable.”
This tells me I have four options available, which we can learn more about via man sshd_config and discuss which of those options is most suitable for the system. Once agreed, you may need to create automation to edit the sshd configuration to incorporate the desired behavior. At this stage, I won't take any action on this.
In this case, I am going to create an AllowUsers entry in a drop-in config file under /etc/ssh/sshd_config.d/ and add my bblasco user to it:
[root@rhel9-cis-tailored ~]# echo "AllowUsers bblasco" > /etc/ssh/sshd_config.d/90-allowusers.conf

[root@rhel9-cis-tailored ~]# cat /etc/ssh/sshd_config.d/90-allowusers.conf
AllowUsers bblasco
[root@rhel9-cis-tailored ~]#
That was easy in my case. But will I need to update my AllowUsers directive when I add another user? Maybe I should be using AllowGroups instead, and this requires some consideration or design to get right. There may be ongoing maintenance created as a result of this change either way.
Check 3: Set the maximum age for existing passwords
This third and final failed check is also Medium severity and has a remediation in the form of an Ansible Playbook available (Figure 5).
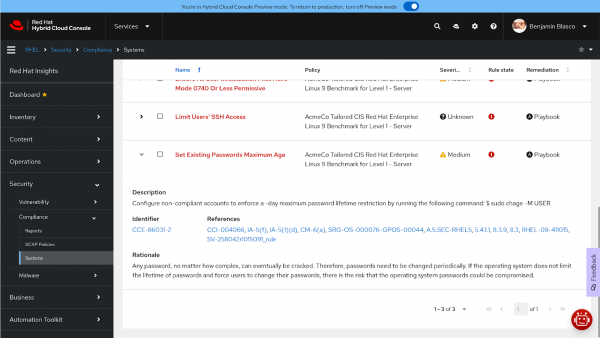
The description is quite straightforward and tells me that the change command is required to enforce a maximum password lifetime on user accounts. I am happy for the remediation to set a maximum password lifetime on existing accounts, and I know from research that it will be set to 365 days by this remediation.
What did you achieve?
Once I assessed and understood the three compliance failures, I was able to make decisions about how to address those issues. I have one manual intervention to carry out and two Ansible Automation Platform remediations available to resolve the other two issues.
Remember that in your environment, your compliance violations may not be the same, so run a compliance scan and assess any violations in detail to understand the failure, what's checked, and how to resolve the issue for your environment's requirements.
In the final lesson, I will show you how to create the remediation playbook and execute it to resolve the remaining compliance violations on our Red Hat Enterprise Linux host.
