Page
JetPack preparation and physical cable layout

In order to enable RHEL on the Jetson Orin device, you’ll first need to prepare the device using the latest Jetpack. This lesson walks through the physical cable preparation and provides two methods for flashing the device.
In order to get full benefit from taking this lesson, you need to:
- An NVIDIA Jetson Orin (AGX, NX, or Nano) or IGX Orin hardware.
- A RHEL ISO.
- A 16Gb+ USB stick.
- Either a screen, keyboard, and mouse or a console cable.
In this lesson, you will:
- Flash the Jetson device using the latest Jetpack to enable RHEL support.
- Install RHEL on a Jetson device.
- Install the NVIDIA Jet Pack kernel modules and libraries on RHEL.
- Enable GPU support in containers.
Preparation and set up
NVIDIA JetPack provides a full development environment for the Jetson platform including Jetson Linux with BSP, kernel, RootFS, etc., the NVIDIA AI stack with hardware accelerated libraries, SDKs, and frameworks, and Jetson Platform Services for application development. In order to install our ISO file, we'll first have to flash Jetson Orin with the latest JetPack. As of writing, the latest is JetPack 6.0, including Jetson Linux r36.3.
Make sure to have an x86 workstation (preferred with GUI) in order to perform the initial flashing with JetPack.
Before you start flashing, you'll have to get your device into a Force Recovery Mode, which can be done by performing the following steps on Jetson AGX Orin:
- Make sure that your Jetson is powered off and that the PSU is disconnected.
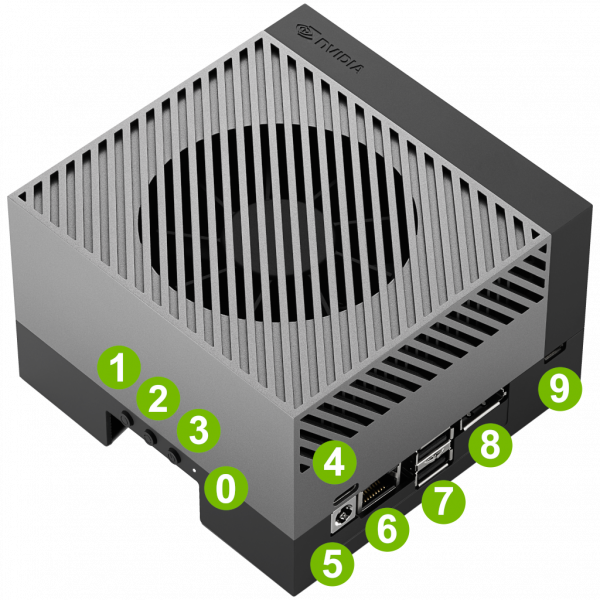
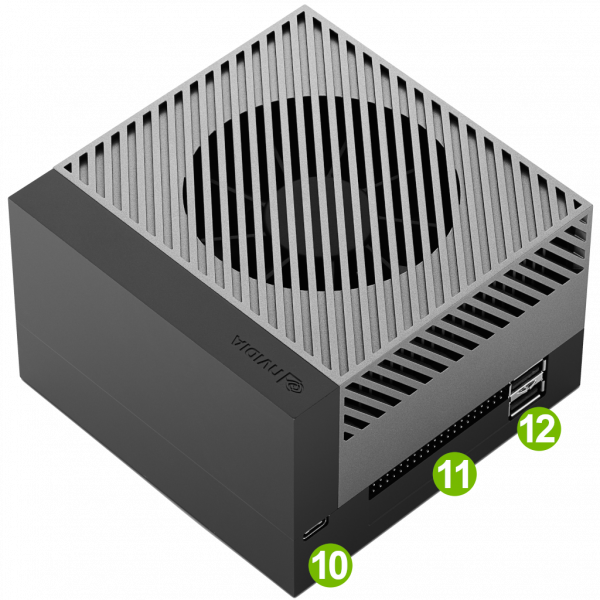
- Using the USB-A to USB-C cable, connect the USB-A to your workstation, and the USB-C to port #10.
- Press the force recovery button (#2), then connect the PSU to the device itself, hold the force recovery button for a few seconds, then release.
Figures 1 and 2 depict the aforementioned ports.


Now, your Jetson AGX Orin is supposed to be in a Force Recovery Mode. You can make sure by running the following command on your workstation:
$ lsusb | grep NVIDIA
  Bus 003 Device 039: ID 0955:7023 NVIDIA Corp. APX
Please note that your device may have a different ID. A full table of Jetson Orin IGX device IDs when in recovery mode can be found here.
You may now start flashing your Jetson Orin device following the method of your choice, described below.
Jetson Orin Nano and NX
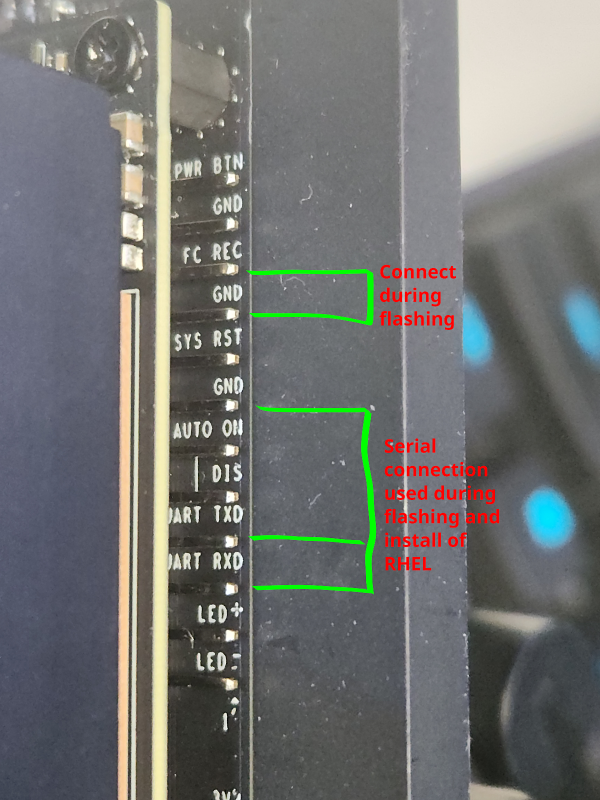
Connect the FC_REC and GND as shown in Figure 3 below. Connect the PSU device, then disconnect these pins after a few seconds. This will set the device to Force Recovery Mode.

Jetson IGX Orin
Please refer to the IGX User Guide to access the IGX BMC and to put the system into recovery mode: IGX Using the BMC.
Flash an original Jetpack 6.0 for L4T using SDK Manager (Optional)
Please follow the official NVIDIA documentation for flashing Jetpack 6.0 using the SDK Manager.
Flash only the Jetpack 6.0 firmware from a RHEL workstation
On your workstation, make sure to download the needed JetPack:
$ wget https://developer.nvidia.com/downloads/igx/v1.0.0/jetson_linux_r36.3.1_aarch64.tbz2Make sure to have the needed files locally in order to start the flash process on your Jetson device:
$ ll *.tbz*
-rw-r--r--. 1 user user  667399690 Jun 19 08:21 jetson_linux_r36.3.1_aarch64.tbz2
Create a directory to extract this file:
$ mkdir ${HOME}/nvidia-jetsonExtract both files to the same created directory in order to start flashing:
$ tar xf jetson_linux_r36.3.1_aarch64.tbz2 -C ${HOME}/nvidia-jetson/Change the directory context to the directory where the flash.sh script is present:
$ cd ${HOME}/nvidia-jetson/Linux_for_Tegra/Important note: Make sure that you have the dependency for running the fdtoverlay command on your workstation. In case you’re running RHEL 9.4 or Fedora 40+, install the following packages upfront:
$ sudo dnf install dtc binutils usbutils lz4Ensure the device is in recovery mode. The device ID will differ based on the device used, please refer to the table and instructions available here:
$ lsusb | grep NVIDIA
  Bus 003 Device 039: ID 0955:7023 NVIDIA Corp. APX
Flash the QSPI firmware which holds NVIDIA Jetson bootloaders.
# For IGX:
$ sudo ./flash.sh p3740-0002-p3701-0008-qspi external# For Jetson AGX Orin devkit:
$ sudo ./flash.sh p3737-0000-p3701-0000-qspi external# For Jetson Jetson Orin NX:
$ sudo ./flash.sh p3768-0000-p3767-0000-a0-qspi external# For Jetson Jetson Orin Nano:
$ sudo ./flash.sh p3768-0000-p3767-0000-a0-qspi externalWhen the QSPI firmware flashing completes, the device will reboot.
Set up Red Hat Enterprise Linux
Once the JP6 BSP is installed, the standard RHEL 9.4 for aarch64 ISO can be downloaded here and installed straight from a USB key on the Jetson hardware by completing the following steps:
- Write the RHEL 9.4 DVD iso image to a removable storage media such as a USB stick or SD card using your favorite image writing tool. For example, use the balenaEtcher or the Linux tool “dd”.
- Connect the removable storage device to the device and power it on.
- Connect to the serial console of the device. When the UEFI bootloader starts, press the ESCAPE key to enter the UEFI menu. Select Boot Manager from the menu and select the removable storage device to boot.
- For IGX: When the GRUB menu appears, select the Install Red Hat Enterprise Linux 9.4 option and press e to edit the commands. In the next screen, append
modprobe.blacklist=astto the Linux kernel command-line options. Then, press Ctrl-x or F10 to begin installation. - For other devices: When the GRUB menu appears, select the Install Red Hat. Enterprise Linux 9.4 option. Then, press enter to begin installation.
- For IGX: When the GRUB menu appears, select the Install Red Hat Enterprise Linux 9.4 option and press e to edit the commands. In the next screen, append
You may then follow the standard installation procedure for RHEL.
Once RHEL is installed, add NVIDIA repositories:
$ curl -s -L https://nvidia.github.io/libnvidia-container/stable/rpm/nvidia-container-toolkit.repo | sudo tee /etc/yum.repos.d/nvidia-container-toolkit.repo
$ curl -s -L https://repo.download.nvidia.com/jetson/rhel-9.4/r36.3.1/nvidia-l4t.repo | sudo tee /etc/yum.repos.d/nvidia-l4t.repo
Configure user groups:
$ sudo usermod -a -G video $USER
$ sudo usermod -a -G video gdm
Install the NVIDIA kernel modules and utilities:
$ sudo dnf -y install nvidia-jetpack-kmod nvidia-jetpack-all nvidia-container-toolkit(Optional) If a monitor is plugged in and you selected a GUI environment (like the “Server with GUI” group) during installation, ensure that the desktop manager will be started on restart:
$ sudo systemctl set-default graphical.targetRestart the system to ensure all the newly installed kernel modules get loaded:
$ sudo systemctl rebootGenerate the CDI specification file and crio config for rootless Podman:
$ sudo nvidia-ctk cdi generate --output=/etc/cdi/nvidiaNote: If you change the device hardware configuration or upgrade NVIDIA drivers or userspace packages, you must generate a new CDI specification. For example, a hardware configuration change can occur when a USB webcam is connected or removed. Please refer to the CDI documentation for more details. Optionally, you may create a systemd unit that generates CDI specification at system startup as follows:
$ sudo su -

# cat << EOF > /etc/systemd/system/nvidia-cdi.service
[Unit]
Description=Generate the nvidia cdi yaml file
Requires=multi-user.target
After=multi-user.target

[Service]
Type=oneshot
ExecStart=nvidia-ctk cdi generate --output=/etc/cdi/nvidia
RemainAfterExit=yes

[Install]
WantedBy=multi-user.target
EOF

# systemctl daemon-reload

# systemctl enable nvidia-cdi

# exit
The NVIDIA Jet Pack includes useful utilities that you can use to set the power mode of your device as well as set the clock speeds to their power mode maximum values:
nvpmodelallows to set the power mode and set the number of cores to be enabled. On first boot after installing the Jetson support packages, it is recommended to issue the following command to set your device to its maximum specs (core count and frequencies):$ sudo nvpmodel -m 0
You will then be instructed to restart the device for the new setting to be applied.
jetson_clocksallows setting the clock speeds of the CPU and GPU to their maximum. You will have to use the following command to set the clock speeds to their maximum:$ sudo jetson_clocksThis command doesn’t require restarting the system and should be run after reboot when needed.
Now that you have set up RHEL on your Jetson device, let’s move on to exploring some of the new features of Red Hat Device Edge.
