Apache Kafka is a well-known streaming solution, and together with Red Hat AMQ Streams (based on the Cloud Native Computing Foundation (CNCF) open source project Strimzi) you can leverage its benefits in Kubernetes.
One challenge found in hybrid and multi-cluster architectures with legacy services is the ability to produce and consume messages without the requirement to use the native Kafka protocol. Strimzi meets this gap not only by providing the mechanics to run Kafka in Kubernetes, but also by using it through the AMQ Streams Kafka Bridge, which provides an API for integrating HTTP-based clients with a Kafka cluster. The bridge is intended to be exposed behind a proxy or an API gateway, which also paves the way to using L7 traffic management best practices like failing over consumer and producer requests to the Kafka Bridge services using Tetrate Ingress Gateways.
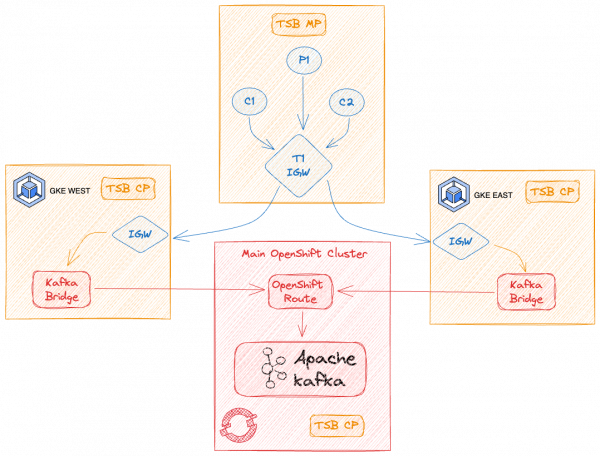
In this article, we will explore the mechanics of how to provision the Kafka broker cluster in a Red Hat OpenShift environment and expose it through Kafka bridge services in the East and West Kubernetes clusters (as illustrated in Figure 1). We will then provide access to the bridge services over a cluster Ingress gateway that is load balanced via a Tetrate Tier1 gateway running in our central Kubernetes cluster.

Step 1: Prepare the Kafka Cluster
The AMQ streams component makes Apache Kafka OpenShift-native by leveraging powerful operators that simplify Apache Kafka deployment, configuration, management, and use on Red Hat OpenShift.
The application of custom resources and operators allows for a highly configurable deployment of Kafka components to an OpenShift cluster using AMQ Streams. The cluster operator will use that definition to provision the components needed to create a fully deployed cluster on top of your OpenShift infrastructure. The same applies for the creation of Topics and Users for that same Kafka cluster.
To deploy the Kafka cluster on OpenShift, follow the steps below.
1.0: Prerequisites
- Cert-manager
- OpenShift cluster
- Cluster onboarded into Tetrate Service Bridge:
- AMQ Streams operator installed
1.1: Login to OCP
Get a token from the UI and log in over the terminal:
oc login --token=sha256~<> --server=https://api.<>:6443 --insecure-skip-tls-verify=true
1.2: Prep certs
Create a cluster issuer for Kafka:
oc apply -f cluster-issuer-selfsigned-issuer-kafka.yaml
Create a certificate:
oc new-project kafka-cluster
oc apply -f certificate-openshift-kafka-cluster.yaml -n kafka-cluster
Note: Make sure to update the hostnames in the Certificate dnsNames to match the brokers routes usually in the form of:
openshift-kafka-bootstrap-kafka-cluster.apps.<<YOUR_HOSTNAME>>openshift-kafka-0-kafka-cluster.apps.<<YOUR_HOSTNAME>>openshift-kafka-1-kafka-cluster.apps.<<YOUR_HOSTNAME>>openshift-kafka-2-kafka-cluster.apps.<<YOUR_HOSTNAME>>
Step 2: Deploy the Kafka cluster
Kafka has built-in data resilience capabilities. However, data persistence plays a vital role when it's deployed in a cloud native environment like Kubernetes. The data persistence required by AMQ Streams components is provided by block storage persistent volume claims defined in the manifest YAML file.
oc apply -f kafka-cluster-persistent.yaml -n kafka-cluster
2.1: Check that all the Kafka pods are running:
oc get pods -n kafka-cluster
NAME                                        READY   STATUS    RESTARTS   AGE
openshift-entity-operator-85c5f6949-v6wtp   3/3     Running   0          17h
openshift-kafka-0                           1/1     Running   0          17h
openshift-kafka-1                           1/1     Running   0          17h
openshift-kafka-2                           1/1     Running   0          17h
openshift-zookeeper-0                       1/1     Running   0          17h
openshift-zookeeper-1                       1/1     Running   0          17h
openshift-zookeeper-2                       1/1     Running   0          17h
2.2: Test your Kafka installation using kcat:
Note: You can get kcat docs on GitHub.
kcat -X security.protocol=SSL -X enable.ssl.certificate.verification=false -b openshift-kafka-bootstrap-kafka-cluster.apps.gke-nmocpt2-us-west1-0.nmocpt2-upic-0.gcp.sandbox.tetrate.io:443 -L
Expect an output like:
Metadata for all topics (from broker -1: ssl://openshift-kafka-bootstrap-kafka-cluster.apps.gke-nmocpt2-us-west1-0.nmocpt2-upic-0.gcp.sandbox.tetrate.io:443/bootstrap):
 3 brokers:
  broker 0 at openshift-kafka-0-kafka-cluster.apps.gke-nmocpt2-us-west1-0.nmocpt2-upic-0.gcp.sandbox.tetrate.io:443 (controller)
  broker 2 at openshift-kafka-2-kafka-cluster.apps.gke-nmocpt2-us-west1-0.nmocpt2-upic-0.gcp.sandbox.tetrate.io:443
  broker 1 at openshift-kafka-1-kafka-cluster.apps.gke-nmocpt2-us-west1-0.nmocpt2-upic-0.gcp.sandbox.tetrate.io:443
 3 topics:
  topic "__strimzi-topic-operator-kstreams-topic-store-changelog" with 1 partitions:
    partition 0, leader 0, replicas: 0,2,1, isrs: 0,2,1
  topic "__strimzi_store_topic" with 1 partitions:
    partition 0, leader 2, replicas: 2,0,1, isrs: 2,0,1
...
Now that you have a functional Kafka cluster, you can switch context to the additional Kubernetes clusters and install the Kafka bridge.
For this, you will need the CA used for the Kafka cluster:
oc extract secret/openshift-kafka-cluster -n kafka-cluster --keys=ca.crt --to=- > ca.crt
Step 3: Prepare Kafka Bridge
The Kafka Bridge provides a RESTful interface that allows HTTP-based clients to interact with a Kafka cluster. It offers the advantages of a web API connection to AMQ Streams, without the need for client applications to interpret the Kafka protocol.
The API has two main resources—consumers and topics—that are exposed and made accessible through endpoints to interact with consumers and producers in your Kafka cluster.
In order to install the bridge in a Kubernetes cluster (without OpenShift) you would need to install the Strimzi operator first and get the CA root cert from the cluster where the Kafka cluster is running.
3.0: Prerequisites
- AMQ Streams operator installed
3.1: Prep namespace
kubectl create ns kafka-bridge
3.2: Deploy the Kafka Bridges
Note: Perform this step in each Kubernetes target cluster.
3.2.1: Prep certs in the target cluster
Using the previously extracted CA, create the secret for TLS connection:
kubectl create secret generic openshift-cluster-ca-cert --from-file=ca.crt -n kafka-bridge
3.2.2: Deploy the bridge
kubectl apply -f kafka-bridge.yaml -n kafka-bridge
Note: Notice how the Kafka Bridge CR has the label failover: enabled which will be used later on.
Check the bridge pod is running:
kubectl get pods -n kafka-bridge -w
NAME                                  READY   STATUS    RESTARTS   AGE
kafka-bridge-bridge-b86c49748-cbltz   1/1     Running   0          23s
Check the logs to make sure the bridge is working properly:
kubectl logs kafka-bridge-bridge-b86c49748-cbltz -n kafka-bridge
Preparing truststore
Certificate was added to keystore
Preparing truststore is complete
Kafka Bridge configuration:
#Bridge configuration
bridge.id=kafka-bridge

#Kafka common properties
kafka.bootstrap.servers=openshift-kafka-bootstrap-kafka-cluster.apps.gke-nmocpt2-us-west1-0.nmocpt2-upic-0.gcp.sandbox.tetrate.io:443
kafka.security.protocol=SSL
#TLS/SSL
kafka.ssl.truststore.location=/tmp/strimzi/bridge.truststore.p12
kafka.ssl.truststore.password=[hidden]
kafka.ssl.truststore.type=PKCS12
...
...
...
2023-07-27 15:07:59 INFO  [vert.x-eventloop-thread-0] AppInfoParser:119 - Kafka version: 3.5.0
2023-07-27 15:07:59 INFO  [vert.x-eventloop-thread-0] AppInfoParser:120 - Kafka commitId: c97b88d5db4de28d
2023-07-27 15:07:59 INFO  [vert.x-eventloop-thread-0] AppInfoParser:121 - Kafka startTimeMs: 1690470479736
2023-07-27 15:07:59 INFO  [vert.x-eventloop-thread-0] HttpBridge:102 - HTTP-Kafka Bridge started and listening on port 8080
2023-07-27 15:07:59 INFO  [vert.x-eventloop-thread-0] HttpBridge:103 - HTTP-Kafka Bridge bootstrap servers openshift-kafka-bootstrap-kafka-cluster.apps.gke-nmocpt2-us-west1-0.nmocpt2-upic-0.gcp.sandbox.tetrate.io:443
2023-07-27 15:07:59 INFO  [vert.x-eventloop-thread-2] Application:125 - HTTP verticle instance deployed [2d8cbf0e-49e3-4a9d-8ba7-3ba3cdf38da0]
2023-07-27 15:13:00 INFO  [kafka-admin-client-thread ] NetworkClient:977 - [AdminClient clientId=adminclient-1] Node -1 disconnected.
3.2.3: Test the bridge
Test the bridge by forwarding the port:
kubectl port-forward deployment/kafka-bridge-bridge -n kafka-bridge 8080:8080
Forwarding from 127.0.0.1:8080 -> 8080
curl -X GET http://localhost:8080/topics
["__strimzi_store_topic","__strimzi-topic-operator-kstreams-topic-store-changelog"]
Now you should have working Kafka bridges on each cluster
Step 4: Tetrate Service Bridge setup
4.1: Install Tetrate Service Bridge
Tetrate Service Bridge has a management plane component as well as per-cluster control planes. We use tooling in the tetrate-service-bridge-sandbox repository to provision both the management plane and the control plane clusters on GCP.
4.2: Inject the sidecar in the bridge namespaces
In the previous step we had the Kafka bridges working; now we need to inject a sidecar proxy and restart the deployments on each Kubernetes cluster where they are running:
kubectl label ns kafka-bridge istio-injection=enabled
namespace/kafka-bridge labeled
kubectl rollout restart deployment kafka-bridge-bridge -n kafka-bridge
deployment.apps/kafka-bridge-bridge restarted
kubectl get pods -n kafka-bridge
NAME                                  READY   STATUS    RESTARTS   AGE
kafka-bridge-bridge-b86c49748-f7x96   2/2     Running   0          43s
Now test the Kafka bridge with a sleep container:
kubectl apply -f https://raw.githubusercontent.com/istio/istio/master/samples/sleep/sleep.yaml -n kafka-bridge
export SLEEP_POD=$(kubectl get pod -n kafka-bridge -l app=sleep -o jsonpath={.items..metadata.name})
kubectl exec -it $SLEEP_POD -n kafka-bridge -c sleep -- curl -X GET http://kafka-bridge-bridge-service.kafka-bridge.svc.cluster.local:8080/topics
Check the proxy sidecar logs for the request:
kubectl logs kafka-bridge-bridge-b86c49748-f7x96 -n kafka-bridge -c istio-proxy
Deployments and Config
Deploy the Tetrate Service Bridge Tenant, Workspace, Workspace Settings, and Gateway group:
kustomize build tsb --reorder none | k apply -f -
Note: For demo purposes, this is done in the central Kubernetes cluster.
Now deploy the Ingress gateways in East and West:
Note: The command below needs to be run in each East/West Kubernetes clusters.
kustomize build ingress-gateway-east --reorder none | k apply -f -
kustomize build ingress-gateway-west --reorder none | k apply -f -
Check the Ingress gateway is running:
kubectl get pods -n kafka-bridge
NAME                                  READY   STATUS    RESTARTS   AGE
kafka-bridge-bridge-b86c49748-lrhwn   2/2     Running   0          2m25s
kafka-bridge-ig-ddf7b8fbc-n94bg       1/1     Running   0          13m
sleep-78ff5975c6-mt95c                2/2     Running   0          88m
Now let's get the Ingress gateway public IP and test the bridge on each region:
export GATEWAY_KAFKA_IP=$(kubectl -n kafka-bridge get service kafka-bridge-ig -o jsonpath='{.status.loadBalancer.ingress[0].ip}')
curl -k -v "http://kafka.tetrate.work/topics" \
    --resolve "kafka.tetrate.work:80:${GATEWAY_KAFKA_IP}"
Expect a response like:
* Added kafka.tetrate.work:80:35.237.238.246 to DNS cache
* Hostname kafka.tetrate.work was found in DNS cache
*   Trying 35.237.238.246:80...
* Connected to kafka.tetrate.work (35.237.238.246) port 80 (#0)
> GET /topics HTTP/1.1
> Host: kafka.tetrate.work
> User-Agent: curl/7.87.0
> Accept: */*
>
* Mark bundle as not supporting multiuse
< HTTP/1.1 200 OK
< content-type: application/vnd.kafka.v2+json
< content-length: 83
< x-envoy-upstream-service-time: 165
< date: Thu, 27 Jul 2023 18:47:30 GMT
< server: istio-envoy
<
* Connection #0 to host kafka.tetrate.work left intact
["__strimzi_store_topic","__strimzi-topic-operator-kstreams-topic-store-changelog"]
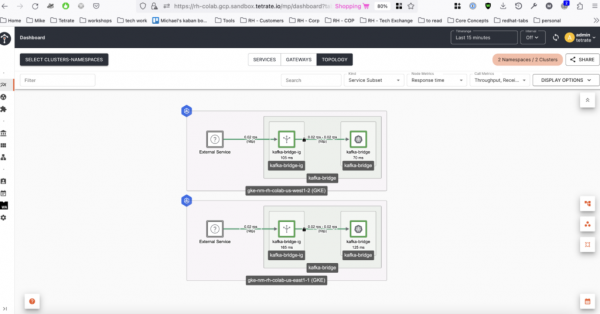
Make several requests to each Ingress gateway at each Kubernetes cluster and navigate to the topology view in the Tetrate Service Bridge web UI (Figure 2) to see the traffic.

Now we are ready to deploy the Tier1 Gateway that load balances traffic between the two regional Ingress gateways:
Note: Don't forget to update the Tier1 gateway config with the onboarded Tetrate Service Bridge cluster names. For demo purposes, the Tier1 gateway is being deployed in the central Kubernetes cluster.
kustomize build tier1-gateway --reorder none | k apply -f -
Test the Tier1 gateway by generating traffic:
export GATEWAY_T1_IP=$(kubectl -n tier1-gateway get service tier1-gw -o jsonpath='{.status.loadBalancer.ingress[0].ip}')
while true; do curl -k "http://kafka.tetrate.work/topics" --resolve "kafka.tetrate.work:80:${GATEWAY_T1_IP}"; sleep 0.5; done
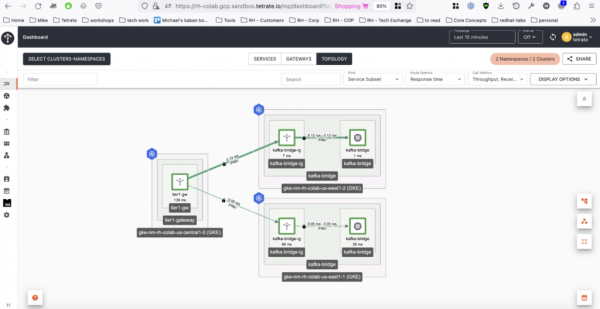
Expect traffic to be split between the two Ingress gateways, as shown in Figure 3.

Now we are ready to test failover of the Kafka bridge across regions.
Step 5: Test Kafka Bridge failover with Tetrate Service Bridge
Now that we have a working setup, we are going to deploy a couple traffic generators that are going to emulate the production and consumption of messages to the exposed endpoint on our Tier1 gateway so we can failover one of the bridges.
Note: For demo purposes we are going to deploy the producer and consumers in the same central Kubernetes cluster where we have the Tier1 gateway.
5.1: Create a Kafka Bridge consumer
5.1.1: Create a couple of consumers
Consumer 1:
curl -k -X POST "http://kafka.tetrate.work/consumers/bridge-quickstart-consumer-group" --resolve "kafka.tetrate.work:80:${GATEWAY_T1_IP}" \
  -H 'content-type: application/vnd.kafka.v2+json' \
  -d '{
    "name": "consumer1",
    "auto.offset.reset": "earliest",
    "format": "json",
    "enable.auto.commit": false,
    "fetch.min.bytes": 512,
    "consumer.request.timeout.ms": 30000
  }'
Expect a response like:
{"instance_id":"consumer1","base_uri":"http://kafka.tetrate.work:80/consumers/bridge-quickstart-consumer-group/instances/consumer1"}
Consumer 2:
curl -k -X POST "http://kafka.tetrate.work/consumers/bridge-quickstart-consumer-group" --resolve "kafka.tetrate.work:80:${GATEWAY_T1_IP}" \
  -H 'content-type: application/vnd.kafka.v2+json' \
  -d '{
    "name": "consumer2",
    "auto.offset.reset": "earliest",
    "format": "json",
    "enable.auto.commit": false,
    "fetch.min.bytes": 512,
    "consumer.request.timeout.ms": 30000
  }'
Expect a response like:
{"instance_id":"consumer2","base_uri":"http://kafka.tetrate.work:80/consumers/bridge-quickstart-consumer-group/instances/consumer2"}
5.1.2: Subscribe the consumers created in step 5.1.1 to the consumer group
Consumer 1:
curl -k -X POST "http://kafka.tetrate.work/consumers/bridge-quickstart-consumer-group/instances/consumer1/subscription" --resolve "kafka.tetrate.work:80:${GATEWAY_T1_IP}" -H 'content-type: application/vnd.kafka.v2+json' -d '{"topics": ["bridge-quickstart-topic"]}' -v
Consumer 2:
curl -k -X POST "http://kafka.tetrate.work/consumers/bridge-quickstart-consumer-group/instances/consumer2/subscription" --resolve "kafka.tetrate.work:80:${GATEWAY_T1_IP}" -H 'content-type: application/vnd.kafka.v2+json' -d '{"topics": ["bridge-quickstart-topic"]}' -v
5.1.3: Test producing messages using the Bridge
curl -k -X POST "http://kafka.tetrate.work/topics/bridge-quickstart-topic" --resolve "kafka.tetrate.work:80:${GATEWAY_T1_IP}" -H 'content-type: application/vnd.kafka.json.v2+json' -d '{"records": [{"key": "my-key", "value": "sales-lead-0001"}, {"value": "sales-lead-0002"}, {"value": "sales-lead-0003"}]}'
Expect a response like:
{"offsets":[{"partition":0,"offset":11},{"partition":0,"offset":12},{"partition":0,"offset":13}]}
5.1.4: Test retrieving messages from the consumers
curl -k -X GET "http://kafka.tetrate.work/consumers/bridge-quickstart-consumer-group/instances/consumer1/records" --resolve "kafka.tetrate.work:80:${GATEWAY_T1_IP}" -H 'accept: application/vnd.kafka.json.v2+json'
Expect a response like:
[{"topic":"bridge-quickstart-topic","key":"my-key","value":"sales-lead-0001","partition":0,"offset":0},{"topic":"bridge-quickstart-topic","key":"my-key","value":"sales-lead-0001","partition":0,"offset":1},{"topic":"bridge-quickstart-topic","key":"my-key","value":"sales-lead-0001","partition":0,"offset":2},{"topic":"bridge-quickstart-topic","key":"my-key","value":"sales-lead-0001","partition":0,"offset":3},{"topic":"bridge-quickstart-topic","key":null,"value":"sales-lead-0003","partition":0,"offset":4},{"topic":"bridge-quickstart-topic","key":"my-key","value":"sales-lead-0001","partition":0,"offset":5},{"topic":"bridge-quickstart-topic","key":null,"value":"sales-lead-0003","partition":0,"offset":6},{"topic":"bridge-quickstart-topic","key":"my-key","value":"sales-lead-0001","partition":0,"offset":7},{"topic":"bridge-quickstart-topic","key":null,"value":"sales-lead-0003","partition":0,"offset":8},{"topic":"bridge-quickstart-topic","key":"my-key","value":"sales-lead-0001","partition":0,"offset":9},{"topic":"bridge-quickstart-topic","key":null,"value":"sales-lead-0003","partition":0,"offset":10},{"topic":"bridge-quickstart-topic","key":"my-key","value":"sales-lead-0001","partition":0,"offset":11},{"topic":"bridge-quickstart-topic","key":null,"value":"sales-lead-0002","partition":0,"offset":12},{"topic":"bridge-quickstart-topic","key":null,"value":"sales-lead-0003","partition":0,"offset":13}]
5.2: Deploy traffic generators
Now that we tested the producers and consumers, let's deploy the traffic generators in the central Kubernetes cluster to generate traffic:
kubectl create ns producer consumer1 consumer2
kubectl apply producer.yaml -n producer
kubectl apply consumer1.yaml -n consumer1
kubectl apply consumer2.yaml -n consumer2
Note: Be sure to update the Tier1 external service IPs in the producers/consumers.
5.3: Failover test
Scale down the deployment in East or West kafka-bridge service to simulate a failure:
kubectl scale kafkabridges.kafka.strimzi.io kafka-bridge -n kafka-bridge --replicas=0
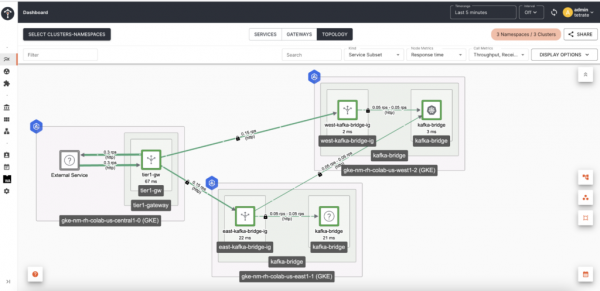
Observe on the Tetrate Service Bridge web UI (Figure 4) how the requests are being redirected from one region's Ingress gateway to the other.

In Figure 4, we can see the West Ingress Gateway detected that the Kafka bridge located in the West cluster was down and redirected the requests across the region to the East Kafka bridge.
Conclusion
In this article, we showed how to provision a sample Kafka cluster on OpenShift and expose it using the AMQ Streams Kafka Bridge running on East and West Kubernetes clusters. Finally, a Tetrate Tier1 gateway on the central cluster load balances a cluster Ingress gateway that makes the bridge service accessible. Using Kafka Bridge instances replicated across regions to provide high availability, combined with Tetrate Service Bridge's ability to load balance and failover the bridge instances, creates an extra layer between the consumers and producers in a streaming architecture, providing better abstraction for multi-cluster topologies.
Files used in this tutorial can be found in this Git repo.
