MicroShift is a lightweight Kubernetes distribution derived from Red Hat OpenShift that is intended for edge or embedded use cases in environments where the availability of computing resources is limited. It enables organizations to leverage Kubernetes in these environments to standardize deployments using common Kubernetes paradigms.
In this article, we will discuss managing both configuration and application deployment in MicroShift using two different approaches. The first approach is embedding GitOps and other manifests using a Red Hat Enterprise Linux (RHEL) RPM. The second is using Red Hat Advanced Cluster Management (RHACM) to dynamically provision GitOps manifests to manage it remotely. While both approaches are covered there will be an emphasis on the second approach.
Please note that this article is future-facing since at the time of this writing, OpenShift for GitOps on MicroShift is technology preview (TP) and RHACM does not yet officially support MicroShift. Both capabilities are planned to achieve general availability (GA) status in future versions.
Installing MicroShift
While a full review of installing MicroShift is beyond the scope of this article, it is important to understand the basics particularly for readers coming from an OpenShift background that may not have a strong familiarity with RHEL and RHEL-based tools.
MicroShift is available for RHEL as an RPM Package Manager (RPM) and is installed following standard RHEL practices. When creating a MicroShift installation, one can choose to use either RHEL image mode or RHEL package mode.
RHEL image mode provides an immutable OS using ostree similar to how Red Hat Enterprise Linux CoreOS, the default operating system for OpenShift, works. Either option can be used, but for edge and embedded use cases, RHEL image mode is recommended and is what we will be using here.
Readers unfamiliar with RHEL image mode are encouraged to review the documentation here, however the basic gist of the process is as follows:
- Create a base blueprint that specifies the image that will be used. This blueprint can include some basic configuration as well as the specific packages (i.e., RPMs) that need to be included in the image.
- Use the RHEL utility
composer-clito register the blueprint and create the image. - Create an installer blueprint that can add additional customizations and use that to create a more specific image based on the previous image.
- Create a kickstart file which provides the instructions to execute when RHEL is installed on the device. You can think of kickstart as a script similar to a bash script with some installation specific commands available.
- Create an ISO based on the installation image and the kickstart file that was created previously.
- Install the ISO on a VM or physical device.
The specific process for creating an image of RHEL with MicroShift is documented here.
Note that the kickstart file included in the documentation shows snippets required to support MicroShift but may not be complete for all use cases as it lacks some needed capabilities like initializing networking. In the GitHub repository supporting this article we have provided example blueprint and kickstart files needed to create a MicroShift enabled RHEL ISO.
OpenShift GitOps for MicroShift
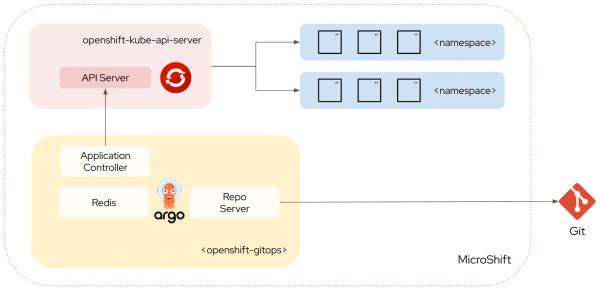
OpenShift GitOps for MicroShift is a reduced feature version of the product designed to operate in a resource constrained environment. It removes the Server and ApplicationSet components from Argo CD leaving only the Application Controller, Repo, and Redis components. This means that no user interface, API or RBAC is available when using OpenShift GitOps for MicroShift. See Figure 1.
Note
This architecture is conceptually and philosophically very similar to the upstream Argo CD Core installation.
MicroShift management options overview
There are a variety of ways that one can bootstrap a MicroShift cluster once it is deployed onto a device. This article will focus on two distinct options summarized in the following sections.
Note that in both approaches we will configure the cluster and deploy applications using the Argo CD Application-of-Applications pattern (colloquially referred to as App-of-Apps). This enables the deployment of a single root Application that will in turn pull in other Applications defined in a git repo.
Embedded
The first option is embedded, depicted in Figure 2.
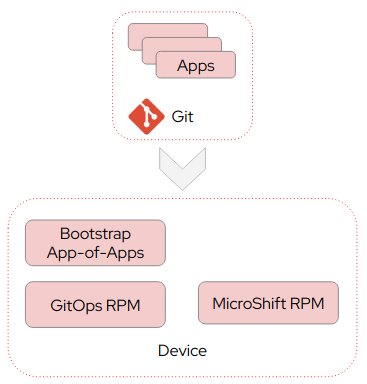
In the embedded option, all manifests needed to install GitOps and the bootstrap application in MicroShift are embedded in the image. Once the image is installed on a device, MicroShift will install these manifests into the cluster at startup. At this point GitOps will process the bootstrap application to configure and provision additional applications in MicroShift from Git.
Configuration updates, application changes or new application deployments are dynamic and can be managed in git. Any changes to the GitOps configuration, for example a change in the argocd-cm ConfigMap, or to the bootstrap application manifest happens outside of the Kubernetes lifecycle and would typically be handled by creating and deploying an updated image.
Remote
The second option is remote, shown in Figure 3.
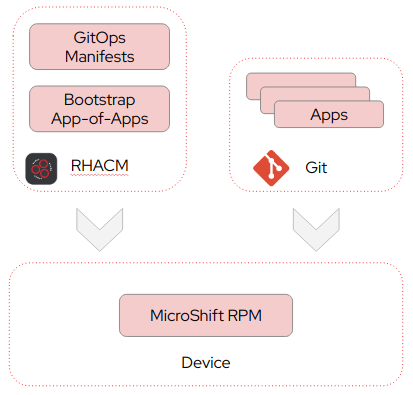
In this option we remotely manage MicroShift with Red Hat Advanced Cluster Management (RHACM). Here, only MicroShift itself is embedded in the image and initially installed on the device. All manifests needed for GitOps and the bootstrap application are sourced from RHACM.
When the image is installed on a device it will automatically register itself as a ManagedCluster with RHACM. Once registered, an RHACM policy will automatically provision the GitOps manifests and the bootstrap application onto the MicroShift cluster. Similar to the embedded option the bootstrap application will then configure and provision additional applications in MicroShift from Git.
Management options deep dive
Let's go over additional details on the embedded and remote options.
Embedded
In the embedded option we will, as the name implies, embed the OpenShift GitOps distribution and all of the supporting files needed in the ISO image. Every time MicroShift starts it will automatically deploy manifest files from the /usr/lib/microshift/manifests or /usr/lib/microshift/manifests.d paths. When manifests are packaged into RPMs, such as the GitOps operator, this is typically where the manifests will be located.
However, MicroShift can also use any manifests contained in /etc/microshift/manifests and /etc/microshift/manifests.d paths. There is an order of precedence and operators can choose to override manifests from the /usr/lib/microshift manifest paths with the /etc/microshift paths. This is useful for the GitOps RPM as we will want to override the default Argo CD argocd-cm ConfigMap it deploys in favor of our own configuration.
As mentioned previously, we include the GitOps product by referencing its package in the blueprint as follows:
[[packages]]
name = "microshift-gitops"
version = "*"
While RPMs are the recommended approach for including additional files, for simplicity of this example I have chosen to embed the files needed for bootstrapping directly into the blueprint. In the blueprint the following files are added to the image:
/etc/MicroShift/manifests.d/020-MicroShift-gitops/argocd-cm.yaml | Overrides the default argocd-cm with our own version that includes additional health checks and configuration. Notably it includes a health check for Applications which is required to support the app-of-app pattern. |
/etc/MicroShift/manifests.d/030-bootstrap/cluster-config-bootstrap.yaml | Includes an Argo CD AppProject as well as the bootstrap App-of-App application. |
Notice in the argocd-cm that is created we define a health check for the application resource, this is required for sync waves to work correctly. Without this health check each application would be considered healthy on deployment and immediately progress to the next application.
Finally, secrets management is a challenge here. When using something like External Secrets or the CSI Secrets Driver, a bootstrap secret must be provided for these tools to access the secrets store backend. Again for simplicity I have embedded this in the image and therefore it is included in the resulting ISO; however, this is NOT the recommended practice and is simply used here as a convenience. Due to this it is not reflected in the Git repository provided.
Readers are urged to look at tools like FIDO Device Onboard (FDO) which facilitates management at scale of devices. Luis Arizmendi Alonso has written about the challenges of securing information at rest in edge devices here and provided a detailed overview of FDO here. It is beyond the scope of this article to cover this topic so please do review the excellent blogs written previously by Luis.
The kickstart file is mostly a typical example, however in my homelab environment I am providing the hostname via DHCP. This hostname is then leveraged to generate the MicroShift configuration as follows:
# Configure API and ingress DNS for MicroShift
cat > /etc/MicroShift/config.yaml << EOF
dns:
 baseDomain: $HOSTNAME.ocplab.com
apiServer:
 subjectAltNames:
 - api.$HOSTNAME.ocplab.com
 - $(hostname -i)
EOF
In my environment ocplab.com is the root domain and the above snippet is prefixing this root domain with the device’s hostname to setup the ingress wildcard hostname as well as the API endpoint.
At this point we can build out an image and deploy it! Of course, the files I have provided are examples only and will need to be changed for your specific environment however hopefully this will help get readers started.
Let's move on to review bootstrapping with RHACM (which is my preferred approach.) In the next section we will review some of the common elements, such as the app-of-apps approach, in more detail.
Remote
In this option we will use RHACM to register and bootstrap MicroShift clusters automatically leveraging the Agent Registration flow and ConfigurationPolicy. In this option we do not embed the GitOps installation into the image. Instead, RHACM will deploy and manage OpenShift GitOps for MicroShift to the cluster remotely along with the bootstrap application.
This is my preferred approach since it is identical to how I am currently managing OpenShift clusters today. However, in environments with network connectivity challenges or no connectivity, this option may not be feasible. It should be noted that GitOps itself may not be an option in these environments either due to the requirement to connect to remote repositories.
The agent registration flow enables MicroShift to automatically register itself with RHACM. To enable this registration process two pieces of information are required to be available when the Kickstart process is executed at device installation:
- The agent endpoint hostname to contact to in the RHACM Hub.
- A token that is used to authorize the registration. This token is tied to a ServiceAccount created on the RHACM Hub cluster as per the documentation. Note that while in this article the token is embedded in the created image and ISO, readers are strongly urged to examine options like FDO to manage this securely.
The script used to initiate this registration process with the Hub is at the end of the kickstart file. This script will execute curl to retrieve the RHACM CustomResourceDefinitions and agent deployment manifests and store these in /etc/MicroShift/manifests.d. When MicroShift is started after the installation it will automatically deploy these manifests which will then trigger the registration process.
As mentioned previously, we are using the hostname to configure the cluster and the registration script also uses the hostname as the ManagedClusterName for this cluster in RHACM. This can be seen in the kickstart script in this line:
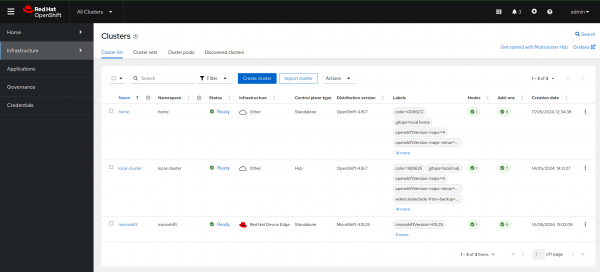
curl --cacert /etc/pki/ca-trust/source/anchors/R11.pem -H "Authorization: Bearer $TOKEN" https://$AGENT_HOST/agent-registration/manifests/$HOSTNAME > /etc/MicroShift/manifests.d/011-register-cluster/register-cluster.yamlWithin a few minutes, assuming the automatic registration was configured in the Hub, the MicroShift cluster will appear in the RHACM console. See Figure 4.
Note
If you opt not to enable the auto-registration for the Agent you will need manually to approve some CSRs and modify the ManagedCluster.spec.hubAcceptsClient to true in order to accept the cluster. Note that at the moment this is a manual process with no support for doing so the RHACM UI.
The blueprint file for the remote option is simpler then the embedded option since we are not including the GitOps package nor do we need to include any GitOps configuration files.
Once the cluster is registered, an RHACM ConfigurationPolicy will automatically deploy the following items to the cluster:
- OpenShift GitOps manifests.
- The root secret needed for the External Secrets Operator to access the secrets back-end.
- The Bootstrap Argo CD App-of-Apps.
This policy uses the PolicyGenerator tool, which as the name implies generates ConfigurationPolicy based on a specified set of manifests. The OpenShift GitOps for MicroShift manifests were extracted from the RPM and, with some tweaks to configuration, provided to the PolicyGenerator. The PolicyGenerator groups these policies together into a single PolicySet to facilitate management.
A Placement is used to determine which clusters the policy is applied against. The placement uses a claim selector for the key product.open-cluster-management.io with a value of MicroShift. This claim is configured by default by RHACM on registration which is how the policy gets deployed automatically to the newly registered MicroShift cluster.
The bootstrap Application uses cluster specific configuration to support per cluster customizations that are often required. In this case the RHACM policy templating feature is used to set the application path in the bootstrap folder to be equal to the cluster name. Note that alternative claims could be used as well:
 <snipped>...
 source:
   path: bootstrap/overlays/{{ fromClusterClaim "name" }}
   repoURL:  https://github.com/gnunn-gitops/MicroShift.git
   targetRevision: HEAD
As mentioned previously, the bootstrap application is using the app-of-apps pattern to load a group of Argo CD Applications onto the MicroShift cluster. This utilizes the Argo CD sync waves feature to deploy these child applications in a specific order. This ensures that cluster configuration items like external secrets, cert-manager and certificates are deployed and healthy before applications are deployed. The set of Argo CD applications that are being deployed by the bootstrap application are shown in the table below.
| Name | Description | Sync Wave |
| external-secrets | The External Secrets Operator used to provide access to the Doppler backend secrets store used in my homelab. Previous blog on the topic here. | 1 |
| cert-manager | Deploys the Cert-Manager Operator to support provisioning and managing certificates. | 2 |
| cet-issuers | Creates the ClusterIssuer issuer for LetsEncrypt along with required ExternalSecrets needed to support it. | 3 |
| certificates | Provisions a new wildcard certificate from LetsEncrypt for the default-router deployment in MicroShift | 6 |
| product-catalog | A basic application deployed from the gitops-examples/simple-app-example repository. | 20 |
Once the bootstrap process is completed we can quickly confirm the deployed Argo CD Applications are healthy and synchronized in MicroShift:
$ oc get apps -n openshift-gitops
NAME                       SYNC STATUS   HEALTH STATUS
cert-issuers               Synced        Healthy
cert-manager               Synced        Healthy
certificates               Synced        Healthy
cluster-config-bootstrap   Synced        Healthy
external-secrets           Synced        Healthy
product-catalog            Synced        Healthy
Next check that the demo application is deployed and running:
$ oc get deploy -n product-catalog
NAME        READY   UP-TO-DATE   AVAILABLE   AGE
client      2/2     2            2           7d23h
productdb   1/1     1            1           7d23h
server      1/1     1            1           7d23h
And then see the endpoints we can use to access the application:
$ oc get routes -n product-catalog
NAME     HOST                                                ADMITTED   SERVICE   TLS
client   client-product-catalog.apps.microshift.ocplab.com   True       client
server   server-product-catalog.apps.microshift.ocplab.com   True       server
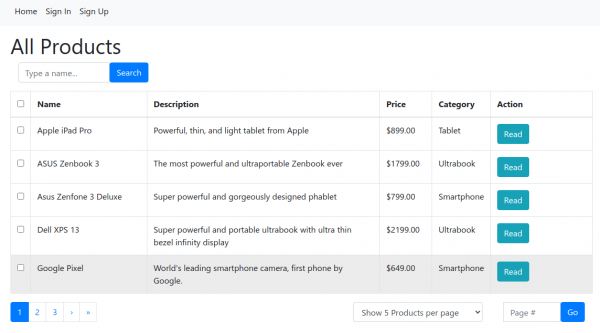
Pasting the client hostname into a browser will display the demo application which is used to manage a product catalog, as shown in Figure 5.
GitOps development and troubleshooting
When developing, testing or troubleshooting GitOps deployments you may need to interact with Argo CD on a MicroShift cluster directly.
Since Argo CD Applications are just custom resources, they can be created and managed declaratively using the Kubernetes API. Status information with regards to Applications can easily be viewed using normal oc commands such as oc get apps, oc describe app <name>, oc edit app <name>, and etc.
In addition, the Argo CD CLI can be used via the log in option --core. While not a well known option, it instructs the Argo CD CLI to use the Kubernetes API rather than the Argo CD API which is perfect here.
To use the Argo CD CLI you must first have access to MicroShift using the oc command as per the MicroShift documentation. Once you have connectivity, switch to the openshift-gitops namespace in your context:
oc project openshift-gitops
And then log in using the Argo CD CLI:argocd login --core
Conclusion
We reviewed how to manage MicroShift clusters with OpenShifty GitOps based on embedded and remote with RHACM approaches. If you have thoughts please do feel free to leave a comment or reach out as we are actively soliciting feedback from our users on this topic.
