Large language models (LLMs) remain an intense domain of research and are increasingly permeating new industries. Each week brings new academic papers and updated open models from private companies like DeepSeek V3, IBM Granite, or Meta Llama closing the gap with closed-source ones.
Thanks to the open source community, new models and innovations are continuously integrated into popular projects like Hugging Face Transformers, Llama Cookbook, and Llama Stack, lowering the barrier to adoption and removing the friction to keep up with the state of the art.
Yet applications powered by deep neural networks (sometimes referred to as software 2.0) require powerful accelerators to train and serve models, and it's a competitive advantage to be able to mutualize infrastructure and provide users with a unified platform that guarantees compatibility and flexibility between software and hardware.
Red Hat OpenShift AI layers open source projects such as PyTorch, Kubeflow, and vLLM on top of OpenShift. OpenShift AI supports a large range of accelerators and leverages workload orchestration tools like Kueue to minimize lock-in while maximizing utilization and ultimately increasing return on investment.
Starting with OpenShift AI 2.19, the Kubeflow Training Operator and SDK become generally available. Any users and customers can now adopt them for training their models on Red Hat OpenShift using PyTorch and popular libraries such as HuggingFace Transformers. This also enables users to explore more tailored libraries such as fms-hf-tuning as demonstrated in this previous article.
Fine-tune LLMs with Kubeflow Trainer
This how-to article walks you through one of the many generative AI use cases possible with OpenShift AI. It demonstrates how to fine-tune LLMs with the Kubeflow Training Operator and SDK, using Hugging Face Supervised Fine-tuning Trainer (SFTTrainer), LoRA / QLoRA, and PyTorch Fully Sharding Data Parallel (FSDP) to scale the training on multiple nodes.
This article also shows how optimized/fused kernels like FlashAttention and Liger Kernel can improve accelerator memory consumption significantly and highlights the need for efficient GPU peer-to-peer communication.
I'll cover that in more detail in a later article, as well as how direct GPU interconnect technologies such as NVIDIA GPUDirect RDMA can improve performance drastically even further.
Prerequisites
You need access to a Red Hat OpenShift cluster (version 4.14 or higher) with the following components installed:
- The OpenShift AI operator (version 2.19 or higher) with the dashboard, workbenches, and training operator components enabled.
- Enough worker nodes with supported accelerators, either:
- NVIDIA GPUs (for this tutorial, Red Hat recommends Ampere-based or newer GPUs), or
- AMD accelerators (for this tutorial, Red Hat recommends AMD Instinct MI300X accelerators).
- The Node Feature Discovery Operator, which detects hardware features and advertises them on the nodes.
- Depending on the accelerators available on your cluster:
- The NVIDIA GPU operator with the appropriate ClusterPolicy, or
- The AMD GPU operator with the appropriate configuration.
- A storage provisioner that supports the dynamic provisioning of PersistentVolumeClaims with ReadWriteMany (RWX) access mode and a corresponding StorageClass enabled in OpenShift AI.
Note
If your cluster doesn't have any dynamic provisioners with RWX support, Red Hat recommends OpenShift Data Foundation, which is part of OpenShift Platform Plus. Alternatively, you might be able to install an in-cluster NFS dynamic provisioner by following these instructions.
Create a workbench
Start by creating a workbench. This is a Jupyter notebook that's hosted on OpenShift, and you'll conveniently run everything from there once it's created.
You can access the OpenShift AI dashboard from the navigation menu at the top of the Red Hat OpenShift web console, as shown in Figure 1.

After logging into the dashboard using your credentials, go to Data Science Projects and create a new project, as shown in Figure 2.

After you create your project, click the Create a workbench button, as shown in Figure 3.

In the workbench creation form, select PyTorch (for NVIDIA GPU) or ROCm-PyTorch (for AMD accelerator), as shown in Figure 4.

Enter the deployment size, as shown in Figure 5. Note that adding an accelerator is optional and only necessary to run inferences for the fine-tuned model from within the notebook, so you can skip this as needed.

Next, create a persistent storage that'll be shared between the notebook and the fine-tuning jobs to persist the model checkpoints, as shown in Figure 6. Make sure to select a storage class that corresponds to a provisioner capable of provisioning PersistentVolumeClaims with ReadWriteMany access mode.

Review the storage configuration and click the Create workbench button, as shown in Figure 7.

From the Workbenches page, click the Open link when the new workbench is ready, as shown in Figure 8.

Fine-tune LLMs
Now, with the workbench ready and open, you're ready to fine-tune models. The workbench hosts the execution of Jupyter notebooks and empowers data scientists to run their training and fine-tuning experiments from an environment they are familiar with while harnessing the power of the accelerators available on the OpenShift AI platform.
Clone the LLM fine-tuning notebook example
You can clone the LLM fine-tuning with Kubeflow Training on OpenShift AI example. Click the Git icon on the left column and paste the following URL into the text box; then click the Clone button (Figure 9):
https://github.com/opendatahub-io/distributed-workloads.git
From there, navigate to the distributed-workloads/examples/kfto-sft-llm directory and open the sft.ipynb notebook (Figure 10).

Configure the fine-tuning job
First, you need to specify which pre-trained model you want to fine-tune and on which dataset you want to fine-tune it. In its default configuration, this example fine-tunes the Llama 3.1 8B Instruct pre-trained model using the GSM8K dataset from Hugging Face.
You can change the model to any of the models listed in the PyTorch row of the supported models table from the Hugging Face Transformers library documentation. Similarly, you can change the dataset to one of the many NLP datasets available on Hugging Face Hub; just keep in mind that you might have to adapt how it gets prepared, as I'll describe in the next section.
Both the model and dataset parameters can take local paths, so it's perfectly possible to adapt the training loop to fetch them from a model registry such as the Kubeflow model registry and write them to the shared persistent storage, or use OCI VolumeSources and ModelCars.
# Model
model_name_or_path: Meta-Llama/Meta-Llama-3.1-8B-Instruct
model_revision: main
# Dataset
dataset_name: gsm8k                       # id or path to the dataset
dataset_config: main                      # name of the dataset configuration
LoRA is configured with these default parameters:
# PEFT / LoRA
lora_r: 16
lora_alpha: 8
lora_dropout: 0.05
lora_target_modules: ["q_proj", "v_proj", "k_proj", "o_proj", "gate_proj", "up_proj", "down_proj"]
LoRA drastically reduces the number of parameters that are trained compared to full fine-tuning, while maintaining comparable performance and providing the flexibility to accommodate limited compute resources. For instance, with the Llama 3.1 8B instruct pre-trained model and these default LoRA parameters, it results in 41,943,000 trainable parameters instead of 8,072,204,288 parameters, or only 0.5196% of the total number of parameters from the pre-trained model.
In addition, only the additional LoRA adapter weights are trained, with the original weights from the pre-trained left unchanged (unless for those in layers added to the lora_modules_to_save configuration parameter). This ensures the knowledge learnt during pre-training by the model won't be “forgotten” after fine-tuning on a different dataset (a process known as catastrophic forgetting).
For more information about PEFT and LoRA/QLoRA, refer to What is parameter-efficient fine-tuning? (PEFT) and LoRA vs QLoRA.
The rest of the configuration contains the typical training hyper-parameters, including those “knobs” that you might want to tune according to the accelerator resources available on your cluster:
attn_implementation: flash_attention_2    # one of eager, sdpa or flash_attention_2
use_liger: false                          # use Liger kernels
per_device_train_batch_size: 32           # batch size per device during training
per_device_eval_batch_size: 32            # batch size for evaluation
bf16: true                                # use bf16 16-bit (mixed) precision
tf32: false                               # use tf32 precision
Be aware that constraints exist on some of these parameters. For instance, floating-point precision formats like bfloat16 and tfloat32 might not be available on older generation accelerators. Also, FlashAttention-2 only supports fp16 or bf16 datatypes, and Liger kernels are only available for a subset of models.
Last but not least, you can tweak checkpointing, logging, and reporting configuration:
# Checkpointing
save_strategy: epoch                      # save checkpoint every epoch
save_total_limit: 1                       # limit the total amount of checkpoints
# Logging
log_level: warning                        # logging level (see transformers.logging)
logging_strategy: steps
logging_steps: 1                          # log every N steps
report_to:
- tensorboard                             # report metrics to tensorboard
output_dir: /mnt/shared/Meta-Llama-3.1-8B-Instruct
Exporting training metrics to TensorBoard will be used in the Observe and experiment section below, but you can also add any of the supported integrations. Also the shared persistent storage is used for the output directory, so distributed checkpointing is an option, and also to make checkpoints available from within the notebook for inferencing, as covered in the Test the fine-tuned model section.
Prepare the dataset
The dataset used to perform supervised fine-tuning provides the domain knowledge that should be incorporated into the pre-trained model you've chosen. It's expected to be in a certain format so the dataset entries can be tokenized and passed as input to the model during training.
Hugging Face Transformers library supports the ChatML structure for multi-turn conversation template style, as well as the “Instruction” structure for prompt-completion template style. The former expects the dataset to be structured as [{"role": str, "content": str}] while the latter expects it to be structured as [{"prompt": str, "completion": str}].
If the dataset you want to use does not follow those structures, as in the case of the default GSM8K dataset used in this example, you can update the template_dataset function:
# Templatize dataset
def template_dataset(sample):
    messages = [
        {"role": "user", "content": sample['question']},
        {"role": "assistant", "content": sample['answer']},
    ]
return {"text": tokenizer.apply_chat_template(messages, tokenize=False)}
With the dataset prepared, a chat template needs to be selected. By default the template from the pre-trained model tokenizer's configuration file (the chat_template field from the tokenizer_config.json file) is used, which is usually present for instruction-tuned models such as Llama 3.1 8B Instruct. Otherwise you can provide your own like in the following example:
# Chat template
# Anthropic/Vicuna like template without the need for special tokens
LLAMA_3_CHAT_TEMPLATE = (
    "{% for message in messages %}"
    "{% if message['role'] == 'system' %}"
    "{{ message['content'] }}"
    "{% elif message['role'] == 'user' %}"
    "{{ '\n\nHuman: ' + message['content'] +  eos_token }}"
    "{% elif message['role'] == 'assistant' %}"
    "{{ '\n\nAssistant: '  + message['content'] +  eos_token  }}"
    "{% endif %}"
    "{% endfor %}"
    "{% if add_generation_prompt %}"
    "{{ '\n\nAssistant: ' }}"
    "{% endif %}"
)
tokenizer.chat_template = LLAMA_3_CHAT_TEMPLATE
Configure the client SDK
In this example, the Kubeflow training SDK is used to create the PyTorchJob resource that the Kubeflow Training Operator uses to configure the PyTorch pods. For the SDK to authenticate to the OpenShift API server, and be authorized to create that PyTorchJob resource, you need to provide a valid bearer token by filling the placeholders in the following cell of the notebook:
api_server = "<API_SERVER>"
token = "<TOKEN>"
# Un-comment if your cluster API server uses a self-signed certificate or an un-trusted CA
#configuration.verify_ssl = False
Note
You can retrieve a valid bearer token as well as the OpenShift API server URL from the OpenShift web console by selecting Copy login command in the drop-down menu located at the top-right corner of the navigation bar.
Create the fine-tuning job
You're almost ready to create the fine-tuning job. You need to fill the HF_TOKEN environment variable value with a valid user access token from Hugging Face if you fine-tune a gated model. You might also need to review the compute resources allocated to the job, like the number of workers and the resources for each of them according to what's available in your environment:
client.create_job(
    job_kind="PyTorchJob",
    name="sft",
    train_func=main,
    num_workers=8,
    num_procs_per_worker="1",
    resources_per_worker={
        "nvidia.com/gpu": 1,
        "memory": "64Gi",
        "cpu": 4,
    },
    base_image="quay.io/modh/training:py311-cuda121-torch241",
    env_vars={
        # HuggingFace
        "HF_HOME": "/mnt/shared/.cache",
        "HF_TOKEN": "",
        # CUDA
        "PYTORCH_CUDA_ALLOC_CONF": "expandable_segments:True",
        # NCCL / RCCL
        "NCCL_DEBUG": "INFO",
    },
    parameters=parameters,
    volumes=[
        V1Volume(name="shared",
       persistent_volume_claim=V1PersistentVolumeClaimVolumeSource(claim_name="shared")),
    ],
    volume_mounts=[
        V1VolumeMount(name="shared", mount_path="/mnt/shared"),
    ],
)
If you use AMD accelerators, you typically need to update those few fields:
client.create_job(
    resources_per_worker={
        "amd.com/gpu": 1,
    },
    base_image="quay.io/modh/training:py311-rocm62-torch241",
    env_vars={
        # ROCm (HIP)
        "PYTORCH_CUDA_ALLOC_CONF": "expandable_segments:True",
    },
)
Note
You can find the list of the supported base container images in the Training images section of Red Hat OpenShift AI supported configurations.
Once you've created the fine-tuning job, you can follow its progress to make sure everything's OK by watching the logs:
client.get_job_logs(
    name="sft",
    job_kind="PyTorchJob",
    follow=True,
)
With HF_HOME configured to point to the shared persistent storage, the pre-trained model from Hugging Face will be downloaded once and written into the cache directory. Only one worker will be able to acquire the shared file-based lock the first time and download the model, while the other workers will wait for the download to complete. Upon subsequent runs of the fine-tuning job, the checkpoint stored in the cache will be used instead of re-download the model, speeding-up the process of experimenting with different hyper-parameters.
Observe and experiment
The training metrics are displayed in near real time once you start TensorBoard from the notebook itself (Figure 11) with:
%tensorboard --logdir /opt/app-root/src/shared
As an example of experimentation, Figure 12 shows the results we have produced from fine-tuning Llama 3.1 8B Instruct on the GSM8K dataset with 8 NVIDIA A100/80 GPUs that compare the default attention “eager” implementation, versus FlashAttention and with Liger Kernel enabled (all the other hyper-parameters remaining constant).
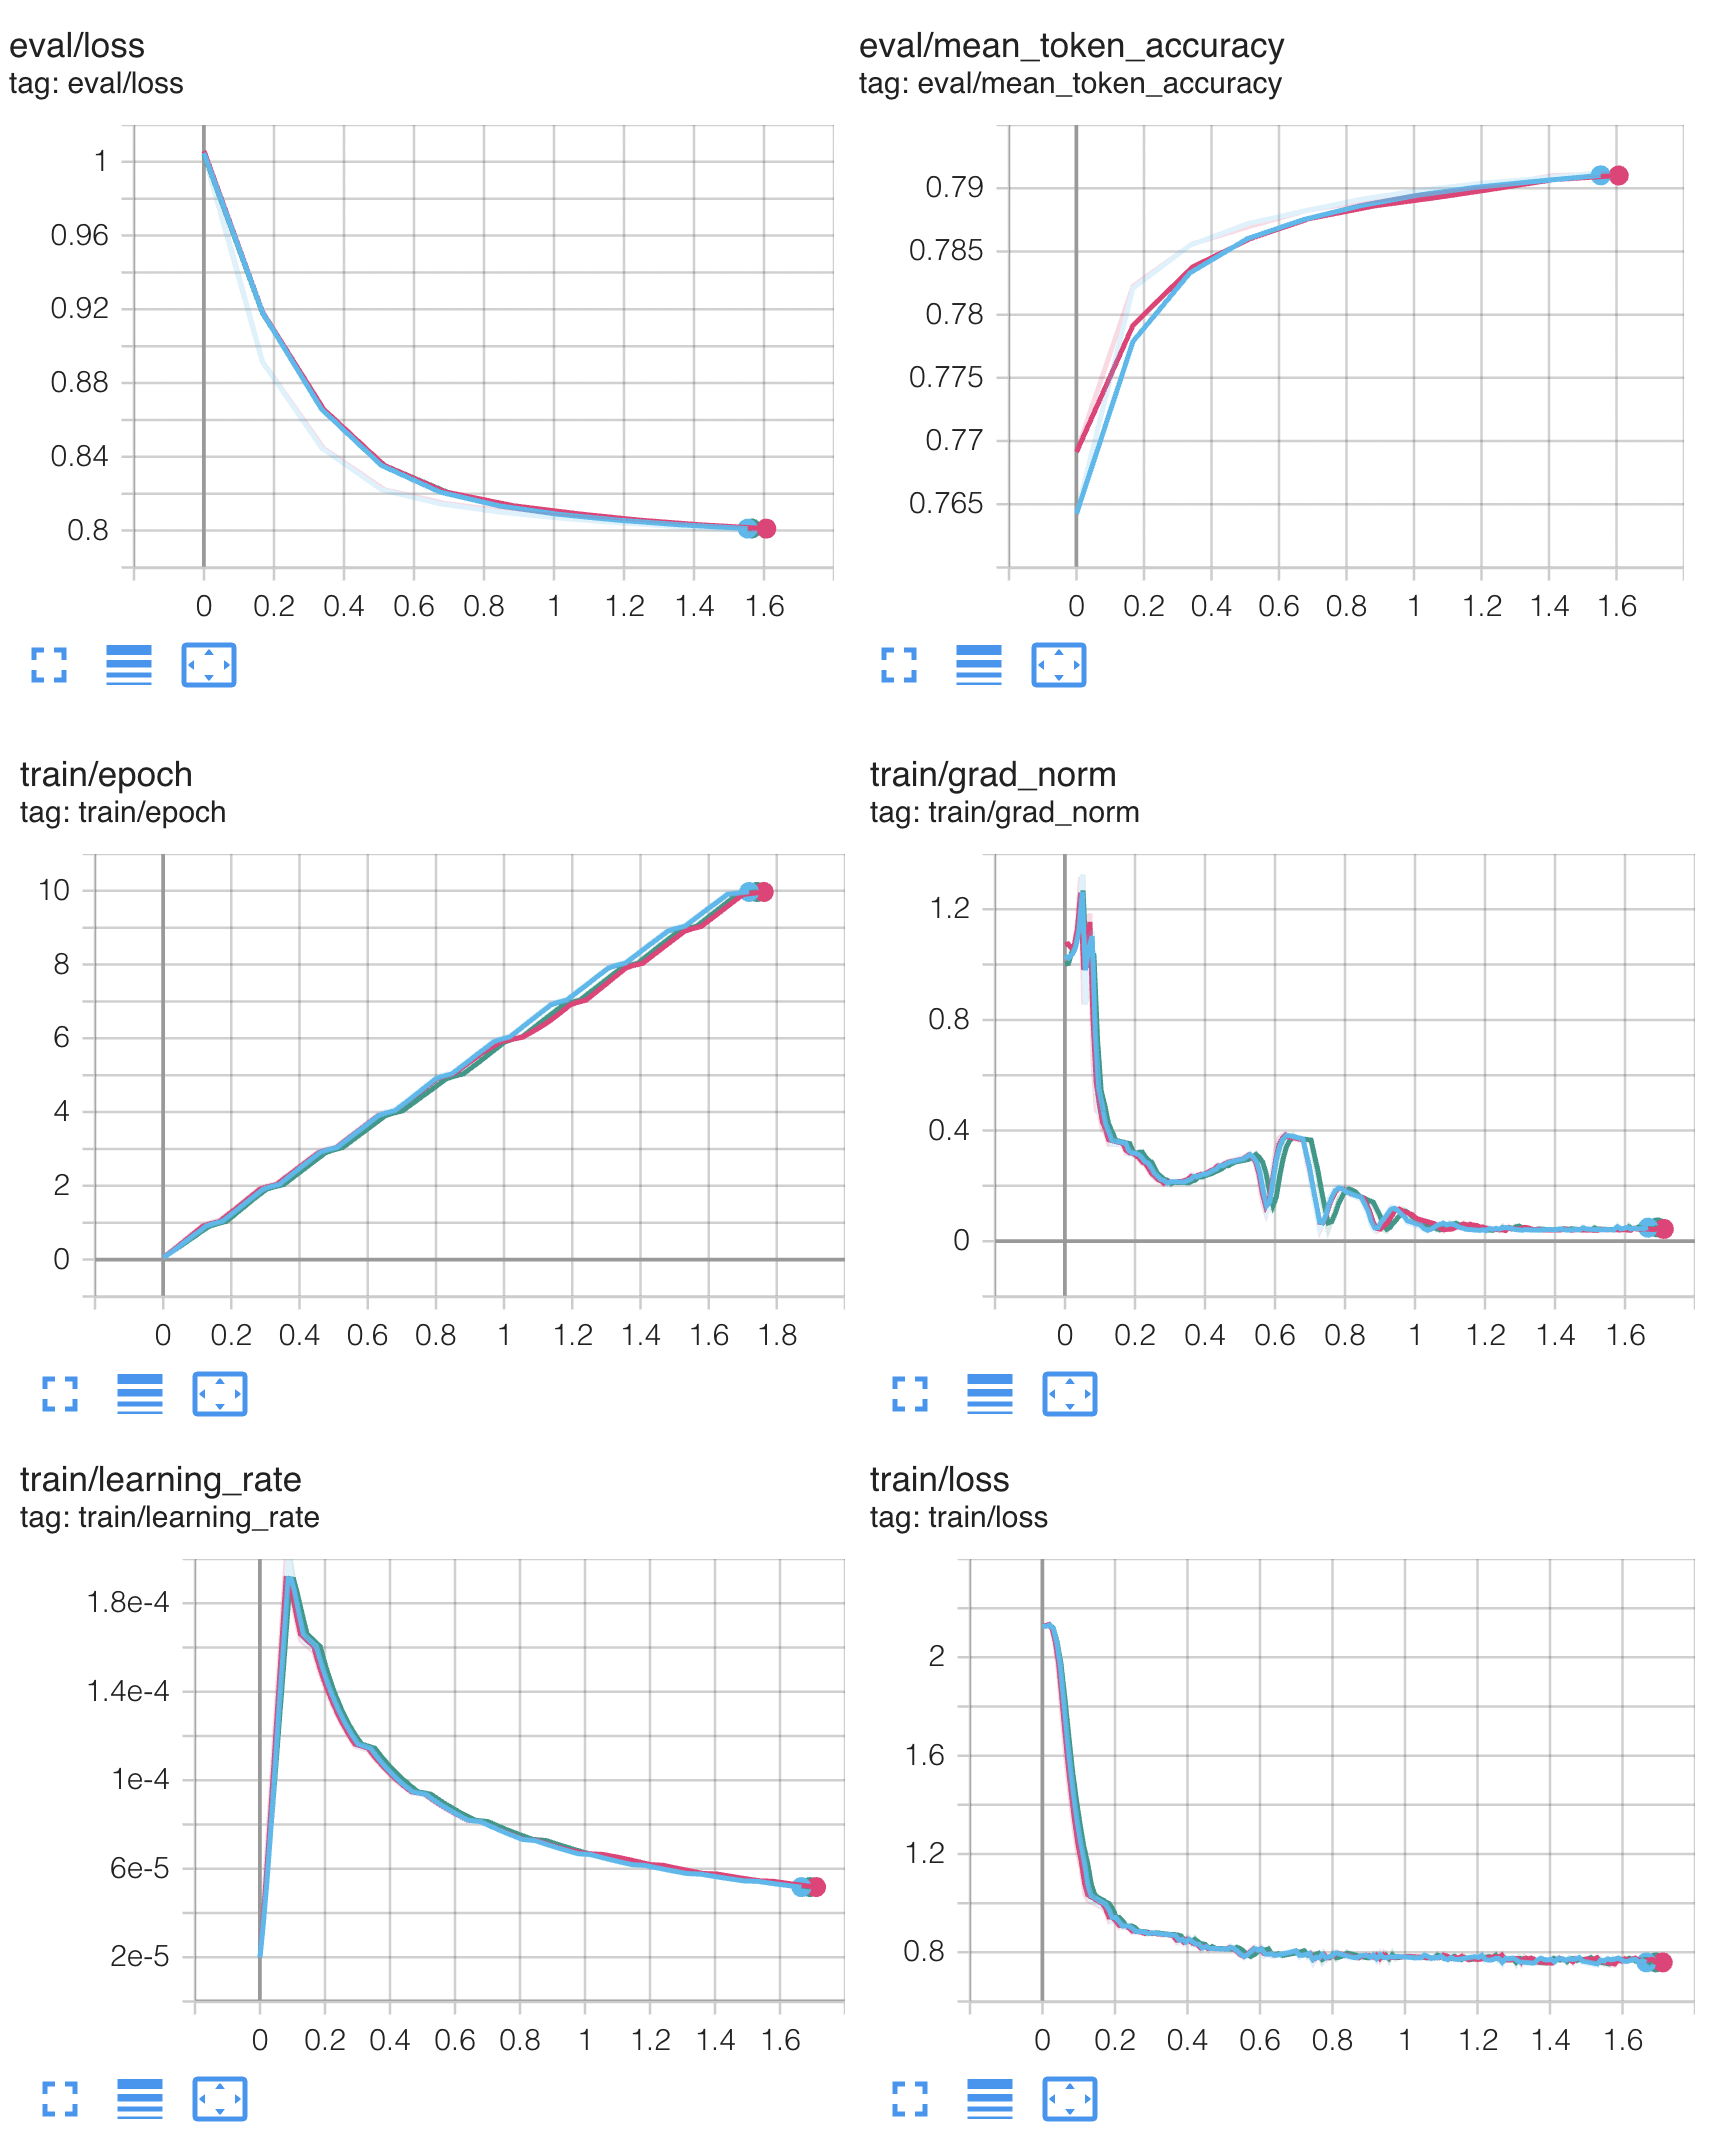
It confirms FlashAttention and Liger Kernel are numerically correct and do not introduce any approximations during computation. However, it does not demonstrate the expected speed-up.
From the GPU memory usage standpoint, Figure 13 shows a 10% memory consumption reduction with FlashAttention and almost 50% with Liger Kernel, which is quite impressive. This means half of the GPUs can be spared to achieve the same result!

The fact that there is no speed-up might indicate there is a bottleneck somewhere else that's not compute-bound.
PyTorch Fully Sharded Data Parallel (FSDP) distributes the training by sharding the model parameters across the GPUs. Sharding, however, induces a significant communication overhead between the GPUs to carry the computation. For example, sharded weights are gathered on all GPUs before every layer forward and backward passes (or unit of layers to be more precise), and local gradients are reduced and scattered at the end of every mini-batch.
Depending on the size of the model and the number of GPUs, this can represent a peak traffic of multiple Gbit/s. This is confirmed by the receive / bandwidth metrics that you can access by navigating to to Observe → Dashboards → Kubernetes → Network from the OpenShift console (Figure 14 and 15).


In a standard environment, that volume of data has to transit via the host OVN network which hasn't been designed for such a use case, and significantly slows down the processing to the point where it becomes the bottleneck and prevents any other performance gain. You'll see in a follow-up article how NVIDIA GPUDirect RDMA in OpenShift AI can help you alleviate that bottleneck.
Test the fine-tuned model
Once you've run the fine-tuning job, you can run inferences from within the notebook if you attached an accelerator when you created it. You can start by testing the pre-trained model output; for example:
# Load the pre-trained model
pretrained_path = "/opt/app-root/src/shared/.cache/hub/models--Meta-Llama--Meta-Llama-3.1-8B-Instruct/snapshots/0e9e39f249a16976918f6564b8830bc894c89659/"
base_model = AutoModelForCausalLM.from_pretrained(
    pretrained_path,
    local_files_only=True,
    torch_dtype=torch.bfloat16,
).to("cuda")
# Test the pre-trained model
pipeline = transformers.pipeline(
    "text-generation",
    model=base_model,
    tokenizer=tokenizer,
    model_kwargs={"torch_dtype": torch.bfloat16},
    device_map="auto",
)
messages = [
    {
        "role": "user",
        "content": "Janet's ducks lay 16 eggs per day. She eats three for breakfast every morning and bakes muffins for her friends every day with four. She sells the remainder at the farmers' market daily for $2 per fresh duck egg. How much in dollars does she make every day at the farmers' market?",
    }
]
outputs = pipeline(messages, max_new_tokens=256, temperature = 0.01)
output = ""
for turn in outputs:
    for item in turn["generated_text"]:
        output += f"# {item['role']}\n\n{item['content']}\n\n"
display(Markdown(output))
If you've configured the fine-tuning job to use LoRA, you can then load the LoRA adapters, merge them into the pre-trained model, and re-run inferences as above to compare with the pre-trained model output:
# Merge the fine-tuned adapters into the base model
finetuned_path = "/opt/app-root/src/shared/Meta-Llama-3.1-8B-Instruct/checkpoint-300/"
model = PeftModel.from_pretrained(base_model, finetuned_path)
model = model.merge_and_unload()
Conclusion
This article walked you through the fine-tuning of LLMs using the Kubeflow Training Operator, PyTorch FSDP, and Hugging Face SFTTrainer. OpenShift AI is a very versatile AI/ML platform that covers many more use cases. It also covered the cross-vendor accelerator support and observability functionalities provided by OpenShift in partnership with accelerator vendors.
Finally, we highlighted how critical east-west GPU traffic is to distributed model training. A follow-up article will focus on that aspect and explain how NVIDIA GPUDirect RDMA enables high-performance direct GPU interconnect across multiple GPU-nodes so distributed model training can scale efficiently on OpenShift AI.
To learn more about OpenShift AI, visit red.ht/openshift_ai.
Check out the AI on OpenShift site for reusable patterns and recipes.
