The increasing adoption of short-lived credentials has enabled organizations to align with zero-trust principles and increase their overall security posture. As introduced in the first article, How short-lived credentials in Quay improve security, quay.io and the self-managed Red Hat Quay now support the generation of short-lived credentials to enable access to the registry. This feature opens the door to a wide range of options for managing integrations with Quay in a secure fashion.
In the previous article, we used a JSON Web Token (JWT) provided by the Red Hat build of Keycloak to invoke the /oauth2/federation API within Quay to generate a set of short-lived credentials. In this second article of our three-part series, we will demonstrate how to enable additional tools and methodologies to access Quay in a secure manner using short-lived credentials.
Enabling Quay robot account federation
To use the federation capability within Quay, a robot account must be available. A robot account can be created either within an organization (for example, "quay_federation") or in the account of an individual user. Within the organization or user account, select the Robot Accounts tab and click the Create robot account button. Enter "keyless" as the name of the robot and complete the remaining dialog options as desired to complete the robot account creation process.
In addition to a robot account needing to be available, federation can only be achieved interactively when using the Quay v2 user interface. This capability is enabled by default in quay.io. However, this feature may not be enabled within the self-managed Red Hat Quay. Consult the Red Hat Quay documentation for steps to enable this feature.
OpenShift service account token federation
A popular method for accessing external services within Red Hat OpenShift is to make use of service account federation. Once enabled (such as in the case of AWS Security Token Service (STS) or Azure Workload Identity), service account tokens are generated using an OpenID Connect (OIDC) provider configured within the target platform. When combined with the volume projection feature of service accounts, a JWT can be injected as a volume within a pod so that a workload can make use of the value. In addition, since OpenShift manages the lifecycle of the token, not only are the values short-lived, but a new token is generated automatically upon expiration time. We can make use of this feature to exchange the JWT provided by OpenShift for a set of Quay credentials.
To demonstrate this feature, you will need an OpenShift environment with service account federation enabled with the service account issuer referencing an external OIDC endpoint. If you are leveraging one of the aforementioned integrations in your OpenShift environment, you are all set to go. If you do not have an OpenShift environment where this feature is enabled, a good alternative is the Developer Sandbox, integrated with AWS STS.
In the following example, we will create a workload inside a cluster that hypothetically wants to communicate with a Quay registry. Instead of relying on static, long-lived credentials, we will enable it to use short-lived robot tokens from Quay. We will do this by giving the workload pod access to a token in the form of a simple text file in its local filesystem. The token is signed by an OIDC provider that the cluster has been configured with. The same OIDC provider will be configured inside Quay as a trusted issuer.
This constitutes a mutual trust, also referred to as "federation." This allows application logic inside the workload pod to use this token to authenticate to Quay and get a short-lived credential back in return. That credential token can then be used to communicate with and automate against Quay. The workload needs to request a new token from Quay regularly once the old one expires (we won’t cover this in the example, for brevity). This is more secure than a long-lived credential assigned to the pod (e.g., via an environment variable or ConfigMap) that, when leaked, can be used to wreak havoc by malicious actors without any time limit.
If you followed along with the previous article, the method discussed below essentially automates the first part of the article, where the token was created manually from within Red Hat build of Keycloak.
Once a suitable environment has been selected, authenticate to the cluster using the OpenShift command-line interface (CLI) and create a new namespace called quay-keyless that will contain resources to interact with Quay.
cat <<EOF | oc apply -f -
apiVersion: v1
kind: Namespace
metadata:
  name: quay-keyless
spec: {}
EOF
Note:
If you are running in the Developer Sandbox, a namespace will be provided for you. For each of the example manifests that will be provided, place the namespace field with the name of the namespace allocated for you.
Now, given that access to Quay will leverage service account federation, an OpenShift service account will need to be created in order for it to be federated with Quay. Create a dedicated service account called quay-keyless using the following command:
cat <<EOF | oc apply -f -
apiVersion: v1
kind: ServiceAccount
metadata:
  name: quay-keyless
  namespace: quay-keyless
EOF
Finally, create a simple workload deployment that can be used to exchange credentials with Quay:
cat <<EOF | oc apply -f -
apiVersion: apps/v1
kind: Deployment
metadata:
  name: quay-keyless
  namespace: quay-keyless
spec:
  replicas: 1
  selector:
    matchLabels:
      app: quay-keyless
  strategy:
    type: Recreate
  template:
    metadata:
      labels:
        app: quay-keyless
        deployment: quay-keyless
    spec:
      containers:
      - command:
        - /bin/bash
        - -c
        - |
          #!/bin/bash

          while true; do sleep 10; done
        image: registry.redhat.io/ubi9/skopeo:latest
        name: quay-keyless
        resources: {}
        volumeMounts:
        - mountPath: /var/run/secrets/tokens
          name: openshift-token
          readOnly: true
        - name: run-containers
          mountPath: /run/containers
      serviceAccountName: quay-keyless
      volumes:
      - name: openshift-token
        projected:
          defaultMode: 420
          sources:
          - serviceAccountToken:
              audience: openshift
              expirationSeconds: 7200
              path: openshift-token
      - name: run-containers
        emptyDir: {}
EOF
There are several properties of note within this deployment. First, the quay-keyless service account that was previously created is being used to run the workload as defined by the serviceAccountName property. Next, and most likely the most significant property of the deployment for this demonstration, is the projected service account token volume:
volumes:
- name: openshift-token
  projected:
    defaultMode: 420
    sources:
    - serviceAccountToken:
        audience: openshift
        expirationSeconds: 7200
        path: openshift-token
By specifying this property, the kubelet obtains a token from the kube-apiserver and mounts the value in a file referenced by the corresponding volume mount.
With all of the resources created within the cluster, let’s see how we can make use of these capabilities. Confirm that the workload pod was created successfully and is currently running:
oc get pods -n quay-keylessA result similar to the following should be returned:
NAME                            READY   STATUS    RESTARTS   AGE
quay-keyless-85f4c77d7f-cpqk2   1/1     Running   0          3h
Now that the workload has been confirmed to be running, obtain a remote shell session within the pod:
oc rsh -n quay-keyless deployment/quay-keylessWithin the workload pod, we can use the token that was injected by the projected service account token volume. The token is located in a file called openshift-token in the /var/run/secrets/tokens directory.
Confirm the file is present and contains a JWT:
cat /var/run/secrets/tokens/openshift-tokenNext, confirm that the token was obtained from an externally facing OIDC issuer and not the internal Kubernetes API server. This is important because Quay must be able to contact this endpoint in order to validate the token. Execute the following command to extract the OIDC issuer from the JWT:
cat /var/run/secrets/tokens/openshift-token | cut -d '.' -f 2 | sed 's/[^=]$/&==/' | base64 -d | python3 -c 'import json,sys;print(json.load(sys.stdin)["iss"])'If https://kubernetes.default.svc is the value that was returned from the prior command, the OpenShift environment being leveraged does not have the service account federation feature enabled and cannot be used for this purpose. Otherwise, take note of this value, as it will be used in subsequent steps.
The OIDC issuer is one of two values that Quay uses to verify a supplied JWT has rights to federate. The other value is the subject. In this case, the subject is the OpenShift service account. Obtain the subject from the JWT:
cat /var/run/secrets/tokens/openshift-token | cut -d '.' -f 2 | sed 's/[^=]$/&==/' | base64 -d | python3 -c 'import json,sys;print(json.load(sys.stdin)["sub"])'system:serviceaccount:quay-keyless:quay-keyless should be the value that is returned, as the subject takes the form system:serviceaccount:<namespace>:<name>, which aligns with how the namespace and the corresponding resources were configured.
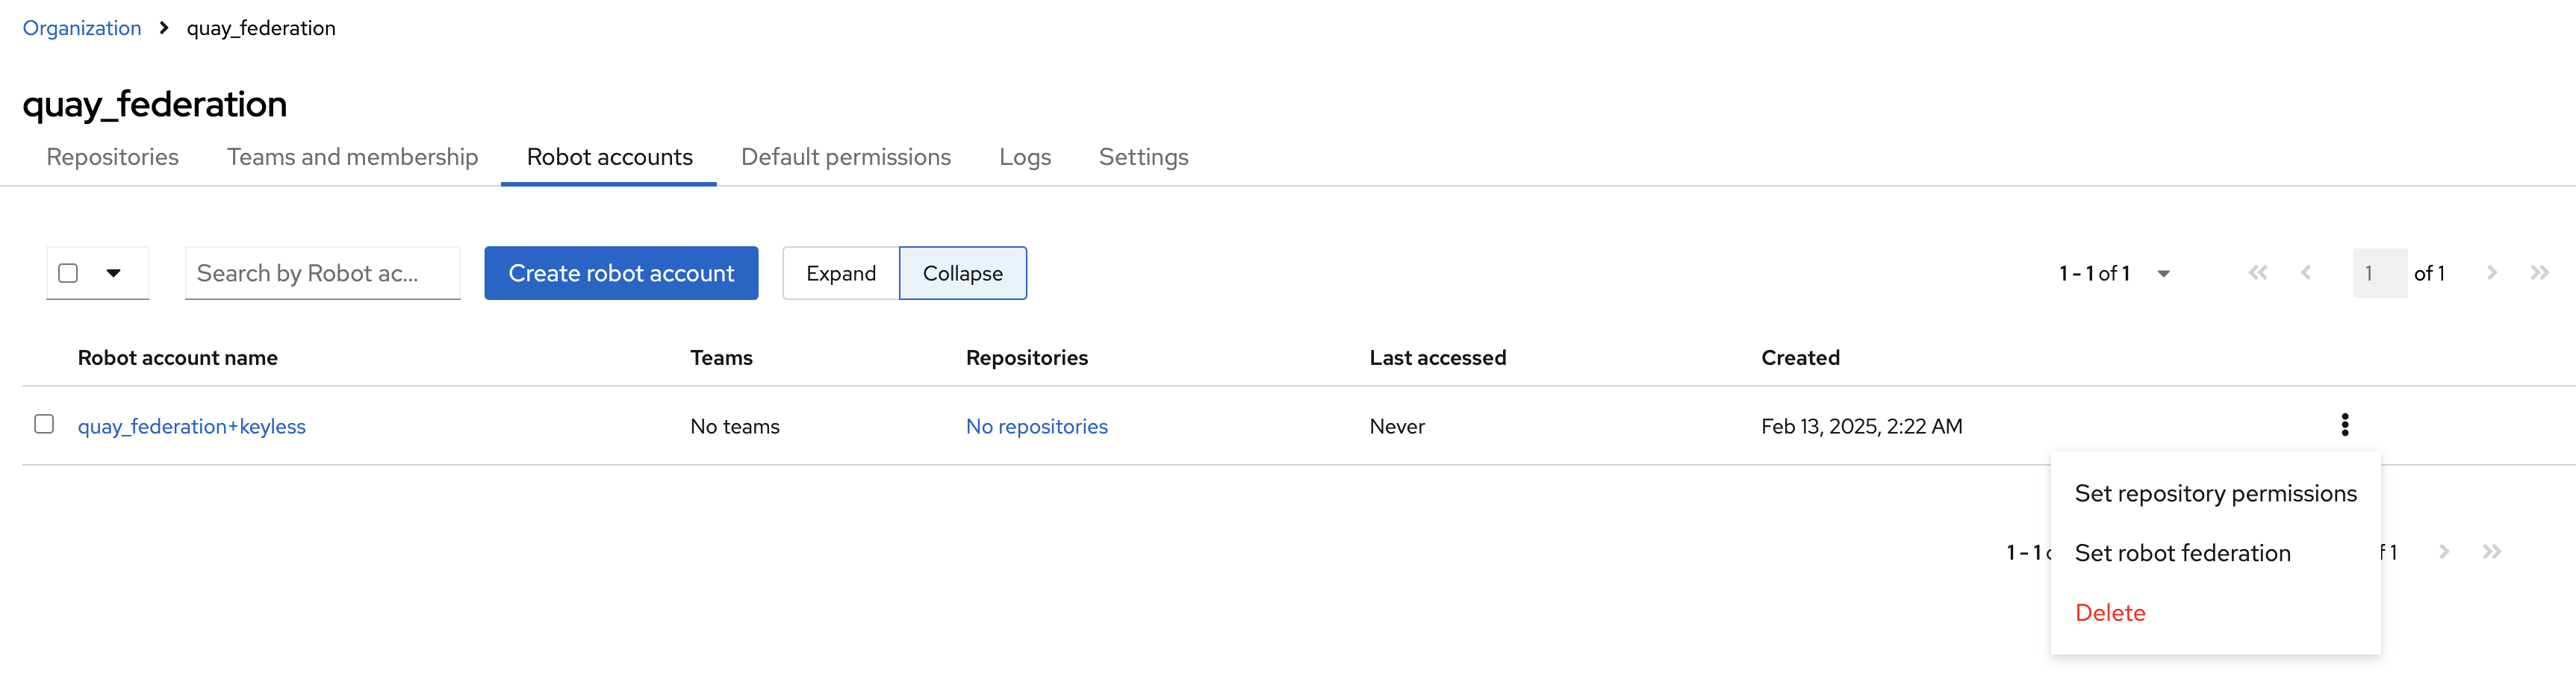
Now that the OIDC issuer and the subject have been obtained, these values can be associated with the Quay robot account in order for credentials to be exchanged. Return to the Quay instance and navigate to the Robot accounts tab where the keyless robot account that was previously created is located. Click the menu kebab next to the keyless robot account and select Set robot federation (Figure 1).
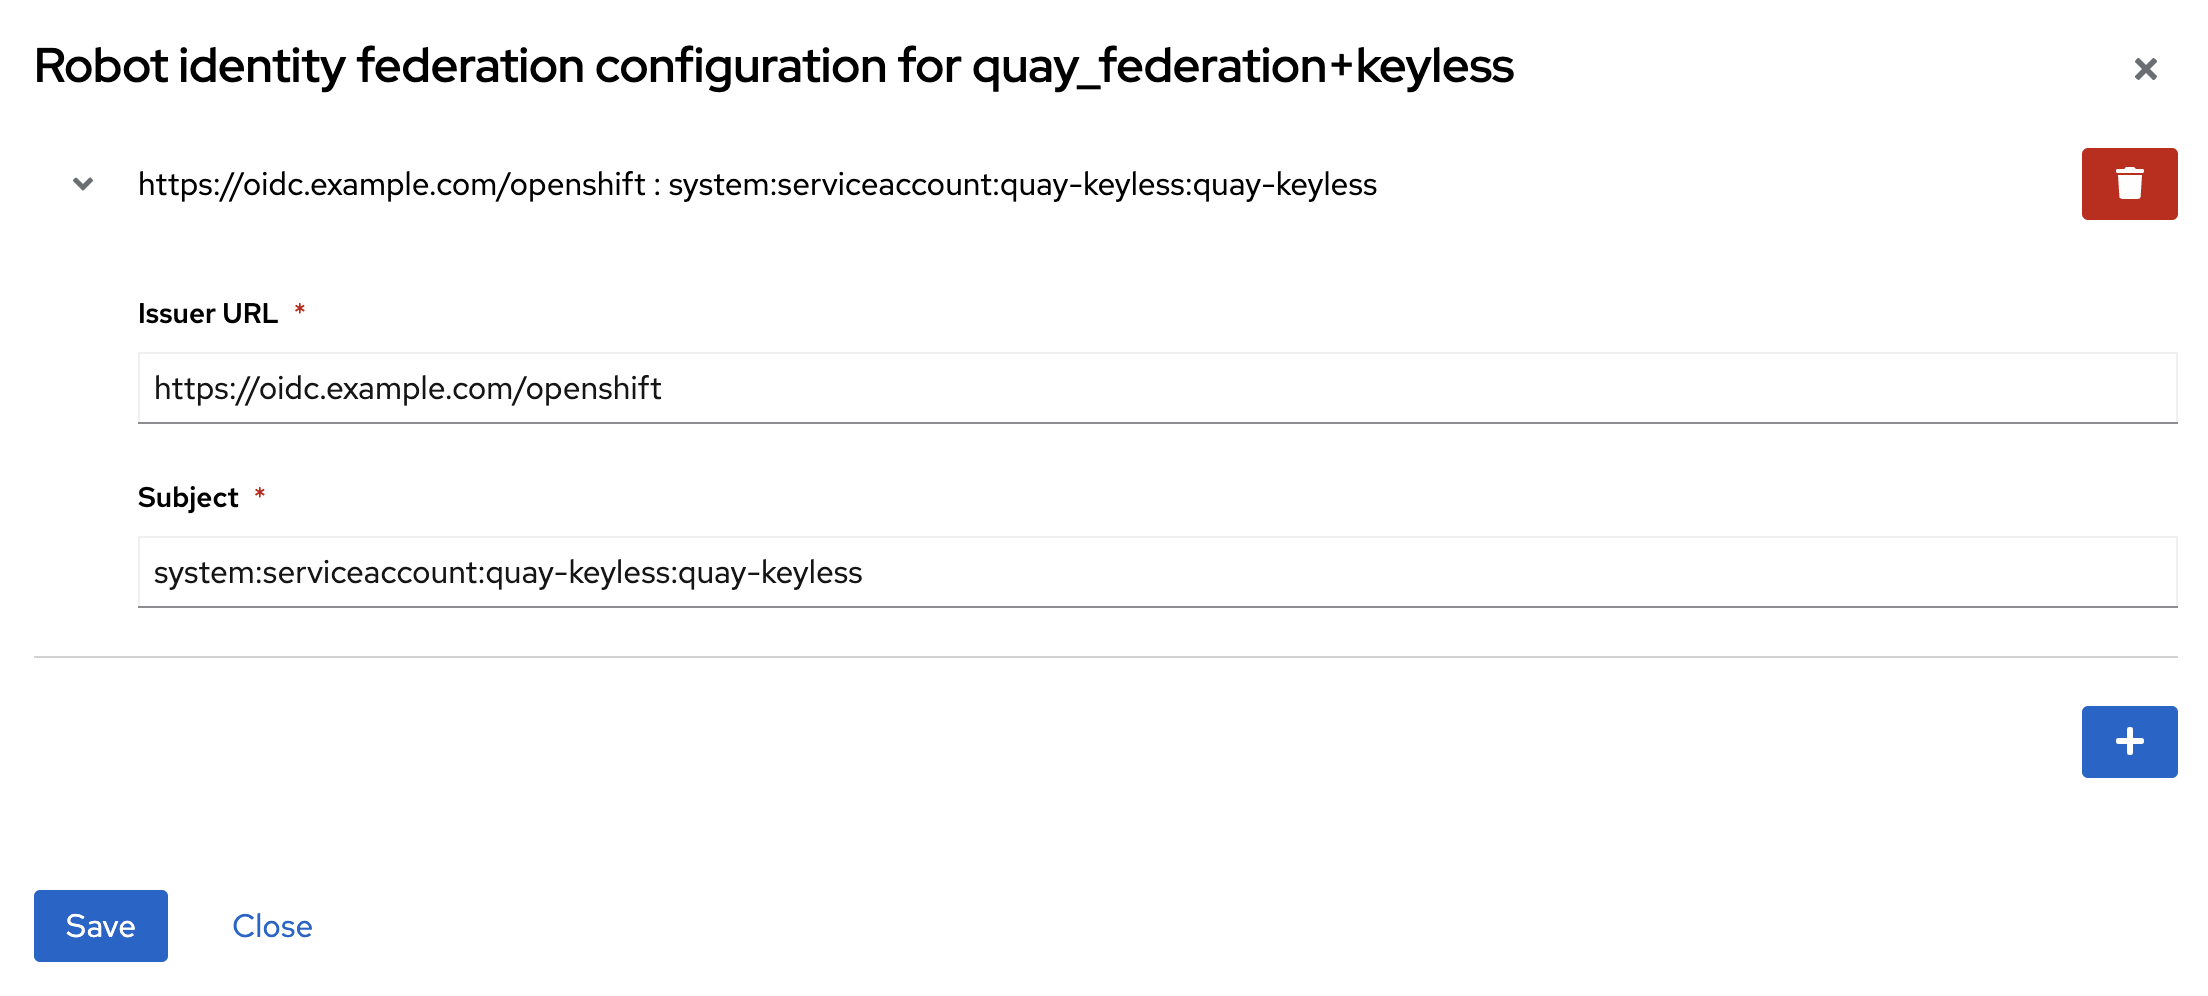
Click the plus (+) button and enter the OIDC Issuer and subject that was retrieved previously from the JWT within the pod. Click Save to apply the changes and then Close to minimize the dialog (Figure 2).
With the settings in Quay configured to enable robot account federation, return to the OpenShift command line and obtain a session in the quay-keyless deployment again if the prior session timed out so that we can verify the integration.
Once in the workload pod, set a few environment variables to simplify the commands that will be issued. First, set the QUAY_REGISTRY_HOSTNAME environment variable representing the hostname of the Quay registry instance. For example, if quay.io is the desired target instance, the value of the QUAY_REGISTRY_HOSTNAME variable would be quay.io:
export QUAY_REGISTRY_HOSTNAME=<quay_registry>Next, set the full name of the robot account in a variable called ROBOT_ACCOUNT. The full name of a robot account is represented by the organization for which the robot account is part of and the name of the robot account, separated by a plus (+) sign. For the robot account previously created, the full name is <organization>+keyless:
export ROBOT_ACCOUNT=<full_robot_account_name>To avoid an overly verbose command when invoking Quay, set the JWT_TOKEN_CMD environment variable to represent the command that is used to obtain the JWT:
export JWT_TOKEN_CMD="cat /var/run/secrets/tokens/openshift-token"Now, execute the credential exchange by invoking the /oauth2/federation/robot/token Quay endpoint and passing in the name of the robot account and the contents of the JWT into the curl command and setting the output within an environment variable called QUAY_TOKEN:
QUAY_TOKEN=$(curl -s --user ${ROBOT_ACCOUNT}:$($JWT_TOKEN_CMD) https://${QUAY_REGISTRY_HOSTNAME}/oauth2/federation/robot/token | python3 -c 'import json,sys;print(json.load(sys.stdin)["token"])')Inspect the contents of the QUAY_TOKEN environment variable to confirm it contains the JWT enabling access to Quay resources:
echo $QUAY_TOKENThe combination of the robot account and the token obtained from the federation endpoint can be used to gain access to protected resources, such as a private repository within Quay. The application inside the workload pod can now leverage this token to interact with Quay. It is also responsible for regularly refreshing this token from Quay, either when it expires or when the projected token issued from the Kubernetes API server is rotated.
Note that the Kubernetes API server rotates projected tokens in place, meaning that the application inside the workload pod must reread the token from the path (/var/run/secrets/tokens/openshift-token in our example) once it has expired. As a result, the application must routinely reread the token so that it ensures that it leverages the most up-to-date value.
The workload pod is leveraging an image containing the skopeo binary which can be used to interact with the remote Quay registry to perform operations such as listing tags, inspecting manifests, and copying content. Log in to the Quay instance using the credentials retrieved previously:
skopeo login --username ${ROBOT_ACCOUNT} --password ${QUAY_TOKEN} ${QUAY_REGISTRY_HOSTNAME}A Login Succeeded! message indicates skopeo was able to authenticate to Quay successfully.
Federated robot account credentials are valid for 1 hour. Since the returned token from Quay is a JWT itself, the expiration time can be found in the exp token claim.
By leveraging a JWT as an identity from a projected service account token issued from an issuer Quay trusts, we were able to perform an exchange to obtain a set of short-lived credentials from the Quay API endpoint. This credential can be used to access resources in Quay and follows best practices, since it is time-limited and its permission scope is limited to the permissions associated with the robot account (least privilege principle).
SPIFFE/SPIRE
While OpenShift service account federation provides an integrated method for supplying an identity to a workload, one of the biggest drawbacks is that it is not available in all environments, such as an on-premise OpenShift cluster. An alternate solution that does support workload identity capabilities and can be used in public and private cloud environments is SPIFFE (Secure Production Identity Framework for Everyone) and its corresponding implementation SPIRE (The SPIFFE Runtime Environment). Similar to service account federation, an identity can be obtained from SPIRE and exchanged for a set of Quay credentials. While SPIRE supports the use of X.509 certificate-based identities, JWT-based identities will once be used to authenticate to Quay. Learn more about SPIFFE/SPIRE with an excellent overview of the use cases and how to get started.
SPIRE deployment
The installation of SPIRE to an OpenShift environment is facilitated by a Helm based deployment. Elevated privileges within the OpenShift environment are required in order to deploy SPIRE. As a result, the Developer Sandbox cannot be used.
First, set a variable called APP_DOMAIN that represents the apps domain of the cluster:
export APP_DOMAIN=apps.$(oc get dns cluster -o jsonpath='{ .spec.baseDomain }')Next, clone the upstream Helm chart repository to the local machine:
git clone https://github.com/spiffe/helm-charts-hardened.gitNow, deploy the SPIRE Custom Resource Definition chart:
helm upgrade --install --create-namespace -n spire-mgmt spire-crds helm-charts-hardened/charts/spire-crdsThen deploy the SPIRE chart:
helm upgrade --install --create-namespace -n spire-mgmt spire helm-charts-hardened/charts/spire -f install/spire/spire-helm-values.yaml --set global.spire.namespaces.create=true --set global.spire.trustDomain=$APP_DOMAIN --values helm-charts-hardened/examples/tornjak/values.yaml --values helm-charts-hardened/examples/tornjak/values-ingress.yaml --render-subchart-notes --debugAfter a few minutes, SPIRE will be deployed to OpenShift. Confirm the following commands return the expected results.
First, check the contents of the spire-server namespace:
oc -n spire-server get podsA successful result should return 3 running pods with all containers running and READY similar to the following:
NAME                                                    READY   STATUS    RESTARTS   AGE
spire-server-0                                          3/3     Running   0          9m17s
spire-spiffe-oidc-discovery-provider-7788f57c55-7zt7r   3/3     Running   0          9m17s
spire-tornjak-frontend-6bb4dc6d7c-b7kn7                 1/1     Running   0          9m17s
Then, check the contents of the spire-system namespace:
oc get daemonset -n spire-systemConfirm that both spire-agent and spire-spiffe-csi-driver DaemonSets are up and running:
NAME                      DESIRED   CURRENT   READY   UP-TO-DATE   AVAILABLE   NODE SELECTOR   AGE
spire-agent               3         3         3       3            3           <none>          21m
spire-spiffe-csi-driver   3         3         3       3            3           <none>          21m
Obtain Quay credentials using SPIRE identities
Now that SPIRE has been installed successfully, let’s update our workload deployment so that it can obtain an identity from SPIRE. Execute the following command to update the deployment:
oc patch -n quay-keyless deployment/quay-keyless --patch-file /dev/stdin <<EOF
{
  "spec": {
    "template": {
      "spec": {
        "containers": [
          {
            "command": [
              "/bin/bash",
              "-c",
              "#!/bin/bash\n\ncat << EOF > /opt/app-root/src/get-spiffe-token.py\n#!/opt/app-root/bin/python\n\nfrom spiffe import JwtSource\nimport argparse\n\n\nparser = argparse.ArgumentParser(description='Retrieve SPIFFE Token.')\nparser.add_argument(\"-a\", \"--audience\", help=\"The audience to include in the token\", default=\"openshift\")\nargs = parser.parse_args()\n\nwith JwtSource() as source:\n    jwt_svid = source.fetch_svid(audience={args.audience})\n    print(jwt_svid.token)\nEOF\n\nchmod +x /opt/app-root/src/get-spiffe-token.py\n\npip install spiffe\n\n# Add .ready File\ntouch /opt/app-root/src/.ready\n\nwhile true; do sleep 10; done\n"
            ],
            "env": [
              {
                "name": "SPIFFE_ENDPOINT_SOCKET",
                "value": "unix:///run/spire/sockets/spire-agent.sock"
              }
            ],
            "image": "registry.redhat.io/ubi9/python-311:latest",
            "name": "quay-keyless",
            "startupProbe": {
              "exec": {
                "command": [
                  "/bin/bash",
                  "-c",
                  "ls /opt/app-root/src/.ready"
                ]
              },
              "failureThreshold": 60,
              "periodSeconds": 10,
              "successThreshold": 1,
              "timeoutSeconds": 1
            },
            "volumeMounts": [
              {
                "mountPath": "/run/spire/sockets",
                "name": "spiffe-workload-api",
                "readOnly": true
              }
            ]
          }
        ],
        "volumes": [
          {
            "csi": {
              "driver": "csi.spiffe.io",
              "readOnly": true
            },
            "name": "spiffe-workload-api"
          }
        ]
      }
    }
  }
}
EOF
Wait for the updated deployment to roll out. Once the new pod becomes available and ready, obtain a remote shell session once again:
oc rsh -n quay-keyless deployment/quay-keylessThe updated deployment generated a script named get-spiffe-token.py which simplifies obtaining a JWT from the SPIRE workload API. The script is located in the /opt/app-root/src directory (default HOME directory where the remote session began).
Execute the script to retrieve the JWT from SPIRE:
/opt/app-root/src/get-spiffe-token.pyFor the SPIRE JWT to be used to exchange credentials with Quay, the OIDC issuer and subject must be extracted.
Execute the following command to obtain the OIDC issuer of the SPIRE OIDC discovery provider:
/opt/app-root/src/get-spiffe-token.py | cut -d '.' -f 2 | sed 's/[^=]$/&==/' | base64 -d | python -c 'import json,sys;print(json.load(sys.stdin)["iss"])'Now obtain the subject:
/opt/app-root/src/get-spiffe-token.py | cut -d '.' -f 2 | sed 's/[^=]$/&==/' | base64 -d | python -c 'import json,sys;print(json.load(sys.stdin)["sub"])'The value of the subject returned should be in the form spiffe://<trust_domain>/ns/quay-keyless/sa/quay-keyless as it includes the namespace the workload is deployed within and the service account that is used to run the workload.
With the OIDC issuer and subject obtained, return to the Quay instance and navigate to the Robot accounts tab where the keyless robot account that was previously created is located. Click the menu kebab next to the keyless robot account and select Set robot federation.
Click the plus (+) button to add an additional federation configuration by entering the OIDC issuer and subject that was obtained from the SPIRE JWT within the pod. Click Save to apply the changes and then Close to minimize the dialog.
Once again, we will repeat many of the same steps that were performed previously within the service account federation section. First, set the QUAY_REGISTRY_HOSTNAME environment variable representing the hostname of the Quay registry instance. For example, if quay.io is the desired target instance, the value of the QUAY_REGISTRY_HOSTNAME variable would be quay.io:
export QUAY_REGISTRY_HOSTNAME=<quay_registry>Next, set the full name of the robot account in a variable called ROBOT_ACCOUNT. The full name of a robot account is represented by the organization for which the robot account is part of and the name of the robot account, separated by a plus (+) sign. For the robot account previously created, the full name is <organization>+keyless:
export ROBOT_ACCOUNT=<full_robot_account_name>To avoid an overly verbose command when invoking Quay, set the JWT_TOKEN_CMD environment variable to represent the command that is used to obtain the JWT:
export JWT_TOKEN_CMD="/opt/app-root/src/get-spiffe-token.py"Now, execute the credential exchange by invoking the /oauth2/federation/robot/token Quay endpoint and passing in the name of the robot account and the contents of the JWT into the curl command and setting the output within an environment variable called QUAY_TOKEN:
QUAY_TOKEN=$(curl -s --user ${ROBOT_ACCOUNT}:$($JWT_TOKEN_CMD) https://${QUAY_REGISTRY_HOSTNAME}/oauth2/federation/robot/token | python -c 'import json,sys;print(json.load(sys.stdin)["token"])')Inspect the contents of the QUAY_TOKEN environment variable to confirm it contains the JWT enabling access to Quay resources:
echo $QUAY_TOKENThe presence of a JWT indicates that the integration was successful. By leveraging SPIFFE provided identities, we can simplify and secure access to resources within Quay across the hybrid cloud.
Summary
In this article, we explored two ways to assign workloads in pods on an OpenShift cluster with an identity to allow it to authenticate to Quay. We were able to use this identity to exchange a set of short-lived credentials for secure interaction with the Quay API. We did not need to embed classic, long-lived credentials to authenticate. This method works solely on the basis of identity in the form of a token signed by a trusted OIDC Issuer. In one instance, identity was given to the pod by the Kubernetes API server, which was configured with an external OIDC provider. In the other example, the token was obtained by communicating with SPIRE as the OIDC provider over a UNIX socket.
This dramatically reduces the attack surface to the cluster-internal network and nodes. Leveraging short-lived credentials also lowers the probability and impact of accidental leaks, for instance, by persisting them inadvertently in a Git repository. Even if a short-lived credential leaked, it could only be used for a limited amount of time before it automatically expires.
Both examples focused on workloads inside pods that want to communicate with a Quay registry. But the cluster infrastructure also communicates with container registries to check for new images, authenticate image pulls, or facilitate pushes. In the final installment of this series, we will focus on how we can enable the cluster to leverage short-lived credentials with Quay. Stay tuned for part 3 next week!
