Have you heard the buzz surrounding platform engineering and internal developer portals (IDP) but haven’t had the chance to try Backstage for yourself? Perhaps you were put off by the effort required to get Backstage running in your own Kubernetes environment, or maybe your rollout plans got derailed when it came to finding operators with the required skills and free time?
Well, fear not! In the next 10 minutes you’ll have your own instance of Backstage hosted on a Kubernetes cluster. Specifically, you’ll deploy Red Hat Developer Hub on Red Hat OpenShift. You can think of these as Red Hat’s enterprise distributions of Backstage and Kubernetes, respectively.
If you prefer to watch and follow along, the following video demonstrates the steps outlined in this article.
Why Red Hat Developer Hub?
Red Hat Developer Hub is an internal developer portal built on Backstage. Deploying and managing upstream Backstage on Kubernetes involves a lot of undifferentiated heavy lifting. Using a commercially supported distribution of Backstage (like Red Hat Developer Hub) enables you to focus on improving your developer experience, instead of wrangling with complex build processes, dependency updates, and worrying about plug-in support.
Without further ado, let’s get back on track and deploy Red Hat Developer Hub on Red Hat OpenShift from the Developer Sandbox for Red Hat OpenShift.
Log in to OpenShift from the Developer Sandbox
Note: This article assumes you’re using Red Hat OpenShift provided by the Developer Sandbox. You can follow along in your own Red Hat OpenShift environment if it’s version 4.13 or greater, if you prefer.
The Developer Sandbox for Red Hat OpenShift provides 30 days of free access to a hosted and managed instance of Red Hat OpenShift.
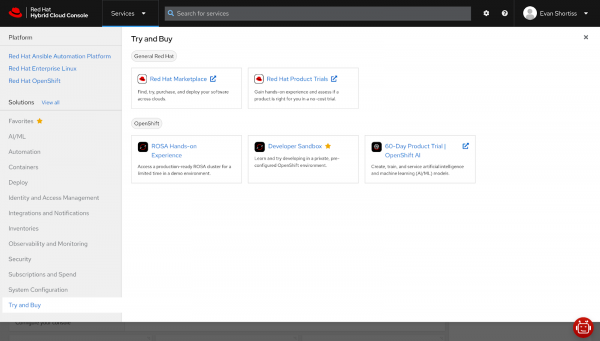
Accessing your OpenShift instance from the Developer Sandbox is as simple as logging in to console.redhat.com, expanding the Services list, and selecting the Developer Sandbox item under Try and Buy. Figure 1 shows the Developer Sandbox item in the Try and Buy section.
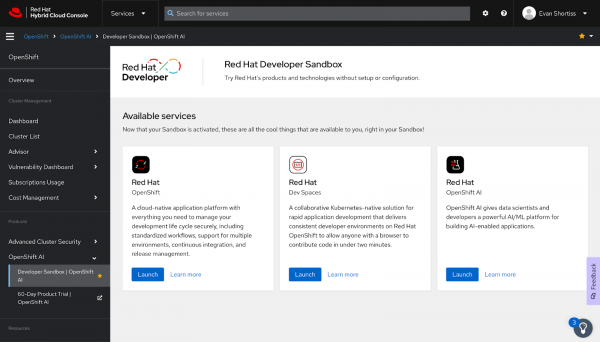
The Developer Sandbox includes access to Red Hat OpenShift, Red Hat OpenShift Dev Spaces, and Red Hat OpenShift AI. Click the Launch button on the Red Hat OpenShift item in your Developer Sandbox, as shown in Figure 2.
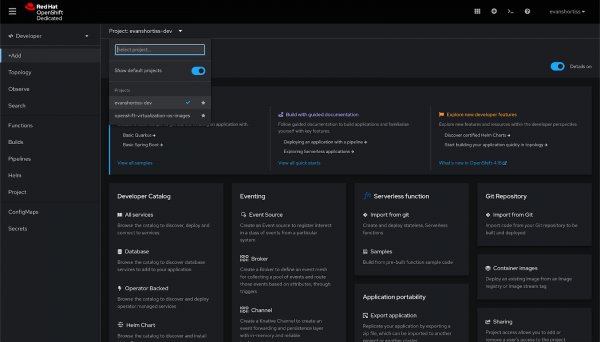
Once you’ve logged in to your Red Hat OpenShift environment, select the project that corresponds to your username—think of this as the Kubernetes namespace where you’ll deploy Red Hat Developer Hub. You can see my evanshortiss-dev project in Figure 3.
Deploy Red Hat Developer Hub using Helm
It’s possible to deploy and manage Red Hat Developer Hub using our Helm chart or Operator. In this section, we'll review the Helm chart approach.
Find the Helm chart
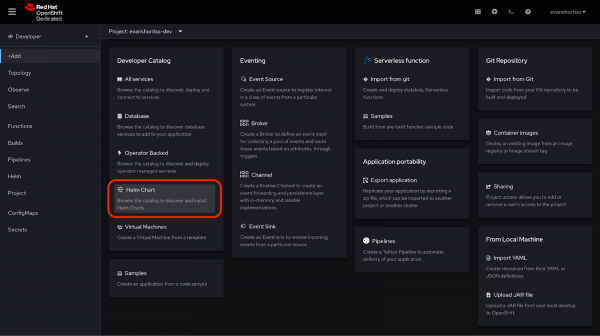
Get started by switching to the Developer Perspective in your OpenShift environment and clicking the +Add link. Scroll down and select the Helm Chart option on the Add screen, as seen in Figure 4.
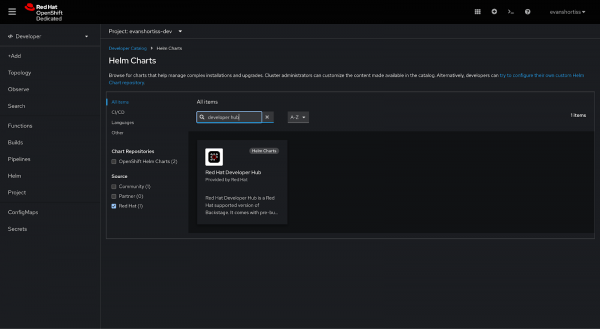
Enable the filter for Red Hat-sourced charts, then search for developer hub. Select the Red Hat Developer Hub chart from the filtered list of entries, and click Create. This is shown in Figure 5.
Configure routes and guest authentication
On the Create Helm Release screen, select a 1.3.x release in the Chart Version dropdown, then switch to the YAML View.
Edit the clusterRouterBase property to match the router base URL of your OpenShift environment. You can deduce this value by copying the hostname from the address bar in your web browser and removing the console-openshift-console prefix.
For example, if the URL in your web browser’s address bar is:
console-openshift-console.apps.sandbox-m3.1530.p1.openshiftapps.comYou need to set the clusterRouterBase to:
apps.sandbox-m3.1530.p1.openshiftapps.comNext, enable guest authentication for the Red Hat Developer Hub instance by adding the guest authentication provider under the appConfig.auth field in the YAML. Your configuration should look similar to this example:
upstream:
  backstage:
    appConfig:
      auth:
        providers:
          guest:
            dangerouslyAllowOutsideDevelopment: true
Note: The guest authentication provider is used for simplicity in this article. Configure an authentication provider as described in the Red Hat Developer Hub documentation when you’ve finished this article.
Click Create to deploy Red Hat Developer Hub using the Helm chart. You’ll be redirected to the Topology View for your project while the deployment progresses.
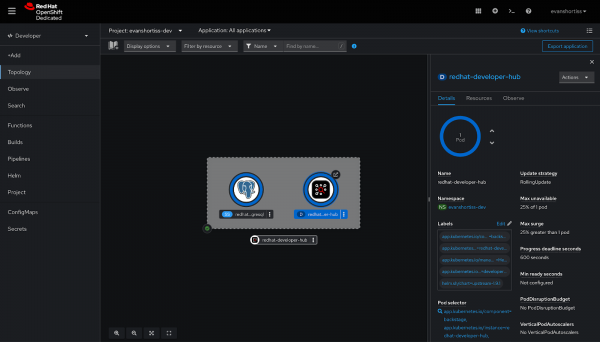
Once the deployment is complete, both the Postgres and Red Hat Developer Hub nodes in the Topology View will be surrounded by dark blue rings, as shown in Figure 6.
Log in to Red Hat Developer Hub
Use the Open URL icon on the redhat-developer-hub node in the Topology View to access your Backstage instance.
Two login options are presented: Guest and GitHub. Choose the Guest option, because you haven’t configured the GitHub Authentication provider—you’ll automatically be logged in as a guest user. Confirm this by visiting the Settings screen, as shown in Figure 7.

At this point you can explore a core feature of Backstage: the Software Catalog. Of course, you’ll find that it’s empty since you need to import your applications, components, APIs, users, groups, and more. These are known as Entities within the Software Catalog—you can learn more about importing entities in the Backstage documentation.
Conclusion
Congratulations! You have successfully deployed Red Hat Developer Hub on Red Hat OpenShift. Now that you have deployed an internal developer portal, it’s time to configure your preferred authentication provider, import your repositories to the Software Catalog (thus creating those Entities you learned about), and start configuring dynamic plug-ins to integrate with your organization’s tooling to make your IDP a single pane of glass for your developers.
