Image-based installation is a process that allows you to provision a single node OpenShift cluster using a pre-generated container image and configure the details per cluster in the second step. This contrasts with traditional, dynamic installation processes where configuration happens in one step during installation.
Image-based installation complements existing tools like GitOps Zero Touch Provisioning (ZTP) and the Agent-based Installer (ABI) by significantly boosting speed and the reproducibility of single node OpenShift cluster provisioning.
Image-based installation features
The motivation behind the image-based installation is the need for speed. In edge environments, the ability to add a new server or replace an old one much faster is critical. It reduces downtime, maintenance windows, and resource utilization. Image-based installation also enables repeatable installations at scale with consistency by leveraging a single container image to capture common configuration across all hosts.
The key features of image-based installation include:
- One installation image for multiple hosts: The installation image contains the common configuration across all hosts. This removes the need to install each host with a separate image, significantly shortens the installation time, and ensures consistent, repeatable installations at scale.
- Speed: It is 84% faster than other installation methods by shifting installation processes earlier in the workflow.
- Disconnected environments: By separating the installation and configuration steps, image-based installation is designed for environments without an active internet connection.
Faster single node OpenShift cluster installation
Our latest scale tests showed that image-based installation of a single node OpenShift cluster is 84% faster than ZTP. During these scale tests, over 3,500 single node OpenShift clusters were provisioned with nearly 100% success rate. An image-based installation of a single node OpenShift took 12 minutes, while ZTP took 74 minutes for the 99th percentile, using the specific hardware and network setup.
Image-based installation achieves its speed by shifting installation processes earlier in the workflow. It introduces an upfront preparation step shared across all hosts, making the process highly efficient as this effort is amortized across multiple installations. Image-based installation uses static, common configuration for the installation image, and it allows for dynamic host configuration during the deployment step. This contrasts with other installation methods where configuration is dynamically set up during the installation, offering a different balance between consistency and flexibility.
Under the hood: core components and concepts
Image-based installation leverages the following key technologies:
- Open Container Initiative (OCI) container image: The seed image, the common configuration across all hosts, is captured via a container image of approximately 1.2G in size.
- Lifecycle Agent (LCA) operator and command-line utility
lca-cli: The software that creates the seed image from an existing single node OpenShift cluster deploys the seed image on a new host and also applies all the distinct per-host configuration. - rpm-ostree and OSTree: The tools that manage snapshots of the operating system are bundled into the seed image and deploy the desired snapshot on the target host.
- recert: A tool that regenerates all cryptographic objects in a single node OpenShift cluster and customizes it according to user provided configuration.
- OpenShift Container Platform install options: The Red Hat OpenShift standard installation command-line tool, to which we have added a new image-based subcommand that creates the image-based installation artifacts (i.e., the installation and the configuration ISO images).
The end-to-end flow installation
Image-based installation consists of one preparation step that is common across all single node OpenShift provisionings and two steps per host (i.e., installation to disk and deployment), as shown in Figure 1. The preparation step captures the common configuration across all hosts and stores it to an OCI container image, which we call the seed image. The two steps per host are as follows:
Step 1: Installation to disk
Boot a temporary Red Hat Enterprise Linux CoreOS (RHCOS).
Extract the seed image to the filesystem.
Install the configuration found in the seed image to the target host.
Step 2: Deployment
Configure the distinct per single node OpenShift cluster details:
- Cluster name
- Base domain
- The default OpenShift kubeadmin user password.
- The kubeconfig file of the single node OpenShift cluster and others.

Provisioning single node OpenShift clusters
Users create the following artifacts when using the image-based installation to provision single node OpenShift clusters:
- Seed OCI image: The seed image is a container image that includes the common configuration and operating system files across all hosts and it is generated by the LCA operator and
lca-clion an existing single node OpenShift cluster. - Installation ISO: A customized RHCOS live ISO that contains the seed image and software that knows how to unpack it and provision the common configuration across all hosts. This is created via the OpenShift installer.
- Configuration ISO: An ISO image that includes the distinct per-host configuration. It is created via the installer or the image-based install operator when Red Hat Advanced Cluster Management for Kubernetes (RHACM) is used to scale your infrastructure. To simplify the demonstration of the image-based installation internals, we will not use the image-based install operator in this article.
How image-based installation works
Let's explore the phases of the installation.
Preparation
The goal of this step is to capture the common configuration across all hosts. This includes the target single node OpenShift environment and its configuration, both of which can be found in the filesystem. What if we could take a snapshot of a healthy cluster that's already running single node OpenShift with the desired configuration? We could then use this snapshot to rapidly provision multiple single node OpenShift clusters with identical configurations. That's exactly what the LCA operator and its lca-cli do. What better way to package the snapshot of an open source container orchestration platform than to use an OCI container image.
Generating the seed image
The seed image is an OCI container image built from scratch with a single layer containing a few files and is approximately 1.2G in size. The LCA operator, using its lca-cli, generates the seed image after ensuring that the cluster is healthy, OpenShift is stopped and all its TLS certificates are forcefully expired using recert. The contents of the seed image look like this:
$ ls -F1 /seed-image/
containers.list
etc.deletions
etc.tgz
lca-cli*
manifest.json
mco-currentconfig.json
ostree-a0c720aa9af355377ee4ee311a1cad89cd2827df7acec2f971a9e87995386828.0.origin
ostree.tgz
recert_config.json
rpm-ostree.json
var.tgz
These files play their part during an image-based installation, but what we basically have in there is an operating system along with a recording of its changes (ostree.tgz, etc.tgz, var.tgz), its last known status (rpm-ostree.json), and a command-line tool that knows how to deploy that operating system (lca-cli). That’s all we need to set up a copy of the seed single node OpenShift cluster on a new host.
Installation to disk
The installation to disk step sets up a copy of the seed single node OpenShift cluster provisioned on the target host using the seed image. But first things first: how do we get from a container image to a single node OpenShift cluster on an empty host? It would be useful to have a temporary environment from which we could mount the seed image and deploy the seed single node OpenShift onto the host’s disk. That’s what the installation ISO provides.
Installation ISO
An ISO image is a single file that contains an exact copy of an optical disc that can be mounted virtually as if it were a physical disk. The best part: it can be bootable, too. We already have such an ISO in the OpenShift ecosystem: the RHCOS live ISO. All we have to do is customize it via Ignition, and after it boots, it executes our installation flow.
You can create the installation ISO with the openshift-install image-based create image command, a feature released in the OpenShift installer with Red Hat OpenShift Container Platform 4.17.0. Take a look into the respective documentation on how to create an installation ISO with the installer. Keep in mind that you only need to create the installation ISO once for all the hosts with the same configuration.
Installation to disk flow
Let’s boot the installation ISO on one of the hosts and see what it actually does. Once the host is booted the image-based installation systemd unit will execute a bash script that does the following:
- Runs a container from the seed image.
- Copies the
lca-clibinary from that container. - Runs the
lca-cli ibisubcommand with a configuration file that was also included in the installation ISO.
The most important steps lca-cli ibi follows to install the seed cluster snapshot onto the new host are shown in Figure 2.

- Prepare the disk:
- Install the RHCOS version found in the RHCOS Live ISO on the disk.
- Mount the seed image to the filesystem to use its contents.
- Extract the OSTree repository (
ostree.tgz) from the seed image and use OSTree’s pull-local command to bring the seed cluster’s RHCOS OSTree repository’s data onto the current system’s OSTree repository.
- Configure OSTree:
- Create a new OSTree stateroot using the OSTree os-init command—that’s where it will deploy the seed cluster’s RHCOS snapshot.
- Deploy the OSTree commit indicated by
rpm-ostree.json. This is the output of therpm-ostreesystem status command in JSON format. Since the OSTree repository contains multiple commits, we need to know which one to actually deploy. - Copy the
ostree-<SHA256 hash>.originfile from the seed image to the proper filesystem location. OSTree uses that file to identify where its default root filesystem tree comes from. It can track the container image defined in the origin file for its future upgrades. - Extract
var.tgzandetc.tgzonto the filesystem, as those two are the only writable directories in an OSTree managed operating system. OSTree does not manage/var, as it contains runtime data, logs, caches, and other persistent data. On the other hand,/etcis managed by OSTree, and it contains a 3-way merge of the default read-only configuration under/usr/etc, the previous configuration, and the active system’s/etc.
- Final setup:
- Pull all the container images found in the seed image
container.listfile. - Execute an optional user-defined post installation script.
- Remove the default RHCOS OSTree deployment applied when installing RHCOS from the live ISO.
- Pull all the container images found in the seed image
A reboot is required for the OSTree staged deployment to take effect. After the reboot, early in the boot process, after the network comes online, another systemd unit, which we call post-pivot, takes over. We snuck the post-pivot systemd unit in the seed image (under /etc/systemd/system). It is responsible for the image-based installation final step, the deployment step.
Deployment
The goal of the deployment step is to have a new single node OpenShift cluster with most of its configuration matching the seed single node OpenShift cluster’s configuration. The remaining configuration is specific to the new cluster:
The cluster ID
Name and base domain
The host IP address and hostname
Any SSH keys and pull secrets to be added
New TLS certificates
The default OpenShift
kubeadminuser password andkubeconfigfile.
As in the installation-to-disk step, we can provide this configuration to the host using the configuration ISO image.
Configuration ISO
The configuration ISO is not a live ISO. The contents look like the following:
$ tree /mnt/image-based-config-iso
/mnt/image-based-config-iso
├── cluster-configuration
│   ├── manifest.json
└── extra-manifests
The manifest.json is a JSON-formatted file that contains the configuration applied by lca-cli and recert. You can create the configuration ISO with the openshift-install image-based create config-image command, the previously mentioned feature released in the installer with OpenShift Container Platform 4.17.0. Take a look at the documentation of how to create an image-based configuration ISO with the installer.
Authentication
The openshift-install image-based create config-image creates, alongside the configuration ISO, the default OpenShift kubeadmin user password and the kubeconfig file for the new cluster. Those can be found in the auth/{kubeadmin-password,kubeconfig} files respectively, just like in a regular OpenShift installation.
Deployment flow
The lca-cli post-pivot command, executed via the post-pivot systemd service, waits until the configuration ISO is mounted. It then configures the single node OpenShift cluster with its distinct details early during boot, before the kubelet starts. The most important steps it follows are depicted in Figure 3 alongside the recert flow.
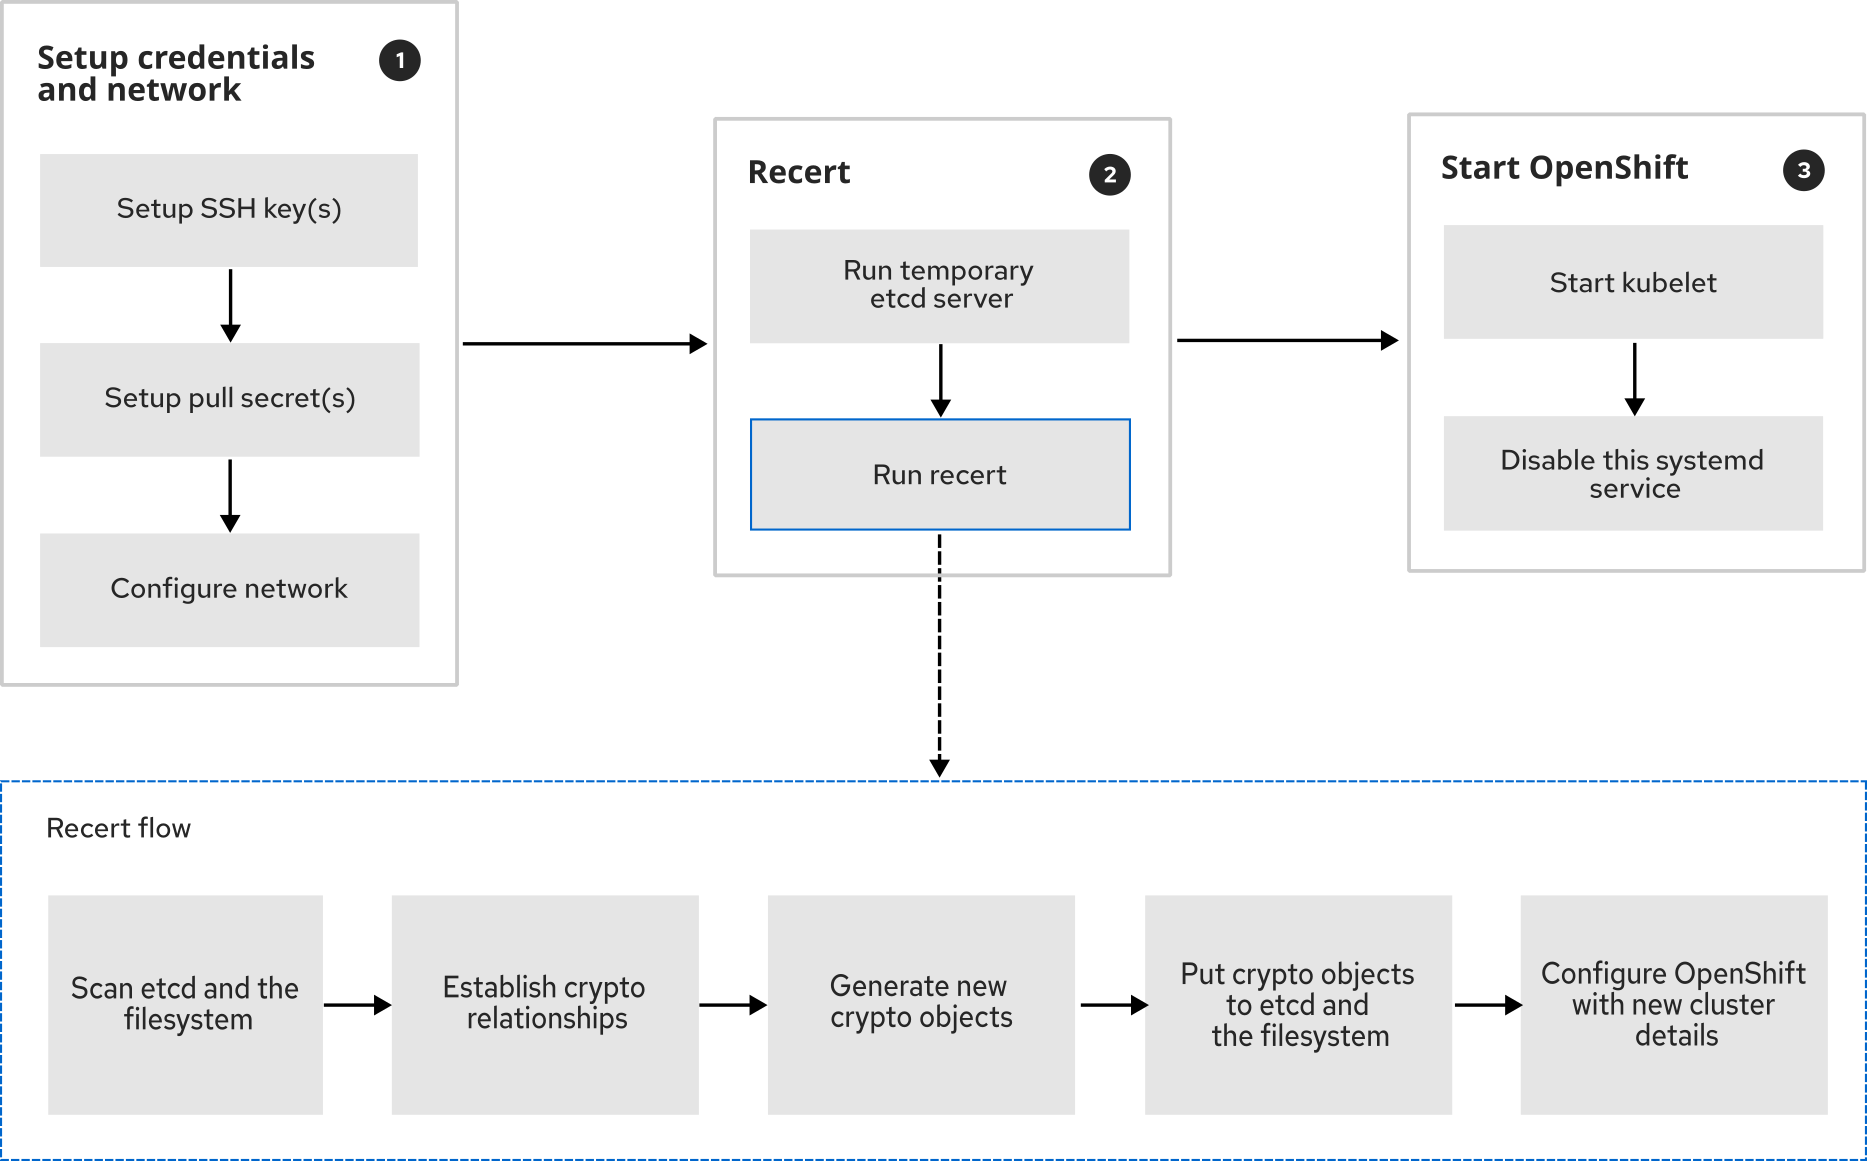
- Set up the host credentials and network:
- Set the SSH key(s).
- Set the pull secret(s).
- Configure the network.
recert- Set up a temporary etcd server, and
recertwill use that server to scan and update the etcd database. - Run
recert.
- Set up a temporary etcd server, and
- Start OpenShift Container Platform:
- Start
kubeletto execute all OpenShift containers. - Disable the
systemdpost-pivot service from which this flow runs.
- Start
The recert tool
The recert command-line interface tool is responsible for transforming a copy of the seed cluster to a new one by providing the following:
- Cryptographic object regeneration:
recertregenerates all the certificates, private keys, and JSON Web Tokens (JWTs) of the cluster. - Single node OpenShift cluster reconfiguration:
recertconfigures the copy of the seed cluster with a new cluster ID, new cluster name, new base domain, etc.
You can find cryptographic objects and Red Hat OpenShift configuration in the filesystem and in the etcd database. That’s why recert scans and writes into both. Learn more about how recert works in this documentation.
Note: The recert tool makes an effort to be FIPS 140-3 compliant by using the OpenSSL library of the underlying RHCOS for all its cryptographic operations. As long as that OpenSSL version is FIPS compliant, recert will also be FIPS compliant.
The other critical task of recert is reconfiguring the Red Hat OpenShift control-plane components in such a way that they don’t even realize that something has changed. This saves more than 8 minutes of trying to reconcile them during boot.
After recert, we have basically what we asked for, a new single node OpenShift cluster configured and ready to go in a matter of minutes.
Try image-based installation
Image-based installation drastically reduces the single node OpenShift installation time. By leveraging a single container image, image-based installation consistently deploys single node OpenShift clusters at scale. Try it yourself by following the documentation and tell us what you think.
