(Probably, a more accurate title would be "The Evolution of a Linux Container Developer")
Since .NET now runs on Linux (as well as Windows and macOS), the whole world of Linux containers and microservices has opened up to .NET developers. With a large pool of developers, a long track record of success, and performance numbers that are impressive, .NET offers a great opportunity to expand the world of Linux containers to formerly Windows-centric developers.
While it’s tempting to rush in -- and I am the first to say, “go for it” -- there are some nuances which should not be missed when running .NET code inside a Linux container. It’s far too easy to push some code into an image and be done. After all, everything happens so quickly, surely all is well. Right?
Not necessarily. While getting your .NET code to run in a Linux container is not a trivial event, there’s an old adage to remember: “Make it work first, then make it work fast”.
Fast, in our case, can refer to the time it takes to build the image, the time it takes to start the image, and the performance of the code inside the image. This two-part blog post will deal with the first two -- image build time and image start time. We’ll start by getting a simple .NET program to run in a container-based application and then watch the evolution of the image as it gets smaller, resulting in shorter build and load times.
Code optimization, on the other hand, is a whole other subject about which entire books have been written.
Lightning strikes ... and it’s alive!
Consider a very simple example microservice that simply gives a “Hello world”-type HTTP response. That is, you point your browser to the URL and get a very simple response, including the host name. With this simple example in mind, I logged into my Linux virtual machine (VM) and downloaded the code from this repo:
https://github.com/donschenck/dotnet_docker_msa.git
Like any developer new to a technology -- in this case Linux containers -- I wanted to get the application up and running as soon as possible. So I hastily crafted a Dockerfile (Dockerfile.attempt1 in the repo) and built the image with the following command:
docker build -t attempt1 -f Dockerfile.attempt1 .
Of course, I was excited when the build successfully finished, and even more thrilled when I was able to run the image in a container using this command:
docker run -d -p 5000:5000 --name attempt1 attempt1
I pointed my browser to the correct URL, which is the IP address of my VM, and voila!

The Numbers
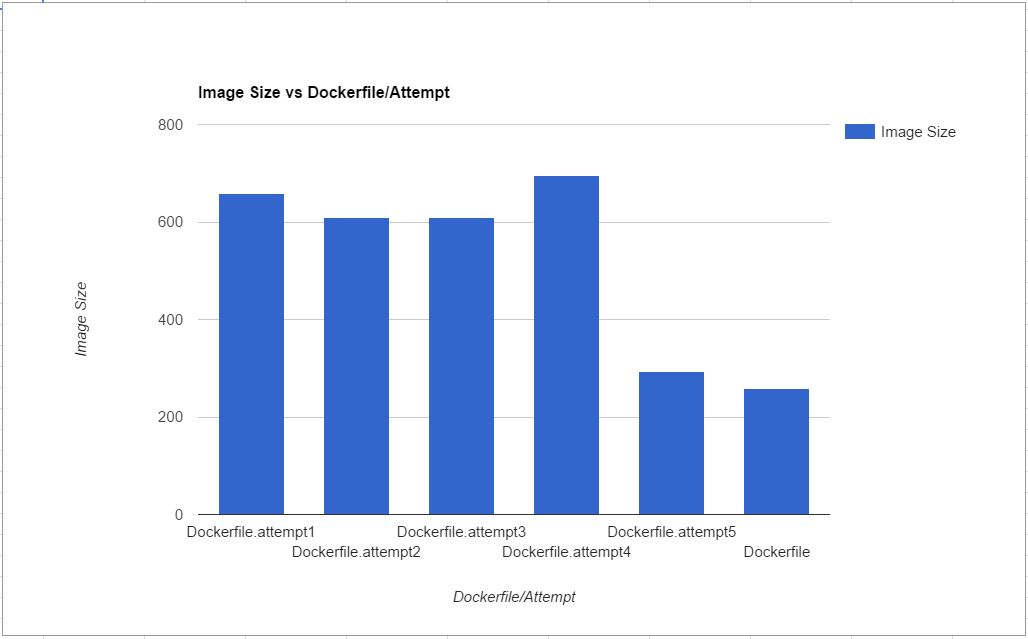
The first time I built the image, it took a whopping 95 seconds. Turns out it was downloading the entire Red Hat Enterprise Linux (RHEL) image with the .NET SDK installed, which weighs in at 490 MB. That also resulted in an image size of 659 MB.
To be fair, subsequent builds would be faster, since the docker-formatted container image was already now available on my machine. I altered the source code and ran the build again; this time it took roughly 50 seconds; they resulting image size was the same at 659 MB.
Image size matters. That's storage space being used on your machine, and while space is cheap, it's still a finite commodity. When working with containers on a regular basis, it's easy to forget about obsolete images that are just sitting around taking up space. You can fill up a disk rather quickly if you're not careful.
So, how to make this image smaller?
Removing Some Unneeded Parts
Adding one simple command-line option to the dotnet restore command helped. I used dotnet restore --no-cache (see Dockerfile.attempt2) to eliminate any caching and the image size dropped to 608.6 MB -- saving 50.6 MB, a savings of over seven percent. But I wasn't satisfied -- there had to be more.
Build the App before Building the Image
I realized that the application was building the .NET application every time I ran an image in a container. While this took about 1.6 seconds -- not a huge time sink -- nevertheless I felt it was a waste of time. By inserting the command dotnet build between the restore, and building the application before I built the container image, it would mean a much faster container start-up. This result is in Dockerfile.attempt3. This came at the cost of storage -- the image size went up to 610.2 MB. However, the dotnet build had to be run no matter what; we might as well spend that time now and benefit every time a container is started.
dotnet publish
Then the lights came on since the container is a runtime environment, why not use the dotnet publish command to publish the code before putting it into the image. If I did this, I wouldn't need .NET to be already installed in my container, after all, publish allows you to build a standalone (or "self-contained") application that can run anywhere. This is what dotnet publish is all about! This has to be a huge win in terms of images size and startup time.
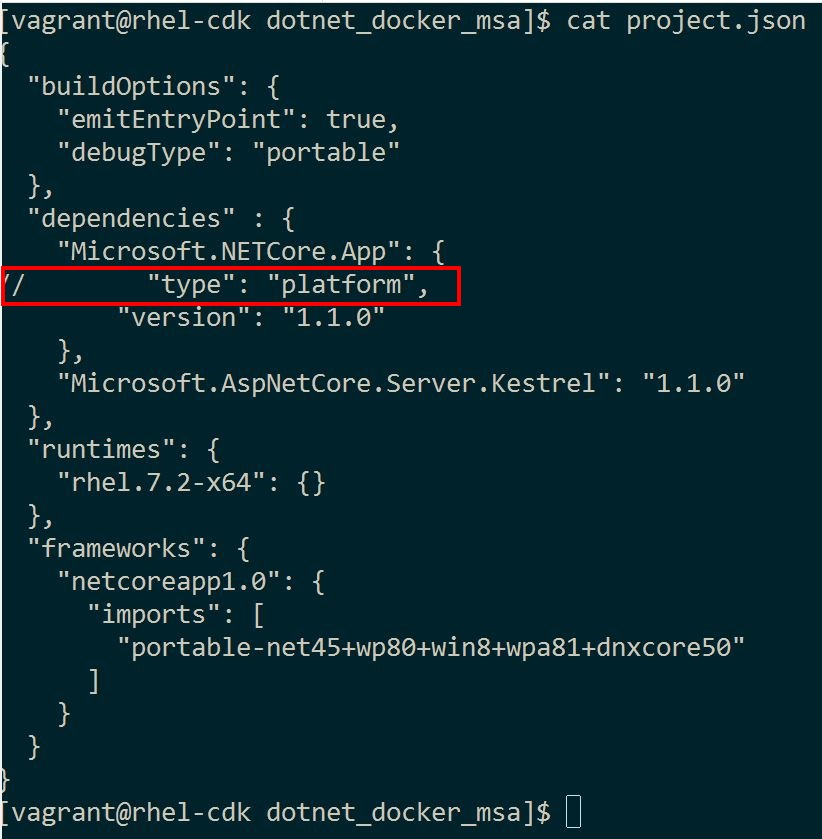
I had to alter the project.json file to support the publishing; I removed the line (commented it out, actually) that told the compiler to build for a platform. You can see it in this screenshot:

Next, I published the code by using the publish command, dotnet publish -c Release -r rheh.7.2-x64. This put all the compiled bits, including all necessary runtime bits, into a folder that I can copy into the image. It gets better: Because I don't need .NET installed, I can use a base image that is just plain RHEL without .NET on it; this will definitely save some space!
To install the bits into the image, I used the following Dockerfile (Dockerfile.attempt4 in the repo):
FROM registry.access.redhat.com/rhel7
RUN yum install -y libunwind
RUN yum install -y libicu
ADD bin/Release/netcoreapp1.0/rhel.7.2-x64/publish/. /opt/app-root/src/
WORKDIR /opt/app-root/src/
EXPOSE 5000
CMD ["/bin/bash", "-c", "/opt/app-root/src/dotnet_docker_msa"]
Note that the two yum install commands will install some prerequisites that .NET on RHEL needs; there is no way around this. But hey, ... no big deal. I ran the docker build, and the resulting image size.
694.6 MB! WHAT HAPPENED?
Who Needs Cache?
Turns out, the two yum install instructions are also building caches for future yum install commands. So if I clear out the caches immediately after each command, I should be fine. Here's the fifth iteration of my Dockerfile, Dockerfile.attempt5
:
FROM registry.access.redhat.com/rhel7
RUN yum install -y libunwind && yum clean all
RUN yum install -y libicu && yum clean all
ADD bin/Release/netcoreapp1.0/rhel.7.2-x64/publish/. /opt/app-root/src/
WORKDIR /opt/app-root/src/
EXPOSE 5000
CMD ["/bin/bash", "-c", "/opt/app-root/src/dotnet_docker_msa"]
Running docker build against this Dockerfile results in an image size of... drumroll, please...
293.7 MB. That's over 55 percent smaller than the first attempt.
Stacking Commands Instead of Cups
My final change, reflected in the file Dockerfile, was to stack the yum install commands, as follows:
FROM registry.access.redhat.com/rhel7
RUN yum install -y libunwind libicu && yum clean all
ADD bin/Release/netcoreapp1.0/rhel.7.2-x64/publish/. /opt/app-root/src/
WORKDIR /opt/app-root/src/
EXPOSE 5000
CMD ["/bin/bash", "-c", "/opt/app-root/src/dotnet_docker_msa"]
The resulting image weighs in at 257.5 MB, down over 60 percent from my first attempt. To refresh your memory, this tells the story:

Summary
As we explore new technologies and patterns, we must be careful to not confuse our early results with our best efforts or practices. While early success brings excitement and encouragement, it can also blind us to progress. Be diligent, keep experimenting, and always be open to suggestions for improvement.
Last updated: September 3, 2019
