Kubernetes Operators reduce the work of human operators or site reliability engineers. Rather than a half-baked definition, I refer you to this original definition from the creators of the Kubernetes Operator Framework: Operators are Kubernetes applications.
When I started building Operators with the operator-sdk I discovered several unknowns that were difficult to address. I decided to create a guided introduction to the Kubernetes Operator SDK.
Hang on tight.
Note: For a more recent version of this article, see Build a Kubernetes Operator in six steps.
Getting started with Kubernetes Operators
Developers use the Kubernetes Operator SDK to make and deploy complex applications in Kubernetes. In this article, for the sake of brevity and understanding, we will create a simple, namespace-scoped Operator in Golang. We will build a deployment and set up a service. We'll also create a custom controller reconciliation loop that will watch over our deployed resources.
The prerequisites for this guided journey are as follows:
- Be familiar with any programming language, though knowledge of Golang will be helpful for this example.
- Have Minikube installed in your development environment
Set up your environment
We will start by installing the utilities we need to build the Operator.
Set up Golang
We will use Golang to build the Operator. Install Golang, and then configure the following environment settings, as well as any other settings that you prefer:
$GOPATH=/your/preferred/path/
$GO111MODULE=on
Next, verify the installation:
# Verify
$ go version
go version go1.13.3 linux/amd64
Set up the SDK
We will use the Kubernetes Operator SDK to build our Operator. Install the Operator SDK, then verify the installation:
# Verify
$ operator-sdk version
operator-sdk version: "v0.17.0", commit: "2fd7019f856cdb6f6618e2c3c80d15c3c79d1b6c", kubernetes version: "unknown", go version: "go1.13.10 linux/amd64"
Build the Operator
In this section, we'll build the Operator. After each instruction, I will share the file tree for the example so far. Please verify the file tree at each step to ensure that you are in sync with the example.
Generate the example application code
Head over to $GOPATH/src/operators and run:
$ operator-sdk new hello-operator
This command generates the boilerplate code for our example application. The default Operator type is GO.
At this point, your file tree should look like this.
Add a custom resource definition
We use custom resource definitions (CRDs) to introduce custom resources that are understandable by k8s deployments. The CRD for this example is as follows:
$ operator-sdk add api --api-version=example.com/v1alpha1 --kind=Traveller
Note that we use api-versionto connect to the example application's namespace Operator. The format is group/version. The kind definition refers to custom kind for the application example. It will be used by the custom resources (CRs) that we create next.
Your file tree should now look like this.
Update the custom resources
Specifications (specs) are like hardcoded configuration values, also known as the desired state of the cluster. In order to create the specs for this example, we will edit the custom resources in two files.
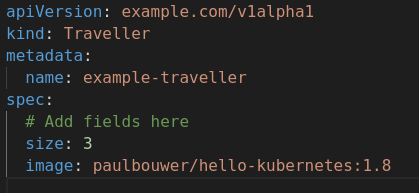
Update example.com_v1alpha1_traveller_cr.yaml
In this file, we can add any custom values that we might need for our controller function. Here, we will add the Hello Kubernetes image created by Paul Bouwer. Figure 1 shows the updated file, which you can find at deploy > crds > example.com_v1alpha1_traveller_cr.yaml.

Figure 1: Add custom values for the controller function.">
Update traveller_types.go
We use this file to bring custom values to the controllers. The variables are case sensitive, so keep the title case for all variables. For example:
{Variable} {type} {json:"name in *_cr.yaml" }
Figure 2 shows the updates to bring custom values to the controllers. This file should be in pkg > apis > example > v1aplha1 > traveller_types.go.

To update the generated code for the given resource type, run the following:
$ operator-sdk generate k8s
After each edit in *_types.go, you must update the CRD to add Open API validations against the newly introduced values. This process is completely automated, simply by entering the following command:
$ operator-sdk generate crds
You should now see this diff.
Add the controller
Controllers define the reconciliation logic and the cluster resources to watch. Any change in a resource that is being watched triggers a reconciliation in the controller. Here is the command to add the controller to your Operator SDK:
>$ operator-sdk add controller --api-version=example.com/v1alpha1 --kind=Traveller
As always, verify the code diff before moving on.
We added the controller with default settings, namely the default APIs, role-based access control (RBAC), and service accounts. Next, we will add the custom logic for creating the application deployment and services. Whatever logic we write should be idempotent.
Add custom logic to the Operator SDK
We will add five custom functions to the Operator SDK:
- backendDeployment: Deploys the pod and exposes it at port 8080.
- backendService: Creates a new back-end service for the exposed port.
- ensureDeployment: Ensures the presence of a deployment in the given namespace. Otherwise, it creates a deployment by calling
1. - ensureService: Ensures the back-end service is present and running in the given namespace. Otherwise, it creates the service by calling
2. - labels: Sets the labels on the deployment and pods.
Change the reconcile function to trigger the newly defined functions.
Your code diff should now look like this.
Test the Operator locally
We are done adding our custom logic and building up the functionality. Now, we will test the Operator locally:
# Please deploy in Sequence only
$ kubectl apply -f deploy/role.yaml
$ kubectl apply -f deploy/service_account.yaml
$ kubectl apply -f deploy/role_binding.yaml
$ kubectl apply -f deploy/crds/example.com_travellers_crd.yaml
$ kubectl apply -f deploy/crds/*_cr.yaml
Assuming that all of the above artifacts deploy successfully, we can run the Operator locally:
$ operator-sdk run up --local
This command should start up the Operator. Make sure that all of the custom resources are deployed by checking them against the namespace. For brevity, we're using the default namespace:
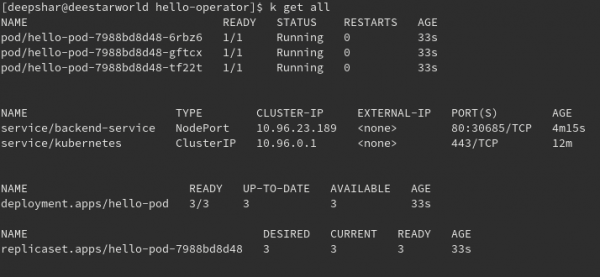
$ kubectl get all
The results are shown in Figure 3 where k is an alias for kubectl.

Test the service
Finally, test the service in Minikube by opening up a tunnel:
$ minikube service backend-service
The results are shown in Figure 4.

Figure 4: Get endpoint for backend-service deployed in Minikube.">
The Minikube tunnel should redirect us to the service that we just created:

Figure 5: Home screen for the 'Hello, world' Kubernetes application.">
And that's it! You have just developed a basic Kubernetes Operator.
Export the Operator
For a real cluster deployment, you would also need to export the Operator:
$ operator-sdk build docker_username/repo:v0.0.1
$ docker push docker_username/repo
$ sed -i "" 's|REPLACE_IMAGE|quay.io/example/memcached-operator:v0.0.1|g' deploy/operator.yaml
$ kubectl apply -f deploy/operator.yaml
Once you export the Operator, you can publish it via Git or Source Control Management (SCM), zip and mail it, or whatever you need to do.
Conclusion
I again want to emphasize that Operators exist to simplify complex application deployments on Kubernetes. Operators especially support day-to-day activities like upgrading and downgrading Kubernetes applications and more. The guided exercise in this article is a good starting point for working with Operators. See the references below to learn more. Also, check out the GitHub repository for this tutorial, Basic Operator for Beginners, which includes the complete example code for this article.
Further references
These additional references are useful for learning about Kubernetes Operators and the Operator Framework:
- Kubernetes Operators: Automating the Container Orchestration Platform (O'Reilly, April 2020)
- Source code for the example application used in this article, Hello Kubernetes!
