KubeVirt is a cloud-native virtual machine management framework based on Kubernetes. KubeVirt orchestrates workloads running on virtual machines in the same way that Kubernetes does for containers. KubeVirt has many features for managing the network, storage, images, and the virtual machine itself. This article focuses on two mechanisms for configuring network and storage requirements: Multus-CNI and CDI DataVolumes. You will learn how to configure these KubeVirt features for use cases that require high performance, security, and scalability.
Note: This article assumes that you are familiar with Kubernetes, containerization, and cloud-native architectures.
Introduction to KubeVirt
KubeVirt is a cloud-native virtual machine management framework that has been a Cloud Native Computing Foundation (CNCF) sandbox project since 2019. It uses Kubernetes custom resource definitions (CRDs) and controllers to manage the virtual machine lifecycle.
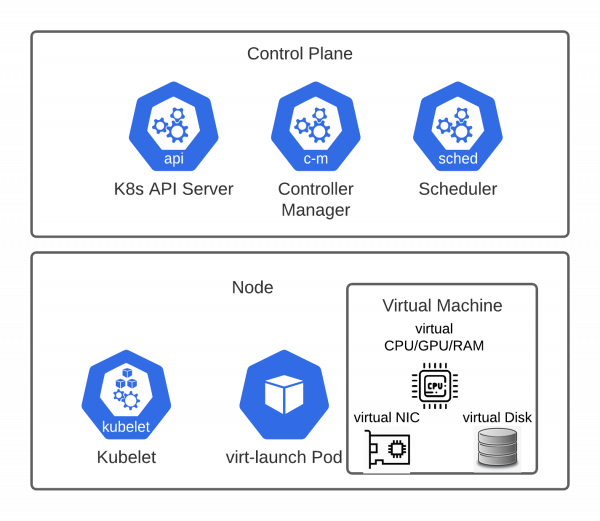
As shown in Figure 1, KubeVirt’s VirtualMachine API describes a virtual machine with a virtual network interface, disk, central processing unit (CPU), graphics processing unit (GPU), and memory. The VirtualMachine API includes four API objects: interfaces, disks, volumes, and resources.
- The Interfaces API describes the network devices, connectivity mechanisms, and networks that an interface may connect to.
- The Disk and Volume APIs describe, respectively, the types of disk (data or
cloudInit); the persistent volume claims (PVCs) from which the disks are created; and the initial disk images. - The Resources API is the built-in Kubernetes API that describes the number of computing resource claims associated with a given virtual machine.
Figure 1 illustrates a virtual machine managed by KubeVirt.
Here is the VirtualMachine API in a partial YAML file snippet:
apiVersion: kubevirt.io/v1alpha3
kind: VirtualMachine
metadata:
  name: my-vm
spec:
  template:
   spec:
     domain:
      devices:
        interfaces:
        resources:
        disks:
      networks:
      volumes:
  dataVolumeTemplates:
    spec:
      pvc:
What is Multus-CNI?
Multus is a meta container network interface (CNI) that allows a pod to have multiple interfaces. It uses a chain of plug-ins in the NetworkAttachmentDefinition API for network attachment and management.
The following partial YAML file shows a sample NetworkAttachmentDefinition instance. The bridge plug-in establishes the network connection, and we've used the whereabouts plug-in for IP address management (IPAM).
apiVersion: k8s.cni.cncf.io/v1
kind: NetworkAttachmentDefinition
metadata:
  name: my-bridge
  namespace: my-ns
spec:
  config: '{
    "cniVersion": "0.4.0",
    "name": "my-bridge",
    "plugins": [
        { "name": "my-whereabouts",
          "type": "bridge",
          "bridge": "br1",
          "vlan": 1234,
          "ipam": {
            "type": "whereabouts",
            "range": "10.123.124.0/24",
            "routes": []
          }
        }
      ]
    }'
Note that there are multiple IPAM instances available: A host-local instance manages IP addresses on the local host scope; static specifies a single IP address; and whereabouts allows us to manage IP addresses across all of the Kubernetes nodes centrally.
Using Multus in KubeVirt
KubeVirt supports Multus natively in its Network API. We can use the Network API to obtain multiple network connections. If the goal is complete isolation, we can configure the API to use Multus as the default network. We will introduce both configurations.
Creating a network extension
Adding a network in KubeVirt consists of two steps. First, we create a NetworkAttachmentDefinition for any connections that do not yet exist. When writing the NetworkAttachmentDefinition, we must note how and at what scope we want to manage the IP addresses. Our options are host-local, static, or whereabouts. If the use case requires physical network isolation, we can use plug-ins, such as the bridge plug-in, to support isolation at the level of the virtual local area network (VLAN) or virtual extensible local area network (VXLAN).
In the second step, we use the namespace/name format to reference the NetworkAttachmentDefinition in the VirtualMachine. When a VirtualMachine instance is created, the virt-launcher pod uses the reference to find the NetworkAttachmentDefinition and apply the correct network configuration.
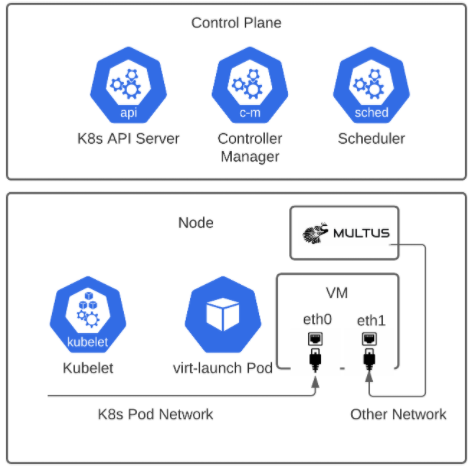
Figure 2 illustrates the configuration for a network extension. In the diagram, a virtual machine is configured with two network interfaces, eth0 and eth1. The network interface names might vary depending on the operating system. The eth0 interface is connected to the Kubernetes pod network. The eth1 interface is connected to the “Other Network.” This network is described in the NetworkAttachmentDefinition and referenced in the Multus networkName for the VirtualMachine instance.
The following partial YAML file shows the configuration for the network extension.
apiVersion: k8s.cni.cncf.io/v1
kind: NetworkAttachmentDefinition
metadata:
  name: my-bridge
  namespace: my-ns
spec:
  config: '{
    "cniVersion": "0.4.0",
    "name": "my-bridge",
    "plugins": [
       {
          "name": "my-whereabouts",
          "type": "bridge",
          "bridge": "br1",
          "vlan": 1234,
          "ipam": {
            "type": "whereabouts",
            "range": "10.123.124.0/24",
            "routes": [
                { "dst": "0.0.0.0/0",
                  "gw" : "10.123.124.1" }
            ]}}]}'


apiVersion: kubevirt.io/v1alpha3
kind: VirtualMachine
metadata:
  name: my-vm
spec:
  template:
    spec:
     domain:
      devices:
        interfaces:
        - name: default
            masquerade: {}
        - bridge: {}
          name: other-net
      networks:
      - name: default
        pod: {}
      - multus:
          networkName:
              my-ns/my-bridge
        name: other-net
One reason for adding additional networks to a virtual machine is to ensure high-performance data transfers. The default Kubernetes pod networks are shared by all pods and services running on the Kubernetes nodes. As a result, the so-called noisy neighbor issue could interfere with workloads sensitive to network traffic. Having a separate and dedicated network solves this problem.
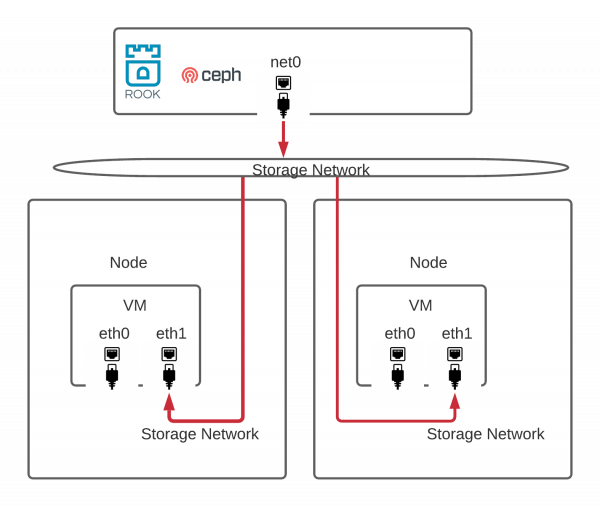
As shown in Figure 3, you can use KubeVirt to configure a virtual machine to use a dedicated Ceph storage network orchestrated by Rook. Rook is a data services operator that orchestrates Ceph clusters. It just graduated from CNCF incubation. It also now supports allowing a Ceph cluster to attach to another network through a NetworkAttachmentDefinition. In this configuration, Ceph’s public network and the virtual machine's Multus network reference the same NetworkAttachmentDefinition.
Create an isolated network
When used for pods, the Multus CNI creates network interfaces in addition to the pod network's default interface. On a KubeVirt virtual machine, however, we can use the Multus network as the default network. The virtual machine does not need to attach to the pod network. As illustrated in Figure 4, the Multus API can be the sole network for the VirtualMachine.
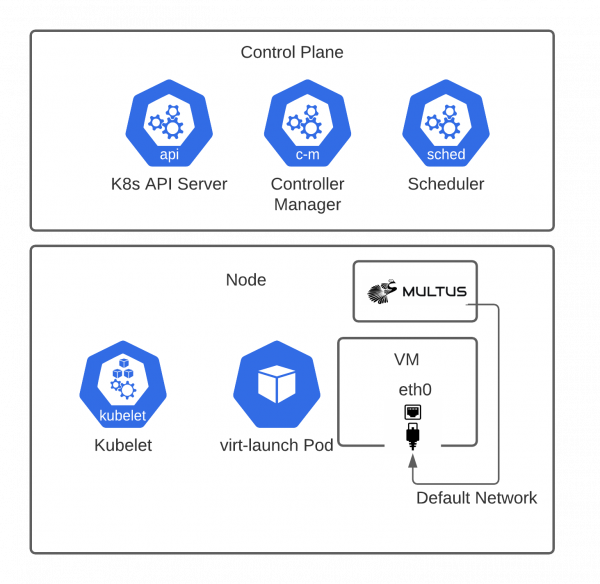
This configuration ensures that a virtual machine is fully isolated from other pods or virtual machines running on the same Kubernetes cluster. Isolation improves workload security. Moreover, the bridge plug-in lets the network attachment use VLANs to achieve traffic isolation at physical networks. Note that a NetworkAttachmentDefinition uses the bridge plug-in and VLAN 1234. The Multus network is the sole network, and thus the default network in the virtual machine.
The following partial YAML file shows the configuration for creating an isolated network, as illustrated in Figure 4.
apiVersion: k8s.cni.cncf.io/v1
kind: NetworkAttachmentDefinition
metadata:
  name: my-bridge
  namespace: my-ns
spec:
  config: '{
    "cniVersion": "0.4.0",
    "name": "my-bridge",
    "plugins": [
       {
          "name": "my-whereabouts",
          "type": "bridge",
          "bridge": "br1",
          "vlan": 1234,
          "ipam": {
            "type": "whereabouts",
            "range": "10.123.124.0/24",
            "routes": [
                { "dst": "0.0.0.0/0",
                  "gw" : "10.123.124.1" }
            ]}}]}'


apiVersion: kubevirt.io/v1alpha3
kind: VirtualMachine
metadata:
  name: my-vm
spec:
  template:
    spec:
     domain:
      devices:
        interfaces:
        - bridge: {}
          name: default-net
      networks:
      - multus:
          networkName:
              my-ns/my-bridge
        name: default-net
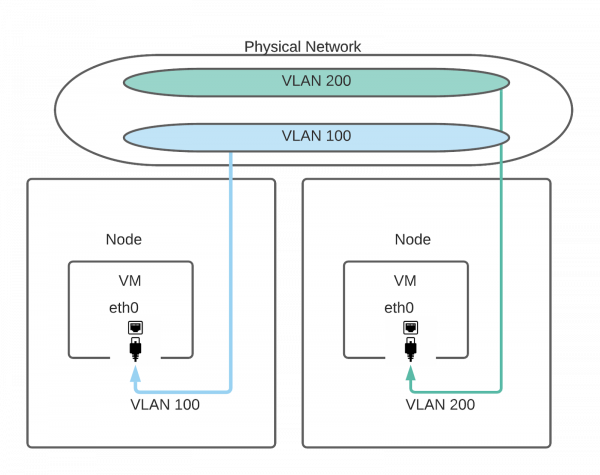
Using separate VLANs in an isolated network
Different virtual machines can use separate VLANs to ensure that they are attached to dedicated and isolated networks, as illustrated in Figure 5. Such configurations need to access native VLANs on the network infrastructure. Because native VLANs are not always accessible on public clouds, we suggest building a VXLAN tunnel first and creating the bridge on the VXLAN interface so that the VLANs can be created on the VXLAN tunnel.
Using DataVolume in KubeVirt
KubeVirt's containerized-data-importer (CDI) project provides a DataVolume resource that encapsulates both a persistent volume claim (PVC) and a data source in a single object. Creating a DataVolume creates a PVC and populates the persistent volume (PV) with data sources. The source can either be a URL or another existing PVC that the DataVolume is cloned from. The following partial YAML file shows a DataVolume that is cloned from the PVC my-source-dv.
apiVersion: cdi.kubevirt.io/v1alpha1
kind: DataVolume
metadata:
  name: my-cloned-dv
spec:
  source:
    pvc:
      name: my-source-dv
      namespace: my-ns
  pvc:
    accessModes:
    - ReadWriteOnce
    resources:
      requests:
        storage: 10Gi
      storageClassName: storage-provisioner
KubeVirt lets us use a DataVolume to boot up one or more virtual machines. When deploying virtual machines at scale, a pre-allocated DataVolume is more scalable and reliable than an ad hoc DataVolume that uses remote URL sources. We will look at both configurations.
Two ways to use DataVolume
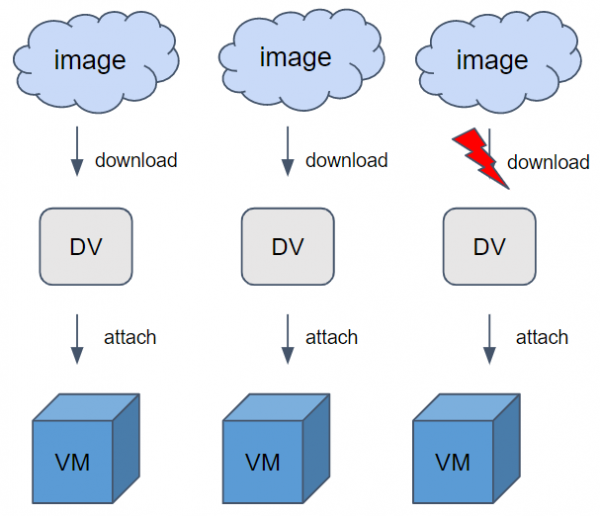
As illustrated in Figure 6, an ad hoc DataVolume refers to a configuration wherein a virtual machine fleet uses the same disk image from a remote URL. This configuration does not require any prior work and is very efficient in reusing the same DataVolume API object. However, because this configuration requires downloading each image to an individual DataVolume, it is not reliable or scalable. If the remote image download is disrupted, the DataVolume becomes unavailable, and so does the virtual machine.
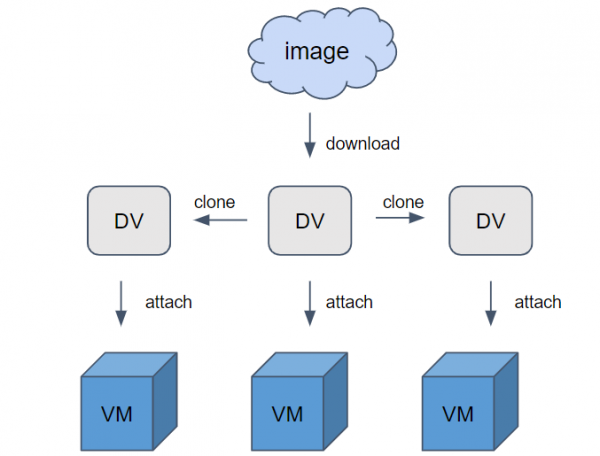
A pre-allocated DataVolume requires a two-step setup. First, we create a pre-allocated DataVolume that uses a remote URL source. After we've created the first DataVolume, we clone a second DataVolume that uses the same image as the pre-allocated one.
Figure 7 illustrates the two-step process for creating a pre-allocated DataVolume. Although it is cumbersome, when used to boot up a large fleet of virtual machines, the two-step process is scalable and reliable.
Cloning a DataVolume
There are two ways to clone a DataVolume in KubeVirt. Both have their advantages and limitations.
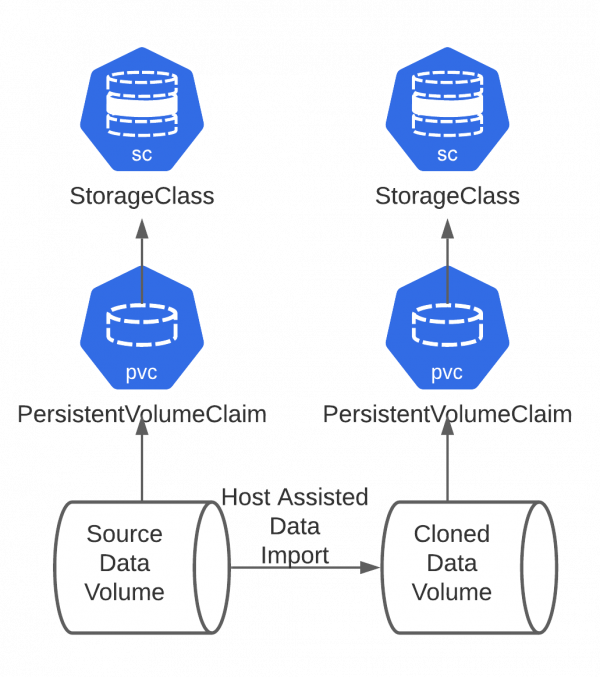
Creating a host-assisted clone
Figure 8 illustrates the process of creating a host-assisted clone. In this process, we can provision the source DataVolume and target DataVolume using the same StorageClass or two different ones. The CDI pod mounts both volumes and copies the source's disk volume to the target. The data-copying process can work for any persistent volume type. Note, however, that copying data between two volumes is time-consuming. When doing it at scale, the resultant latency will delay the virtual machine bootup.
Creating a smart clone
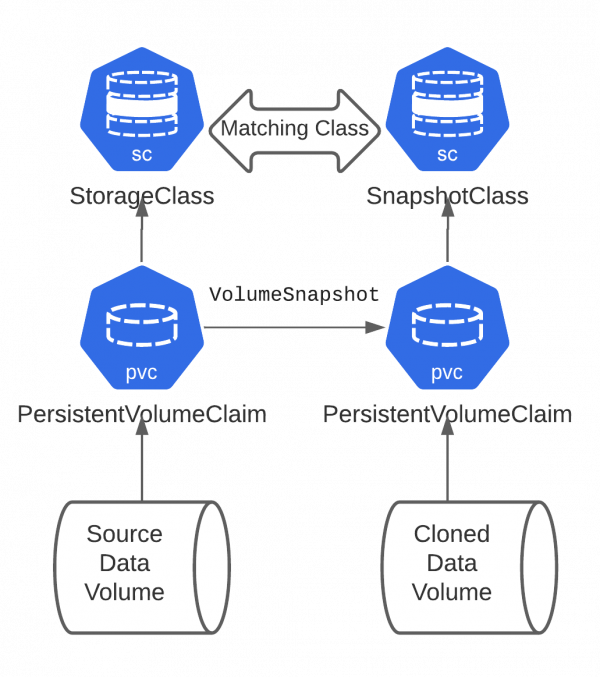
As illustrated in Figure 9, a smart clone only works for volumes that have a matching StorageClass, meaning that they use the same storage provisioner. A smart clone does not copy data from the source to the target. Instead, it uses a VolumeSnapshot to create the target persistent volume. A VolumeSnapshot can leverage the copy-on-write (CoW) snapshot feature on the storage back-end and is thus highly efficient and scalable. This approach is especially useful for reducing startup latency during a large-scale virtual machine deployment.
Conclusion
As a cloud-native virtual machine management framework, KubeVirt adopts cloud-native technologies alongside its own inventions. As a result, KubeVirt APIs and controllers support flexible and scalable virtual machine configurations and management that can integrate well with many technologies in the cloud-native ecosystem. This article focused on KubeVirt's network and storage mechanisms. We look forward to sharing more exciting features in the future, including KubeVirt's mechanisms for handling CPU, memory, and direct device access.
Last updated: February 5, 2024