Kubernetes is an established foundation layer for cloud-native microservices and serverless architectures. By automating application deployment, scaling, and management, Kubernetes changes the developer's daily workflow in terms of inner loop development (local coding, building, running, and testing the application) and outer loop development (integration testing, continuous deployment, and security). Developers using Kubernetes also must plan for containerization, debugging code inside pods, and automating test cases.
In this article, you'll see how using Quarkus remote development enhances the development loop on Kubernetes. We will set up a new Quarkus project then configure it for live coding on a remote Red Hat OpenShift cluster, just like you would in your local development environment.
Step 1: Create a new Quarkus project
We’ll use a Maven plug-in to scaffold a new project with the following command:
$ mvn io.quarkus:quarkus-maven-plugin:2.1.0.Final:create \
    -DprojectGroupId=org.acme \
    -DprojectArtifactId=quarkus-remote \
    -DprojectVersion=1.0.0-SNAPSHOT \
    -DclassName="org.acme.GreeterResource" \
    -Dextensions="openshift"
This command generates a quarkus-remote directory that includes a new Quarkus project. When you open the GreeterResource.java class file in src/main/java/org/acme, you will see a simple RESTful API:
@Path("/hello")
public class GreeterResource {

   @GET
   @Produces(MediaType.TEXT_PLAIN)
   public String hello() {
       return "Hello RESTEasy";
   }
}
Step 2: Live coding in your local environment
Quarkus comes with a built-in development mode for hot deployment with background compilation. After changing the code, resources, or configuration in a running application, you only need to refresh your web browser or invoke the project's RESTful API for the changes to take effect automatically. To run your application locally, execute the following command in the project's home directory:
$ mvn quarkus:dev
You will see that live coding has been activated:
INFO [io.quarkus] (Quarkus Main Thread) Profile dev activated. Live Coding activated.
Invoke the application's RESTful API endpoint with acurl command:
$ curl http:/localhost:8080/hello
The output should be:
Hello RESTEasy
Return to the GreeterResource.java class file in src/main/java/org/acme. Change the code in the hello() method:
return "Hello RESTEasy from Local";
Save the file, then use the same curl command to re-invoke the endpoint. The new output should be:
Hello RESTEasy from Local
Invoking the RESTful API triggers a scan of the workspace. If any changes are detected, the Java files are compiled, and the application is redeployed, and the redeployed application services your request. If you check the logs in your running Quarkus runtime, you should see the detected source files:
INFO [io.qua.dep.dev.RuntimeUpdatesProcessor] (vert.x-worker-thread-4) Changed source files detected, recompiling [/Users/danieloh/Downloads/quarkus-remote/src/main/java/me/daniel/GreeterResource.java]
Hit CTRL+C when you are ready to stop the application.
Step 3: Build and deploy a mutable application
What if you want to expand the inner loop development cycle to a remote container environment such as Kubernetes or OpenShift? You can configure your application in remote development mode to make changes to your local files immediately visible in your remote container environment.
To develop remotely, you need to build a mutable application using the mutable-jar format. You can then use the OpenShift extension and Maven plug-in to deploy the application to your remote OpenShift cluster. Append the following configurations to your Quarkus project's application.properties file:
# Mutable Jar configurations
quarkus.package.type=mutable-jar
quarkus.live-reload.password=changeit

# OpenShift Extension Configurations
quarkus.container-image.build=true
quarkus.kubernetes-client.trust-certs=true
quarkus.kubernetes.deployment-target=openshift
quarkus.openshift.route.expose=true
quarkus.openshift.env.vars.quarkus-launch-devmode=true
Note that you can change the password to whatever you want. It is used to secure communication between the remote side and the local side.
Open the mutable application in your OpenShift cluster
To log in to the OpenShift cluster, you have to install the oc command-line interface and use the oc login. Installation options for the CLI will vary depending on your operating system.
Assuming you have oc installed, execute the following command in your Quarkus project home directory:
$ oc new-project quarkus-remote
$ mvn clean package -DskipTests -Dquarkus.kubernetes.deploy=true
This command creates a new project in the remote OpenShift cluster. The mutable JAR will be packaged and deployed to OpenShift. The output should end with BUILD SUCCESS.
Check the application in the OpenShift console
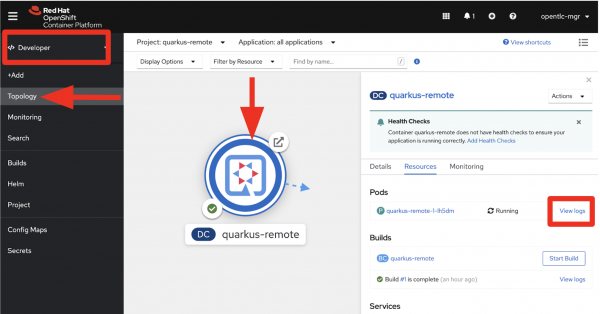
So far, so good. Now, let’s go to the Developer console in the OpenShift cluster and then navigate the Topology view. You will see that your Quarkus application has been deployed. Click on View logs to see how the mutable application is deployed, as shown in Figure 1.

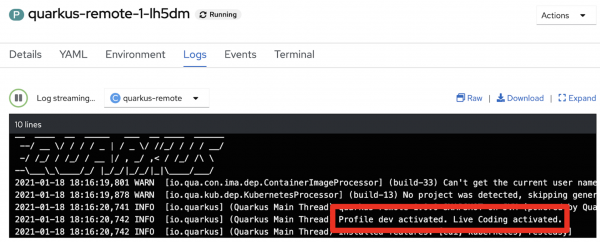
You should see the output "Profile dev activated. Live Coding activated" in the pod logs, as shown in Figure 2.

Check the application's RESTful API
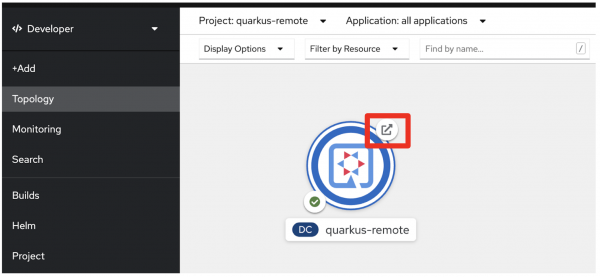
Go back to the Topology view to access the application's RESTful API. Click the Open URL icon highlighted in Figure 3.

Append /hello at the application’s route URL. When you check it, you should see the same output in your local environment :

Step 4: Run the application in remote development mode
The last step is to connect your local agent to the remote host on OpenShift. To start, append the quarkus.live-reload.url configuration to your application.properties file. Note that you will need to remove or comment the OpenShift extension configurations so that they will not trigger the source-to-image build when you change the code:
# Mutable Jar configurations
quarkus.package.type=mutable-jar
quarkus.live-reload.password=changeit
quarkus.live-reload.url=http://YOUR_APP_ROUTE_URL

# OpenShift Extension Configurations
# quarkus.container-image.build=true
# quarkus.kubernetes-client.trust-certs=true
# quarkus.kubernetes.deployment-target=openshift
# quarkus.openshift.expose=true
# quarkus.openshift.env-vars.quarkus-launch-devmode.value=true
Use the remote-dev command to execute the remote development mode:
$ mvn quarkus:remote-dev
The output should end with Connected to remote server. Now you can develop in the same environment where you will run your app, with access to the same services.
Next, return to the GreeterResource.java class file in src/main/java/org/acme, then change the code in the hello() method:
return "Hello RESTEasy from OpenShift";
Save the file, then refresh the browser. The output should be what you see in Figure 5.

Every time you refresh the browser, you should see that local changes are immediately visible in the remote application. An HTTP-based long polling transport synchronizes your local workspace and the remote application via HTTP calls. Here's an example of log output in the local Quarkus runtime:
INFO  [io.qua.dep.dev.RuntimeUpdatesProcessor] (Remote dev client thread) Changed source files detected, recompiling [/Users/danieloh/Downloads/quarkus-remote/src/main/java/me/daniel/GreeterResource.java]
...

INFO  [io.qua.ver.htt.dep.dev.HttpRemoteDevClient] (Remote dev client thread) Sending dev/app/me/daniel/GreeterResource.class
INFO  [io.qua.ver.htt.dep.dev.HttpRemoteDevClient] (Remote dev client thread) Sending quarkus-run.jar
...
Awesome! You should be all set to enjoy your inner loop development experience while implementing your application's new business requirements.
Note: Using Quarkus's remote development mode in production could cause unexpected functional changes to the running application. Remote development should only be used when the application is in development.
Conclusion
You can use Quarkus to enhance the development loop by connecting the live coding features from your local machine to a remote container environment such as OpenShift. Being able to do remote development in a cloud-native Java runtime simplifies the development workflow—from writing code to building, running, debugging, and deploying microservices at speed. See the Quarkus Guides for more about how Quarkus optimizes development productivity through unified configuration, zero-config with live coding, and easy injection of extensions for implementing cloud-native applications.
Last updated: October 7, 2022