Are you curious about the power of artificial intelligence (AI) but not sure where to begin? The world of AI can seem daunting, but Red Hat is making it accessible to everyone with their free Developer Sandbox for OpenShift AI.
The Red Hat Developer Sandbox contains your personal AI playground, providing a risk-free environment to explore, experiment, and learn the ropes of OpenShift AI. No prior AI experience is needed! Whether you're a developer, data scientist, student, or simply an AI enthusiast, this is your chance to dive in and discover the possibilities.
The Red Hat Developer Sandbox is a free, no-cost environment that allows you to try out Red Hat products and technologies for 30 days. It provides a shared OpenShift cluster and Kubernetes platform. You can access industry-leading frameworks and languages like Quarkus, Node.js, React.js, and .NET to jump-start your application development. The Sandbox includes preconfigured tools and services to get you started quickly, including Apache Camel K, Red Hat OpenShift Pipelines, Red Hat OpenShift Dev Spaces, Red Hat OpenShift Serverless, and Red Hat OpenShift AI.
Red Hat OpenShift AI is an AI platform that includes popular open source tooling, including familiar tools and libraries like Jupyter, TensorFlow, and PyTorch, along with MLOps components for model serving and data science pipelines—all integrated into a flexible UI.
In this guide, we'll walk you through setting up your sandbox, navigating the OpenShift AI interface, and even give you some ideas for your first AI projects. Get ready to unleash your creativity and embark on an exciting AI journey.
Red Hat Developer Sandbox
To begin, if you haven't done so already, visit the Developer Sandbox page to obtain an OpenShift cluster. This will also enroll you in the Red Hat Developer Program, if you aren't already a member, which offers numerous valuable resources and opportunities. The process will require you to login with your Red Hat account, if you don't have one don't worry, you can create one for free.
Once done you should be able to access the Developer Sandbox welcome page that should show you three main components: OpenShift, Dev Spaces and OpenShift AI.
In this quick how-to we will go only through OpenShift and OpenShift AI. Let's start with the OpenShift AI first.
Red Hat OpenShift AI
Once you click the launch button on your Developer Sandbox main page, you should be redirected to the OpenShift AI web interface. The platform will ask to login and it will leverage your existing Red Hat credentials that you used before.
You can now take a look into the OpenShift AI platform and enabled services, you will notice that you are not allowed to create new Data Science projects but instead a default one has been already created for you as shown in the following picture.
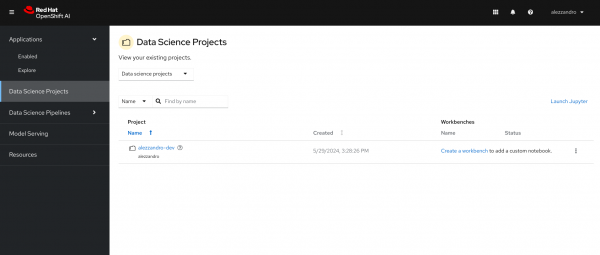
Clicking on your Data Science project name you will be able to:
- Create your first Workbench
- Create and configure a Data Science Pipeline Server
- Configure external S3 Storage endpoints
- Create a Model Server and start serving Data Science Models
I'm not going to go in deep in the OpenShift AI concepts but I will give you in the next section a selected set of hints to match the OpenShift AI resources requirements with Red Hat Developer Sandbox limited ones.
Running your first OpenShift AI Tutorial in the Developer Sandbox
For this example we are going to leverage the existing Fraud Detection tutorial available in the Red Hat OpenShift AI documentation.
Red Hat Developer Sandbox comes with a limited set of resources, in particular it includes one project (namespace) and a resource quota of 3 cores, 14 GB RAM, and 40 GB storage per user. We should then think about resource consumption if we want to experiment with every feature of OpenShift AI.
Setup the S3 storage solution
First of all the main prerequisite needed it is an S3 storage solution to host our AI/ML Models once trained/created in our Data Science Workbench (usually it is a JupiterHub notebook environment).
The Fraud Detection tutorial already contains the quickest and easiest way to configure an S3 storage solution on our OpenShift project/namespace in section 2.3.2, but I'm going to report the configuration here for you convenience, in case you want to leverage it for other tutorial or experiments.
First of all we need to connect to the underlying OpenShift cluster to setup the S3 storage solution. Starting from the Developer Sandbox welcome page, let's click on Launch button in the Red Hat OpenShift box. Once connected to the OpenShift cluster, we have to get the login command to interact with the cluster via the command-line. Let's click on your username, on the top right corner of the page, then click on copy login command button. You will be redirected to a simple webpage where you can find the command to copy and paste on your favorite terminal window.
Please note that for the login command to work you need to have the latest openshift-clients binaries on your system. You can download the latest ones from the Red Hat Downloads page.
So the sequence of commands to launch for starting the S3 storage solution configuration is the following:
oc login --token=sha256~YOURTOKEN --server=https://YOURURL.openshiftapps.com:6443
oc apply -f https://github.com/rh-aiservices-bu/fraud-detection/raw/main/setup/setup-s3.yaml
The previous command will deploy a containerized Minio service, that will hosts S3 storage for our OpenShift AI services.
You can monitor the Minio service deployment via the Topology view under Developer console in the OpenShift web interface, once done you should have something similar to the following environment.
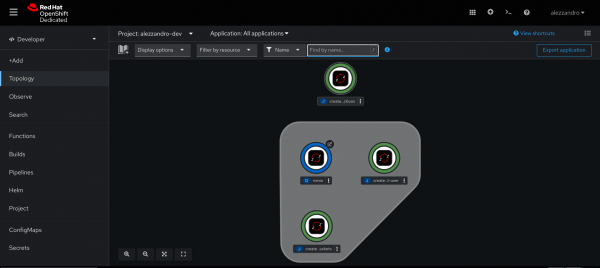
Once ready, you can then login to the Minio web interface by clicking the arrow near the minio deployment circular icon, this will open in a new tab/window the Minio's login page, you will find the auto-generated credentials in the Secret object named minio-root-user.
The YAML file we just executed against our OpenShift cluster has also setup for us also some configuration directly into the OpenShift AI platform. If we go back to the OpenShift AI page, in our Data Science Project we can check that we can now find two Data Connections available:
- My Storage: the S3 bucket storage for saving the models generated via Workbench
- Pipeline Artifacts: the S3 bucket storage for saving the models generated via Pipelines
You should see something similar in your Data Connections tab, as shown in the following picture.

This S3 storage configuration helps us saving a lot of time and speeding up our experiments, automating the infrastructure configuration.
Dealing with the Developer Sandbox resource limits
After setting up the storage, you can follow Chapter 3 of the tutorial, to create a workbench, an environment instance to start the development of new Data Science experiments. Following the tutorial you will be guided in cloning the Data Science repository to train an AI/ML Model and then uploading it on a S3 storage.
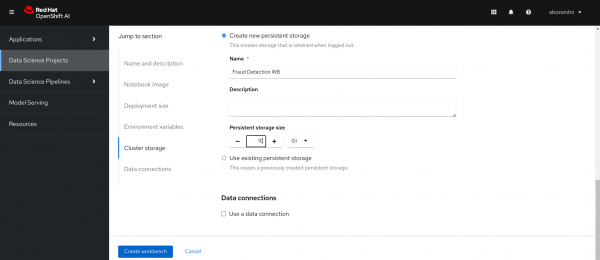
An important setting to tune is the Persistent Storage for the Workbench you will create. You should downsize it to 10 GB, instead of 20 GB, because the Data Science Pipeline server requires a MariaDB database that will be bound automatically to a 10 GB Persistent Volume. On the Workbench creation wizard, it will be enough to set to 10 GB the persistent storage as shown in the following image.
On Chapter 4, you will learn how to create you first Multi-model server to offer your just trained model as a service and you can follow the chapter with no additional tuning.
You can always monitor your infrastructure under the hood looking at the OpenShift Console, you should see something similar to the following image, with three running pods:
- Minio: the S3 storage solution
- Model server: actually serving our AI/ML model
- Workbench: the Data Science environment we used for development
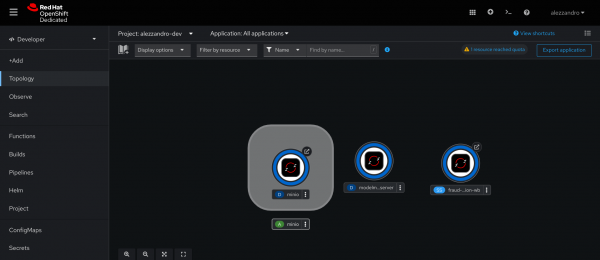
After that if you want to experiment with the Data Science Pipelines, we need to scale down to zero the Model Server to save some resource that we need to use for the Pipeline server, as shown in the following image.
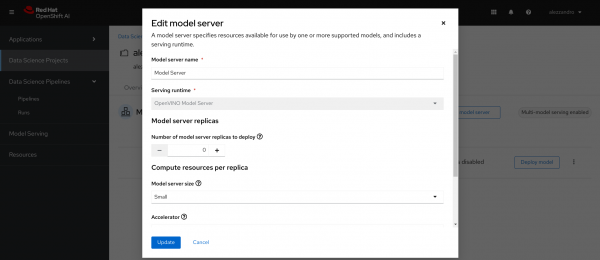
After that you can then follow section 2.4 of the tutorial for configuring the Data Science Pipelines. Finally you can then follow Chapter 5 for implementing these pipelines.
Please note: you may need to recreate the Workbench environment (after deleting it) to ensure that the Data Science Pipelines Endpoints are correctly configured in the Workbench. Your data and existing work will be preserved, you will need only to re-use the same Persistent Volume that you were using before, selecting it in the Workbench creation wizard. Don't worry, it will not be deleted once you hit the delete button on your existing Workbench.
Conclusion
The Red Hat Developer Sandbox and OpenShift AI present an incredible opportunity to explore the cutting edge of artificial intelligence, without any financial commitment. It shows the Red Hat's commitment to open source and fostering a community of innovators. So, take the plunge and see what you can create!
But this is just the beginning... stay tuned for an upcoming demo on which I am working with the exciting world of Large Language Models (LLMs) and Retrieval Augmented Generation (RAG) on OpenShift AI. I'll show you how to build powerful applications that combine the strengths of both, opening up new possibilities for your AI projects. Get ready to be inspired!
