Page
Deploy OpenShift AI and Elasticsearch vector database
We’ve provided you with a Jupyter notebook to ingest data into your Elasticsearch database. You’ll walk through setting up an OpenShift AI project with the necessary environment variables to access the Elasticsearch vector database from the provided Jupyter notebook.
In order to get the full benefit from taking this lesson, you need to:
- Install the OpenShift CLI.
- Have the appropriate access on your OpenShift cluster to install the OpenShift AI and Elasticsearch operators.
- Have the appropriate access on your OpenShift cluster to create projects.
In this lesson, you will:
- Set up OpenShift AI and Elasticsearch vector database.
- Run a notebook in OpenShift AI that ingests PDFs and URLs into a vector database.
OpenShift AI automated install
Optional: If you already have an OpenShift AI instance with a data science cluster, you can skip this section.
Follow the product documentation to install OpenShift AI or follow the instructions below:
- Clone podman-ai-lab-to-rhoai.
Log in to your OpenShift cluster in a terminal with the API token. You can get your API token from the OpenShift web console in the top right corner of the page under admin. Click Copy login command (Figure 1).
Figure 1: OpenShift API Copy login command. Your OpenShift CLI command should look similar to the one below:
oc login --token=<YOUR_OPENSHIFT_API_TOKEN> --server=https://<YOUR_OPENSHIFT_API_URL>:6443We'll first deploy the OpenShift AI operator:
oc apply -k ./components/openshift-ai/operator/overlays/fastNow we'll create a data science cluster. Make sure the operator is fully deployed before creating the data science cluster:
oc get pods -n redhat-ods-operator --watch
NAME					            READY		STATUS
Rhods-operator-5f7cf677cd-wp8vd 	1/1		    RUNNING
Once the pod has a Running status and is ready, you can run the below command:
oc apply -k ./components/openshift-ai/instance/overlays/fast

Elasticsearch automated install
Optional: If you already have an Elasticsearch instance, you can skip this section.
Follow the product documentation to install Elasticsearch or follow the instructions below:
- Clone podman-ai-lab-to-rhoai.
We'll now deploy the Elasticsearch operator. This will be our vector database:
oc apply -k ./components/elasticsearch/base/Now we can create an Elasticsearch cluster instance. Make sure the Elasticsearch operator pod is in a Running state and ready:
oc get pods -n elastic-vectordb --watch
NAME						        READY		STATUS
Elastic-operator-5848f6968d-97qjj	1/1		    RUNNING

oc apply -f ./components/elasticsearch/cluster/instance.yaml
Ingest data into the Elasticsearch vector database
Now that the Elasticsearch operator has been deployed and an instance has been created, we can ingest some data and query the vector database.
Go to your OpenShift AI Dashboard. You can get the URL either from the below
occommand or the OpenShift web console:oc get routes -n redhat-ods-applicationsOR
Select the redhat-ods-applications project, then Networking > Routes, then open the URL under Location (Figure 2).
Figure 2: RHOAI dashboard. Log in to the dashboard, and select Data Science Projects. Select Create data science project (Figure 3).
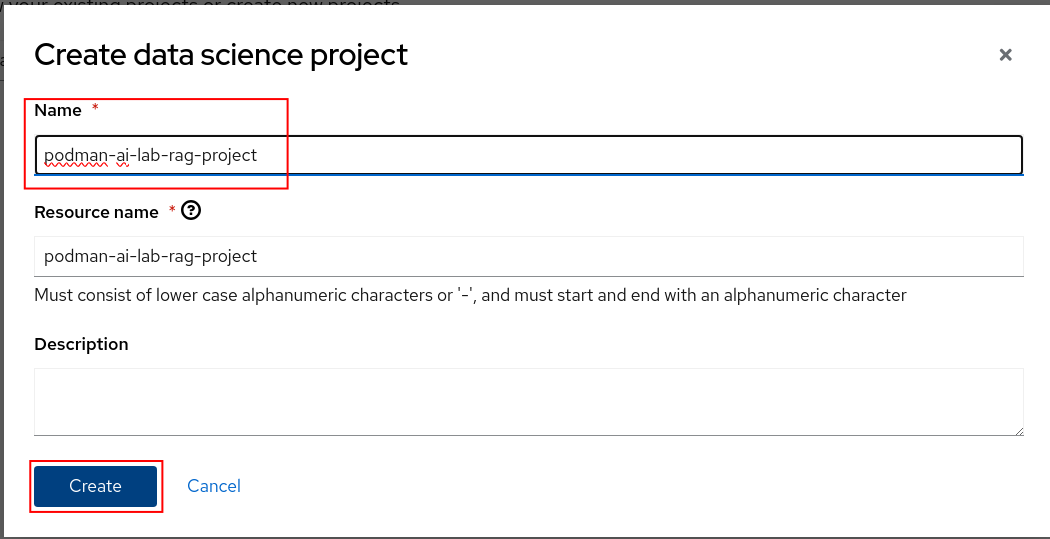
Figure 3: RHOAI Create Project. Name the project "podman-ai-lab-rag-project" and click the Create button (Figure 4).
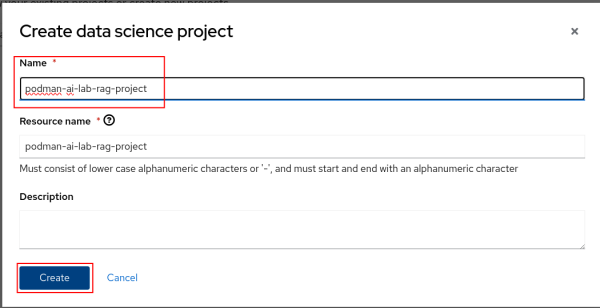
Figure 4: RHOAI Name project. We'll now create a workbench where we can upload a Jupyter notebook to ingest data into the Elasticsearch vector database. We'll then test it out by querying for some data. Select Create a workbench (Figure 5).
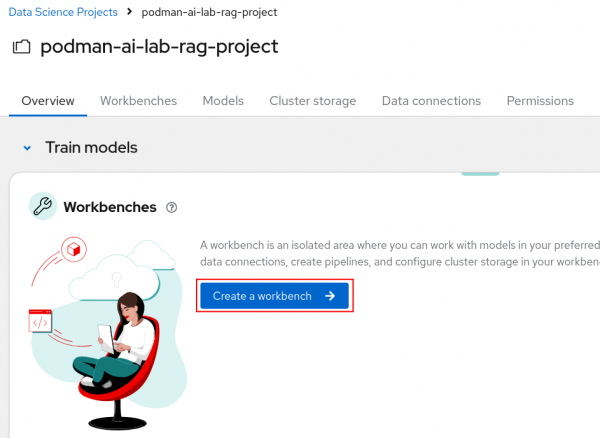
Figure 5: RHOAI Create a workbench button.


Name the workbench "elastic-vectordb-workbench". Select a Standard Data Science notebook and a Medium size (Figure 6).
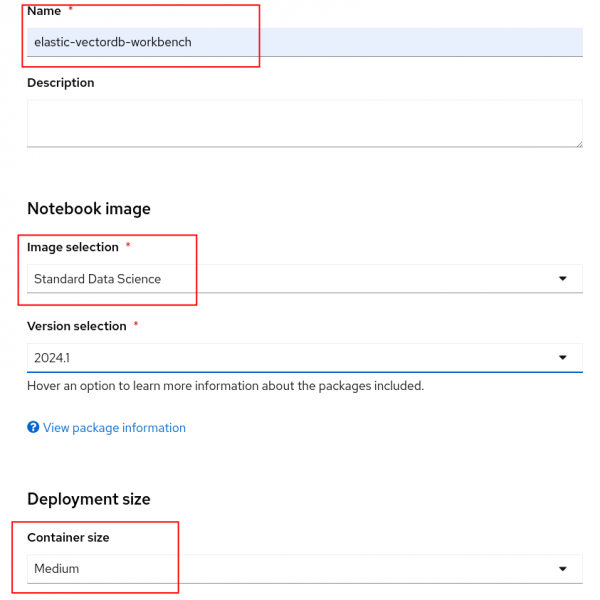
Figure 6: RHOAI set up workbench. You'll also want to set two environment variables so we can connect to Elasticsearch from the notebook. See below:
CONNECTION_STRING: Copy the CLUSTER-IP and PORT from thisoccommand:oc get service elasticsearch-sample-es-http -n elastic-vectordb- Add the
CONNECTION_STRINGkey/value as a ConfigMap environment variable.
PASSWORD: Create a secret environment variable with the Elasticsearch secret value:oc get secret elasticsearch-sample-es-elastic-user -n elastic-vectordb -o jsonpath="{.data['elastic']}" | base64 -d > elastic_pass.txtAdd the
PASSWORDkey/value as a Secret environment variable. The password is in theelastic_pass.txtfile that was created by the aboveoccommand (Figure 7).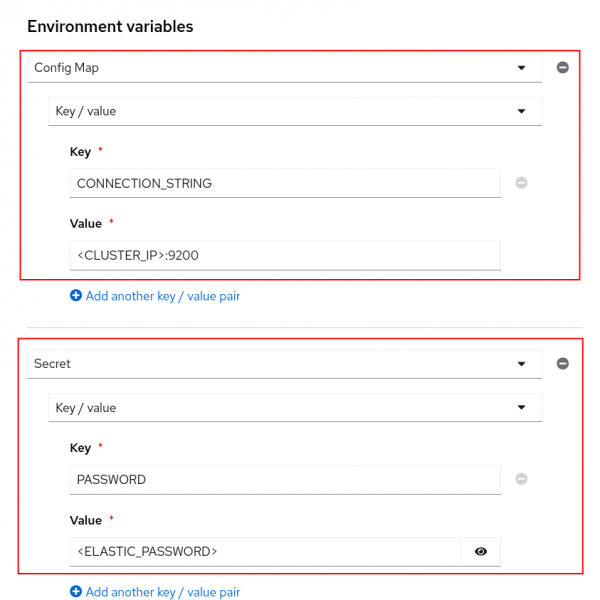
Figure 7: RHOAI environment variables.

Note: You can delete the elastic_pass.txt file that you got the password from after you add it to the environment variable.
- Click the Create Workbench button. Your workbench should start in a few minutes.
- Open your workbench after it has started and log in.
Note: If you have insufficient resources to start a medium container size, stop the workbench and change the workbench to start as a small container size.
Upload or import the
./notebooks/Langchain-ElasticSearchVector-ingest.ipynbnotebook to your workbench (Figure 8).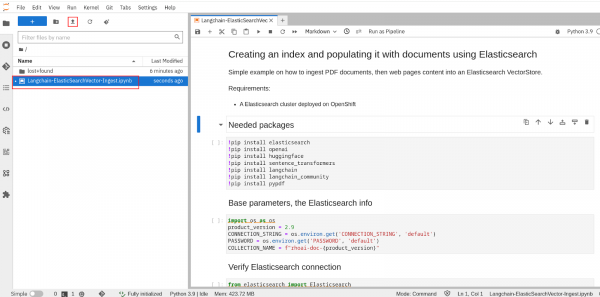
Figure 8: RHOAI workbench notebook. Run the first 3 cells (Shift + Enter in each cell to run). Make sure you can connect to your Elasticsearch cluster (Figure 9).
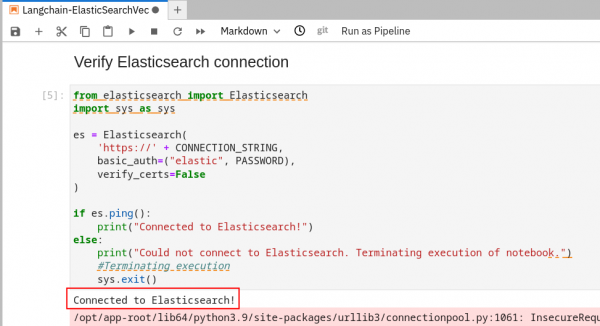
Figure 9: Notebook execution: first section. Note: You can safely ignore the pip dependency error during the package installations and you can ignore any TLS warnings when connecting to Elasticsearch
Continue to run through each cell while reading through what is occurring in each one. The "Create the index and ingest the documents" cell is where all of the websites and PDFs are stored with embeddings into the Elasticsearch vector database (Figure 10).
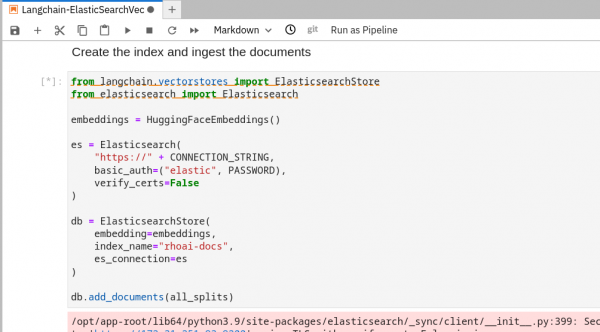
Figure 10: Notebook execution: second section. This cell will take a while to run. Good time for a coffee break.
After all of the data is stored in our vector database, we can directly query it. Run the last 2 cells to make sure the data was stored successfully and that we get back the results we expect (Figure 11).
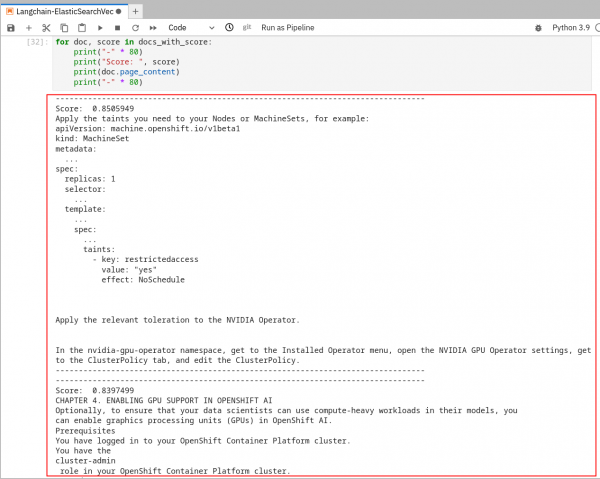
Figure 11: Notebook execution: third section.


You now have OpenShift AI and Elasticsearch deployed. Data has been ingested into the Elasticsearch vector database and you were able to query data from the Jupyter notebook in OpenShift AI. Head over to the next lesson to deploy an LLM on OpenShift AI and update the chat recipe to connect the LLM and vector database to create an RAG chatbot!
