Page
Putting the RAG chatbot together
In this last lesson, we’ll connect all of the pieces together to create an RAG chatbot. LangChain will help us connect the LLM we deploy on OpenShift AI to the Elasticsearch vector database that we ingested data into in the last lesson.
In order to get the full benefit from taking this lesson, you need to:
- Install the OpenShift CLI.
- Have the appropriate access on your OpenShift cluster to deploy Minio.
- Have the appropriate access on your OpenShift cluster to create projects.
- Have admin access on OpenShift AI.
- Have admin access to create projects and install operators on OpenShift.
- Have admin access on OpenShift AI to create custom serving runtime images.
In this lesson, you will:
- Configure an OpenShift AI project, LLM serving model platform, and upload a custom model serving runtime.
- Update and deploy the chatbot recipe code from Podman AI Lab on OpenShift with LangChain to connect to the Elasticsearch vector database and OpenShift AI model serving endpoint.
Deploy s3 Storage (Minio)
Optional: If you already have s3-compatible storage, you can skip to step 2 to create the bucket.
OpenShift AI model serving has a dependency on s3 storage. We'll deploy Minio for this tutorial, but any s3 compatible storage should work. For an enterprise s3 storage solution, consider OpenShift Data Foundation.
Follow the Minio Installation if you don't have s3-compatible storage:
Log in to the Minio UI. You can find the route in either the web console or from the
oc cliin your terminal. Log in withminio/minio123. Minio contains 2 routes, an API route and UI route. Make sure you use the UI route (Figure 1).
Figure 1: Minio login. Create a bucket named "models" and click the Create Bucket button (Figure 2).
Figure 2: Minio Create Bucket. Go to Object Browser, select the models bucket you just created, and click the Create new path button. Name the folder path "mistral7b" and select Create (Figure 3).
Figure 3: Minio path. Upload the Mistral7b model to the folder path you just created. You can find out where the model was downloaded if you go back to Podman AI Lab and click the Open Model Folder icon. See Figure 4.

Figure 4: Podman AI Lab model folder. In Minio, click the Upload File button and select the model file under the
hf.TheBloke.mistral-7b-instruct-v0.2.Q4_K_Mdirectory (Figure 5).
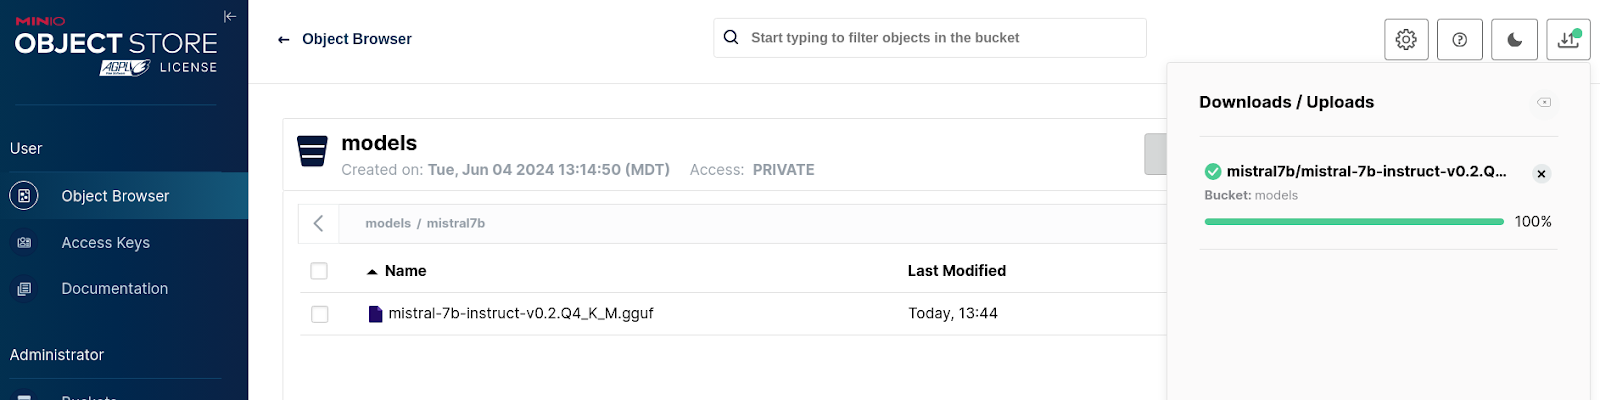
Figure 5: Minio model upload. If the model is uploaded successfully, you should see the screen depicted in Figure 6.

Figure 6: Minio model upload success.


Create your custom model serving runtime
Follow the product documentation to install the single-model serving platform OR follow the instructions below.
Single-model serving platform automated install
To install the single-model serving platform and add our custom serving runtime, you first need to clone podman-ai-lab-to-rhoai. Then do the following:
Run the following
occommand to deploy the Service Mesh operator:oc apply -k ./components/openshift-servicemesh/operator/overlays/stableRun the following
occommand to deploy the Serverless operator:oc apply -k ./components/openshift-serverless/operator/overlays/stableRun the following command to find out when the Service Mesh and Serverless operators have installed successfully:
oc get csv -n openshift-operators --watchNAME PHASE rhods-operator.2.9.1 Succeeded Serverless-operator.v1.32.1 Succeeded Servicemeshoperator.v2.5.2 SucceededWe'll be using the single stack serving in OpenShift AI so we'll want to use a trusted certificate instead of a self-signed one. This will allow our chatbot to access the model inference endpoint.
Get the name of the ingress cert by selecting a secret that has
certin the name:oc get secrets -n openshift-ingress | grep certCopy the full name of the secret you chose and replace the name. Make sure you're in the top-level directory of this project when you run the below command:
oc extract secret/<CERT_SECRET_FROM_ABOVE> -n openshift-ingress --to=ingress-certs --confirmYou should now have an
ingress-certsdirectory with atls.crtandtls.keyfile (Figure 7).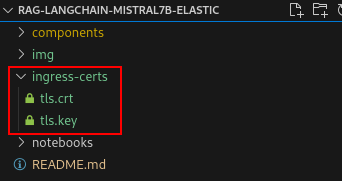
Figure 7: Ingress cert directory. Figure 7: Ingress-cert directory. To update the secret that will be used in our OpenShift AI data science cluster, run the following commands in sequence:
cd ingress-certs

oc create secret generic knative-serving-cert -n istio-system --from-file=. --dry-run=client -o yaml | oc apply -f -

cd ..

Note: You can delete the ingress-certs folder after you have created the knative-serving-cert secret.
Run the following
occommands to enable the Single Model Serving runtime for OpenShift AI:oc apply -k ./components/model-server/components-servingIt will take around 5 to 10 minutes for the changes to be applied.
To see when single-model serving is ready, start by opening the OpenShift web console and going to Operators -> Installed Operators. When you see both Service Mesh and Serverless as shown in Figures 8 and 9, the single-model serving should be available.
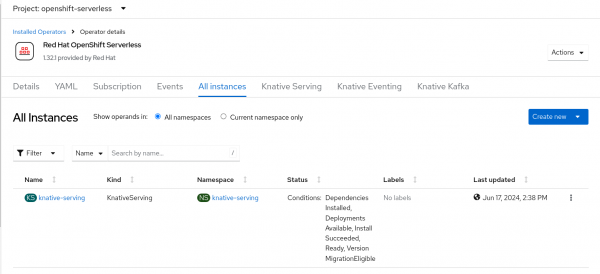
Figure 8: Successful RHOAI knative-serving. 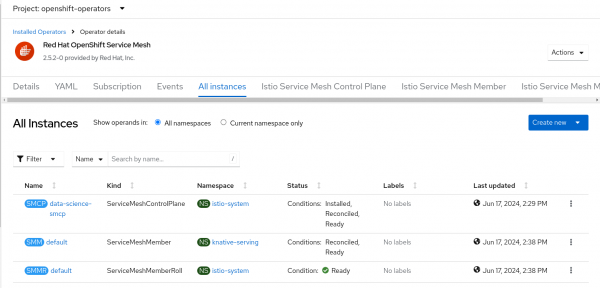
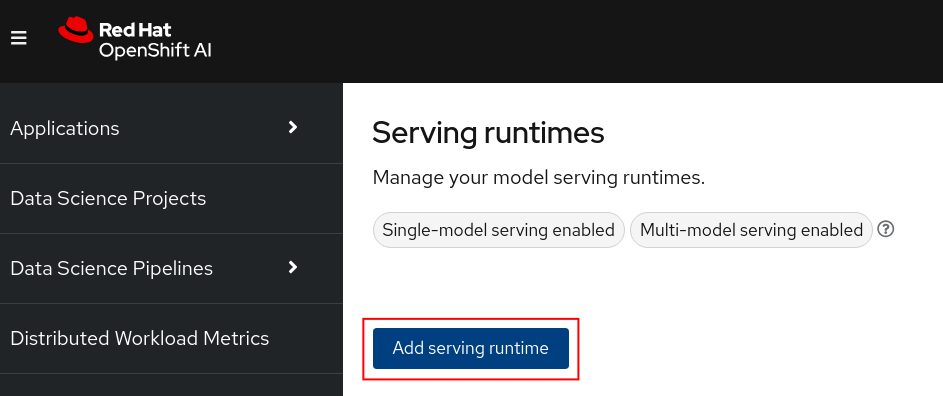
Figure 9: Successful RHOAI Service mesh control plane. - Go to the OpenShift AI dashboard, expand Settings, and select Serving Runtimes. You should now see "Single-model serving enabled" at the top of the page (Figure 10).


Note: You might need to refresh the page and it could take a few minutes for the changes to be applied.
-

Figure 10: Single-serving enabled.

Note: Make sure your single-model serving platform is using a trusted certificate. If it is not or you're unsure, make sure to apply steps 4-7 in the Single-model serving platform automated install above.
Add a custom serving runtime
We'll now add a custom serving runtime so we can deploy the GGUF version of the model.
Note: We will continue to use the GGUF version of the model to be able to deploy this model without the need for a hardware accelerator (e.g., GPU). OpenShift AI contains a scalable model serving platform to accommodate deploying multiple full sized LLMs.
Click the Add serving runtime button (Figure 11).

Figure 11: Add serving runtime button. Select Single-model serving platform for the runtime and select REST for the API protocol. Upload the
./components/custom-model-serving-runtime/llamacpp-runtime-custom.yamlfile as the serving runtime. Select Create (Figure 12).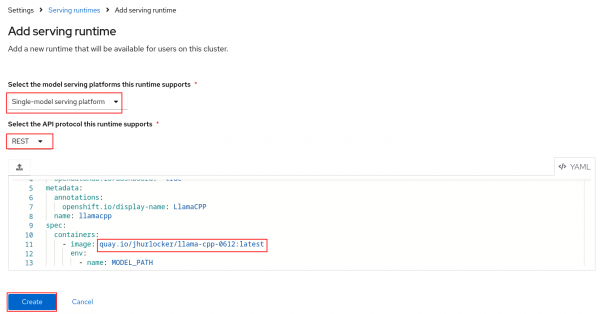
Figure 12: Add serving runtime.

Note: I've included a pre-built image that is public. You can build your own image with the Containerfile under ./components/custom-model-serving-runtime, if you would rather pull from your own repository.
If the serving runtime was added successfully, you should now see it in the list of available serving runtimes (Figure 13).

Figure 13: Serving runtime list.

Deploy model
Follow the steps below to deploy the model you uploaded to Minio.
Go to your "podman-ai-lab-rag-project" and select Models. You should see two model serving type options. Select Deploy model under the Single-model serving platform (Figure 14).

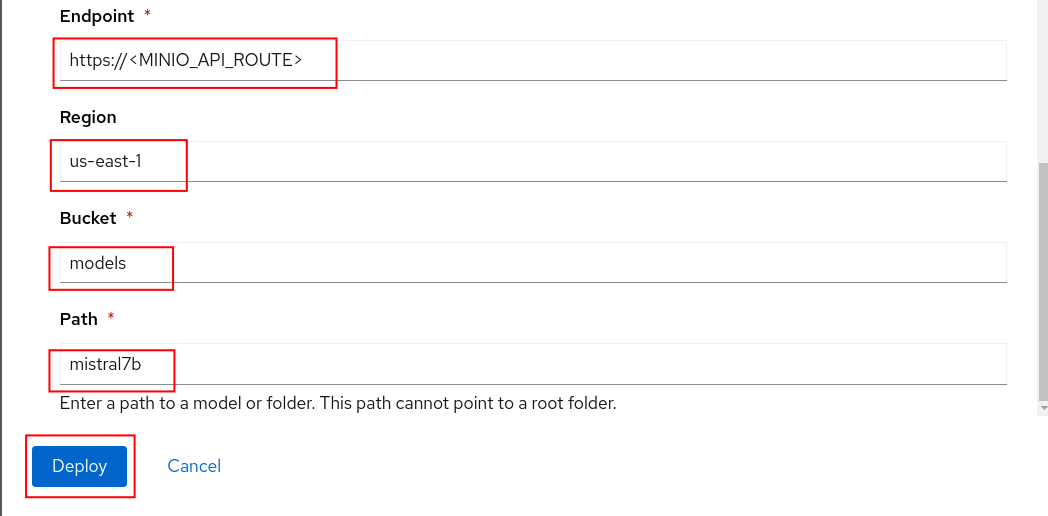
Figure 14: Deploy model on single-model serving platform. - Fill in the following values and click the Deploy button at the bottom of the form (Figures 15-17):
- Model name = mistral7b
- Serving runtime = LlamaCPP
- Model framework = any
- Model server size = Medium
- Select New data connection
- Name = models
- Access key = minio
- Secret key = minio123
- Endpoint = Your Minio API URL
- Region = us-east-1
- Bucket = models
- Path = mistral7b


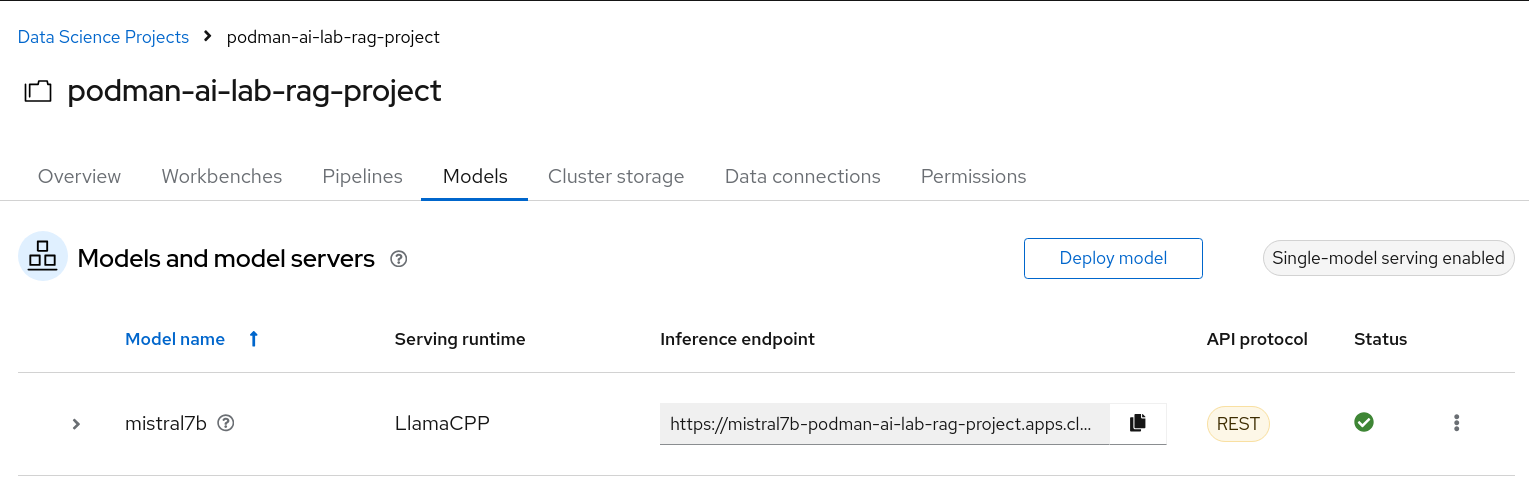
If your model deploys successfully, you should see the following page (Figure 18).

Figure 18: Successful model deployment. Test your model to make sure you can send in a request and get a response. You can use the client code that is provided by the model service in Podman AI Lab. Make sure to update the URL in the cURL command to the Inference endpoint on OpenShift AI:
curl --location 'https://YOUR-OPENSHIFT-AI-INFERENCE-ENDPOINT/v1/chat/completions' --header 'Content-Type: application/json' --data '{
"messages": [
    {
      "content": "You are a helpful assistant.",
      "role": "system"
    },
    {
      "content": "How large is the capital of France?",
      "role": "user"
    }
  ]
}'
Your response should be similar to the following:
{"id":"chatcmpl-c76974b1-4709-41a5-87cf-1951e10886fe","object":"chat.completion","created":1717616440,"model":"/mnt/models/mistral-7b-instruct-v0.2.Q4_K_M.gguf","choices":[{"index":0,
"message":{"content":" The size of a city's area, including its metropolitan area, can vary greatly, and when referring to the
\"capital\" of a country like France, people usually mean the city itself rather than its total metropolitan area. Paris, the capital
city of France, covers an urban area of approximately 105 square
kilometers (40.5 square miles) within its administrative limits.
\n\nHowever, if you are asking about the total area of the Paris
Metropolitana region, which includes suburban areas and their
combined population, it is much larger at around 13,022 square
kilometers (5,028 square miles). This encompasses more than just the city of Paris.",
"role":"assistant"},"logprobs":null,"finish_reason":"stop"}],"usage":{"prompt_tokens":32,"completion
If you face any SSL errors when running the previous command, try to add the max_tokens limit to 100, which will get you safely under the 60-second timeout limit of the Knative queue-proxy service (The use of jq is optional):
curl -k --location 'https://YOUR-OPENSHIFT-AI-INFERENCE-ENDPOINT/v1/chat/completions' --header 'Content-Type: application/json' --data '{
    "messages": [
      {
        "content": "You are a helpful assistant.",
        "role": "system"
      },
      {
        "content": "How large is the capital of France?",
        "role": "user"
      }
    ],
    "max_tokens": 100
  }' | jq .
    % Total    % Received % Xferd  Average Speed   Time    Time     Time  Current
                             Dload  Upload   Total   Spent    Left  Speed
  100  1011  100   793  100   218     14      3  0:01:12  0:00:55  0:00:17   174
  {
    "id": "chatcmpl-687c22c8-d0ba-4ea4-a012-d4b64069d7a2",
    "object": "chat.completion",
    "created": 1727727459,
    "model": "/mnt/models/mistral-7b-instruct-v0.2.Q4_K_M.gguf",
    "choices": [
      {
        "index": 0,
        "message": {
          "content": " The size of a city's area, including its urban and rural parts, is typically measured in square kilometers or square miles. However, when referring to the size of a city's capital, people usually mean the size of its urban core or central business district rather than the entire metropolitan area. In this context, Paris, the capital city of France, has an urban area of approximately 105 square kilometers (40.5 square miles). However, if you meant",
          "role": "assistant"
        },
        "logprobs": null,
        "finish_reason": "length"
      }
    ],
    "usage": {
      "prompt_tokens": 32,
      "completion_tokens": 100,
      "total_tokens": 132
    }
  }
Update the chat recipe application
We'll now take a look at the updates to the chat recipe application that we created from Podman AI Lab to use Langchain to connect the model we just deployed on OpenShift AI and the Elasticsearch vector database.
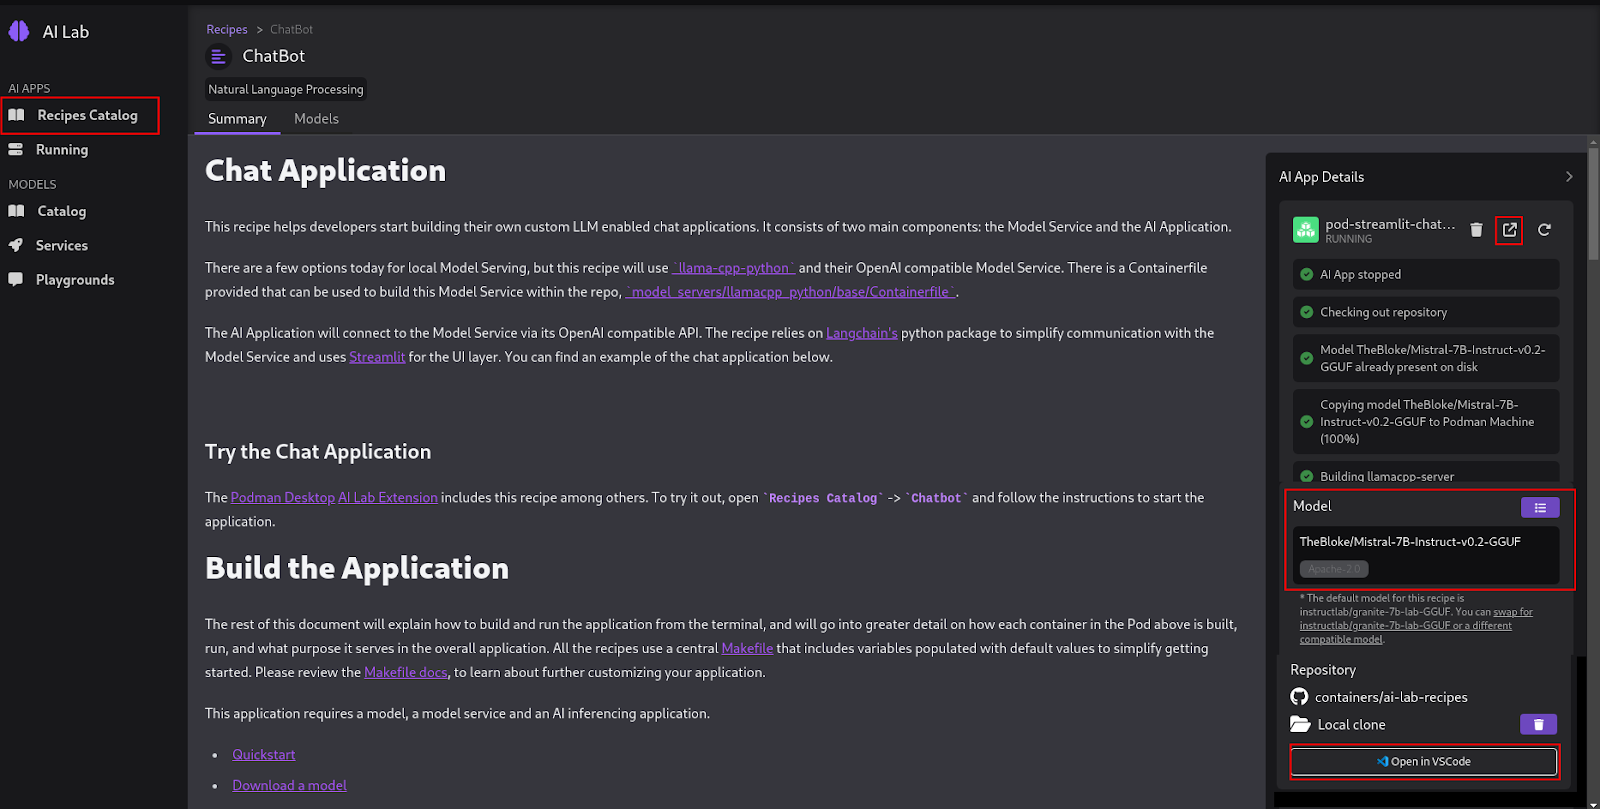
We'll start from the default chatbot recipe code accessible from Podman AI Lab (Figure 19).
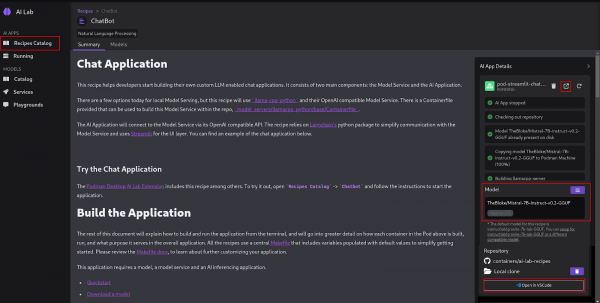
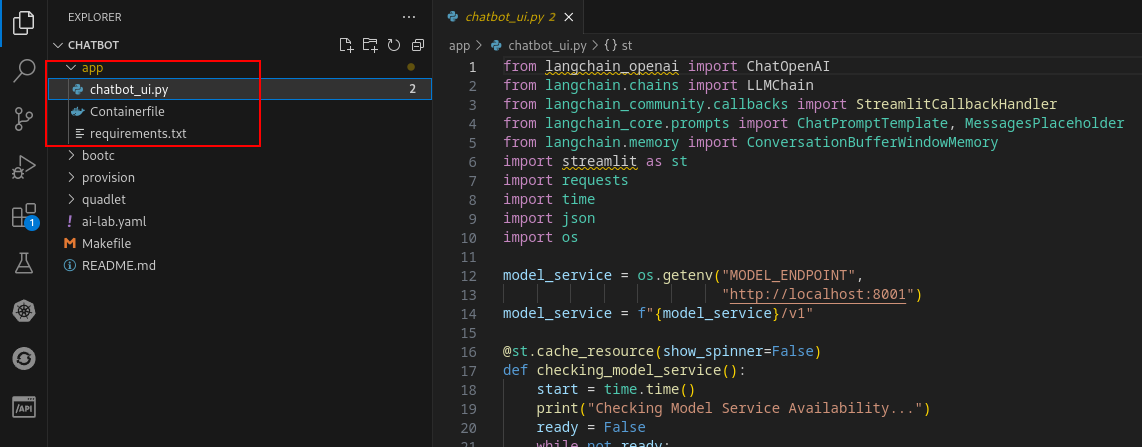
Figure 19: Podman AI Lab chat application. In Podman AI Lab, after clicking the Open in VSCode button, you should see the following (Figure 20):

Figure 20: Chatbot in VS Code. The only code that is modified is under the app directory.
Open the
./components/app/chatbot_ui.pyfile.Note: All of the code changes to the
chatbot_ui.pyfile have been made for you. The next step is intended to walk you through the code changes.We will first get some environment variables:
Then we will add in the Langchain code to give us our RAG functionality. Note where the
model_serviceor your OpenShift AI inference endpoint URL is configured and the Elasticsearch setup. Finally, take note of how both of these are passed to Langchain (chainvariable):llm = ChatOpenAI( api_key="sk-no-key-required", openai_api_base=model_service, streaming=True, callbacks=[StreamlitCallbackHandler(st.empty(), expand_new_thoughts=True, collapse_completed_thoughts=True)]) db = ElasticsearchStore.from_documents( [], Embeddings, index_name="rhoai-docs", es_connection=es, ) chain = RetrievalQA.from_chain_type(llm, retriever=db.as_retriever( search_type="similarity_score_threshold", search_kwargs={"k": 4, "score_threshold": 0.2 }), chain_type_kwargs={"prompt": QA_CHAIN_PROMPT}, return_source_documents=True)The last updates to the code are just to format the response so that the relevant documents will be included. Extra packages were also added to the
./components/app/requirements.txtfile.You can build the Containerfile and push it to your own repository, or you can use the one at
quay.io/jhurlocker/elastic-vectordb-chat.Update the
./components/app/deployment.yamlfile with your values for theMODEL_ENDPOINT,ELASTIC_URL, andELASTIC_PASSenvironment
variables.env: - name: MODEL_ENDPOINT value: '<OPENSHIFT_AI_MODEL_INFERENCE_ENDPOINT>' - name: ELASTIC_URL value: 'https://<YOUR_ELASTICSEARCH_SERVICE_URL>:9200' - name: ELASTIC_PASS value: '<YOUR_ELASTICSEARCH_PASSWORD>'
Note: Make sure you include https:// and the port :9200 in the ELASTIC_URL environment variable.
Create the project:
oc new-project elastic-vectordb-chatApply the
deployment.yamlyou just updated to deploy the chatbot application:oc apply -f ./components/app/deployment.yamlGet the route to the chatbot application:
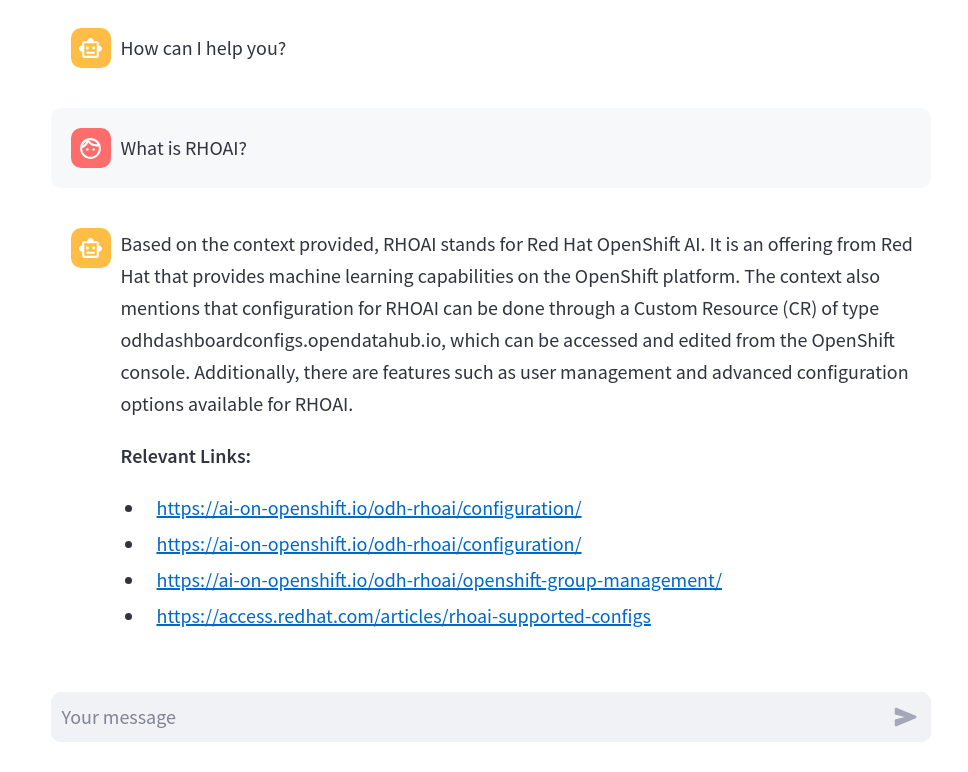
oc get route -n elastic-vectordb-chatOpen the application in your browser (Figure 21).

Figure 21: Chatbot deployed on OpenShift. Type in a message and press Enter. It might take a while to respond if the model is deployed on a CPU (Figure 22).
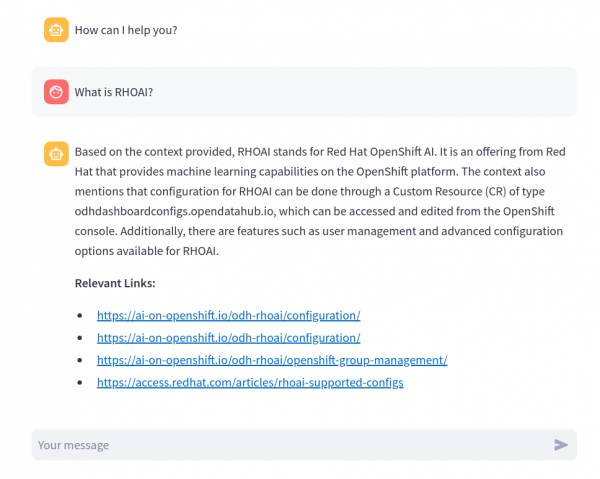
Figure 22: RAG chatbot in action. In the OpenShift web console, you can check the model server logs under the podman-ai-lab-rag-project -> Workloads -> Pods (mistral7b-*) -> Logs. Note the log statements when a message is sent to the model inference endpoint (Figure 23).
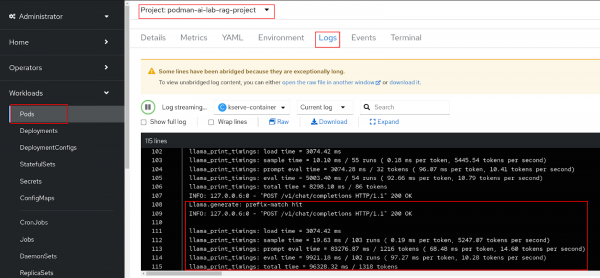
Figure 23: The model pod log in OpenShift.


Congratulations! You've successfully taken a model and application from Podman AI Lab and created an RAG chatbot deployed on OpenShift and OpenShift AI.
Special thanks to the maintainers of the below repositories:
- LLM On OpenShift The notebook to ingest data into Elasticsearch and the Langchain code added to the chatbot app.
- AI Accelerator The code used to deploy the various components on OpenShift and OpenShift AI.
I recently did a live YouTube demonstration of this learning path. Click on the link to view it.
Want to learn more about OpenShift AI? Explore these OpenShift AI learning paths.
