Bootable containers are an exciting new development in the containerization field. In a recent blog, we touched on the shift towards bootable containers with the announcement of image mode for Red Hat Enterprise Linux. In this article, we will walk you through our implementation journey, sharing insights and discoveries along the way.
The benefits of bootable containers
Bootable containers (bootc) come with their own kernel, which means that in addition to deploying them as usual application containers with standard tooling like Podman, you can also use these containers to provision a bare metal instance or create an image for a virtual machine (VM).
With bootc, we can use the same tooling to create an application container, VM image, or bare metal installer. This simple but powerful concept truly allows for a unified approach for DevOps and brings the concept "build once—deploy everywhere" to the next level.
Currently, bootable containers base images are available for several operating systems (Fedora, CentOS Stream). However, none of them provide a bootc image with preinstalled real-time kernel. We built our own base image to get to the root cause of this injustice.
Why we use pre-tuned real-time bootable containers
Running a real-time (RT) workload in a system requires a kernel-rt installation and a many additional steps to properly tune that system for achieving the best latency. Using pre-tuned bootc RT images can substantially simplify the tuning process and speed up development and deployment of an RT workload.
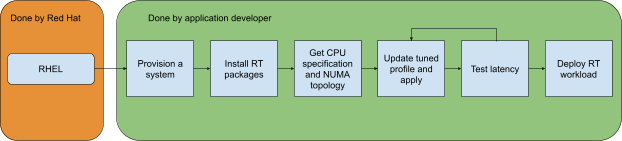
Currently, tuning steps require deep understanding of the underlying hardware (HW) platform as well as the impact configuration parameters have on latency. Figure 1 depicts a typical, simplified workflow for RT applications on a Red Hat Enterprise Linux (RHEL) example. This reflects the complexity of steps that must taken before starting testing an RT workload.
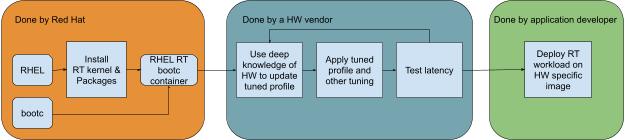
Tuning can be a complex, hardware-specific, and time-consuming process. To make the deployment simpler and faster for application developers, it’s a good idea to make use of the layering mechanisms offered by bootable containers. This allows the application developer to shift some of the previous steps to distribution providers and the hardware vendor, who can use their know-how about their hardware to provide the best tuning available (Figure 2).
To a large extent, this layered approach isn’t a new concept. Similarly in embedded systems, a board support package is typically provided by a system on chip (SoC) manufacturer.
Figure 2 depicts a possible workflow where hardware vendors take over responsibility for the hardware-specific tuning required for real-time applications by adding layers with tuning to a bootable container. That workflow should greatly simplify deploying a real-time application using a pre-tuned RT bootable container for an application developer. In the most extreme case, it is as easy as the following:
from quay.io/<hw-vendor>/rhel9-pretuned-rt:<hw-platform>
ADD <my-rt-application> <path in bootable container>
Testing latency
To check the latency achieved by the workflow in Figure 2, we implemented a processor on chip (PoC) with a pre-tuned RT bootable container image preconfigured for the Advantech UNO-148-B53BA system. This system comes with a single NUMA node equipped with Intel Core i5-1145G7E CPU and 16GB DDR4 memory.
You can review to the exact configuration parameters for this example project.
We used the provisioned system to run the following types of tests defined as:
- Test 1: Execute
cyclicteston three isolated CPUs (1,2,3). - Test 2: Execute
oslaton three isolated CPUs (1,2,3). - Test 3: Execute
cyclicteston two isolated CPUs (1,3), while runningstress-ngpinned to another CPU (2) to simulate a "noisy neighbor" scenario. - Test 4: Execute
oslaton two isolated CPUs (1,3), while runningstress-ngpinned to another CPU (2) to simulate a "noisy neighbor" scenario. - Test 5: Execute
cyclicteston three isolated CPUs (1,2,3) andstress-ngon the same isolated CPU with lower scheduler priority to simulate concurrency on an isolated CPU. - Test 6: Execute real-time Linux analysis (rtla)’s
timerlatin three isolated CPUs (1,2,3). - Test 7: Execute rtla’s
osnoisein three isolated CPUs (1,2,3).
We executed each test for an interval of 10 hours which resulted in the following measured max latency:
- Test 1: 11µs
- Test 2: 4µs
- Test 3: 24µs
- Test 4: 17µs
- Test 5: 24µs
- Test 6: 11µs
- Test 7: 7µs
With latency this low, we can enable the deployment of applications, such as industrial control systems, time-precise medical devices, or comply with real-time requirements of 5G/6G low latency communication.
The system performed well in all tests, delivering low latency values. But tests 3-5 are of the most interest to us since they represent a real-world scenario where a real-time workload runs in parallel (tests 3-4) and alongside (test 5) with a best effort non-real-time application.
It is important to note that cyclictest and oslat represent two classes of real-time applications:
cyclictestrepresents a workload that relies on sleep functionality and runs only for a limited time.oslatrepresents a class of workloads continuously running and consuming complete CPU time.
In the this context, it‘s very interesting to see that latency results for test 3 and test 5 are the same, which demonstrates that it is possible for a best effort workload to share a CPU with a particular type of real-time workload without impacting the perceived latency.
To compare the latencies achieved by this concept with the default CentOS image, we ran a jitterdebugger test on Advantech UNO-148-B53BA (Figure 3).

The graph in Figure 3 shows that maximum latency went down from about 3000µs to less than 20µs.
We should take these results with a grain of salt since latency can increase if the RT task is more sensitive to cache evictions than cyclictest/oslat/jitterdebugger, given that cache evictions can be caused by a memory intensive best effort workload.
It should be noted that even though the image has all required bits in place for tuning RT capabilities, some basic input/output system (BIOS) configuration should either come preset by the HW vendor or corresponding changes have to be applied by the application developer to ensure that some hardware related interferences are removed. Regular recommendations include disabling SMT/HyperThreading, low power states, and power management.
The benefits of pre-tuning bootable containers
Relying on bootable containers for pre-tuning has several important benefits besides leveraging Containerfile semantics and tooling.
The following benefits of deploying the RT application on a rt-pretuned-bootc-container allow significant flexibility for development, testing, and deployment:
- Using it as an application container for testing.
- Turning it into a VM rootfs (qcow2, etc) and deploying on a RT-able and pre-tuned host.
- Turning it into an
anaconda-isoand using it to deploy on real hardware (bare metal). - Updating a
bootc-deployedsystem, such as the one created in #3.
The tuning process steps
There is no prebuilt RT CentOS Stream9 bootc image available in Quay.io. The best way to build one is to start from a regular (non-RT) CentOS Stream9 bootc image and add a few lines on the Containerfile:
from quay.io/centos-bootc/centos-bootc:stream9
RUN dnf config-manager --set-enabled rt nfv
RUN rpm-ostree override remove kernel kernel-{core,modules,modules-core} \
   --install kernel-rt-core --install kernel-rt-modules --install kernel-rt-kvm
Alternatively, one could build their own base image to include the kernel-rt packages.
To properly do the tuning, we followed these steps:
It’s necessary to have the CPU isolation mechanism on top of the
kernel-rt. TuneD conveniently takes care of that, so we added tuned package and its RT oriented profiles:tuned-profiles-nfv-guestandtuned-profiles-nfv-host.Then we added realtime-tests and rtla packages, to run latency-debugging tests, such as
cyclictest,oslat, and rtla (timerlatandosnoise).We needed to enable the TuneD profile, but there is a caveat to doing that: the
tuned-admcommand requiresdbusto communicate with tuned (daemon), butdbusis not available when the container is being built. This could be fixed by running this step in VM context, but that is not currently supported.To work around this issue, we used the following systemd unit file to postpone setting the tuned profile to the moment when the bootable container first boots:
[Unit]
Description=Service to Tune RT after installation of bootc
Requires=tuned.service
After=tuned.service
ConditionPathExists=!/var/lib/rt-post-install-tuning.done
[Service]
Type=oneshot
ExecStart=/usr/local/sbin/custom-rt-tuning-first-boot.sh
ExecStartPost=/usr/bin/touch /var/lib/rt-post-install-tuning.done
RemainAfterExit=yes
[Install]
WantedBy=multi-user.target
This simple systemd service executes on boot-up and runs the supplied configuration script custom-rt-tuning-first-boot.sh only if it hasn’t been done before (first boot). Executing a script has the advantage over directly invoking the tuned command since it makes it possible to apply additional tuning steps if needed, but also means that the RT tuning will be available only after the first reboot.
How to customize a base RT pre-tuned bootc container
To easily reproduce the steps described in the previous section, we created a base container recipe that features the following build arguments in the Containerfile:
TARGET: Allows you to distinguish between bootc host and guest containers. The difference between them is fairly subtle and mostly reduces to an applied tuned profile as well some extra packages installed on a host to enable hypervisor functionality (e.g.qemu,libvirt, andvirt-install).TARGET_PROFILE: Allows you to set a custom tuned profile, by default we rely onrealtime-virtual-* profiles.RTCPU_LIST: Allows you to specify which CPU to isolate—by default only CPU1 is isolated.EXTRA_KARGS: Allows you to pass extra arguments to the Linux kernel boot command line.EXTRA_PKG: Allows you to install extra package, by default is empty.EXTRA_CMD: Allows you to perform some extra steps without the need for an additional custom Containerfile.
To further simplify usage, we created an rt-pretuned-bootc-example PoC that leverages the described mechanisms of our Containerfile to build a pre-tuned RT CentOS bootable container as well as generate a directly deployable image (VM or bare metal). This project is meant to serve as an example for hardware vendors to create dedicated RT pre-tuned bootable containers for their hardware solutions by setting up isolated CPUs, proper boot parameters, and adding additional packages (if required).
Options for hardware vendors
The rt-pretuned-bootc-example project contains a script allowing the user to input a tuning file that describes the desired tuning configuration, which corresponds to setting the previous section’s Containerfile build arguments. Due to this flexibility, a hardware vendor can provide their tuning files in many ways, including the following:
The first option is to create a project with the tuning files, and include the example project as a submodule. This can be somewhat tricky at first, but it’s easy to maintain for multiple hardware platforms. It's also easier to update in case the example project gets any bug fix. A simple submodule update should do the trick.
The second option is to fork the example project and add a directory to keep all the supported hardware’s tuning files. This can be a very simple way to maintain multiple platforms, but requires manual merges in case the example project gets any bug fix.
A third option would be to fork the example project for every supported platform, which can be very simple for a few platforms, but does not scale well if many platforms are supported.
This is not an exhaustive list of options. There could be another way of harnessing the project to distribute the scripts to build a rt-pretuned-bootc in their hardware. It’s up to the hardware vendor to use their own experience and skill set to decide the best way to fit their needs.
Options for application developers
There are many ways to consume rt-pretuned-bootc repositories created by hardware vendors. The following is not an exhaustive list, but includes a few recommended options:
The first option is to create a project with the application installing and setting snippets, which should go into the end of the base tuned.containerfile. Then include every supported hardware platform fork as a submodule and create a script initializes the project for each supported platform, appends the snippet to the end of its
tuned.containerfile, and runs the building script. This option can be laborious to set up, but scales very well for multiple hardware platforms.- The second option would be to fork rt-pretuned-bootc and add a new commit with the application installing and setting steps on the tuned.containerfile. Then clone each supported hardware platform fork and replace the original rt-pretuned-bootc with your fork. This can be very simple to deploy, but does not scale well if you have to maintain your application in many different hardware platforms.
Again, deciding which option is best depends on the development setup, previous experience, and particular needs of the application.
The pre-tuned real-time bootc solution
It is exciting to leverage bootable containers to rethink ways to consume real-time Linux. In this article, we described how to pre-tune the system and delegate the responsibilities to Linux experts and hardware vendors. This responsibility split leads to a more reusable, robust, and maintainable solution, allowing everyone in the chain to focus on the areas of their expertise:
Linux experts focus on RT-kernel and packaging.
HW vendors are responsible for hardware aspects.
Application developers can focus on actual application logic.
Learn more about bootc containers and get started with image mode for Red Hat Enterprise Linux.
