A recent article, The present and future of CI/CD with GitOps on Red Hat OpenShift, proposed Tekton as a framework for cloud-native CI/CD pipelines, and Argo CD as its perfect partner for GitOps. GitOps practices support continuous delivery in hybrid, multi-cluster Kubernetes environments.
In this two-part article, we'll build a CI/CD workflow that demonstrates the potential of combining Tekton and GitOps. You'll also be introduced to Red Hat OpenShift Serverless, as we'll use Knative service resources in our CI/CD workflow. Let's start with an overview of the CI/CD workflow that we'll implement for the demonstration.
The CI/CD workflow
The diagram in Figure 1 illustrates the CI/CD workflow. A commit initiated in the application's source code repository triggers a full CI/CD process, which ends with a new version of the serverless application deployed in development, staging, and production environments as laid out in Figure 1.
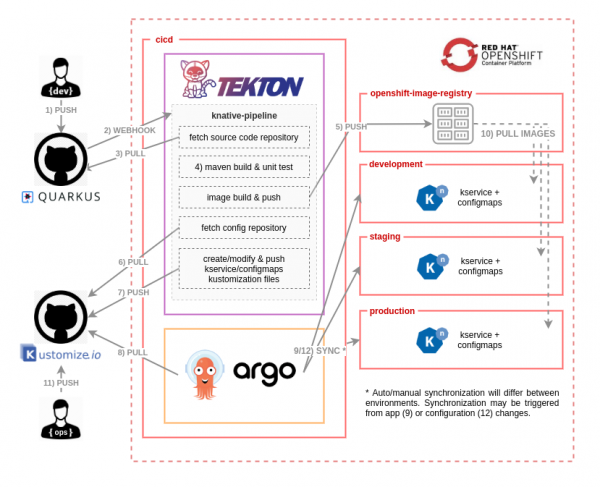
Let's look more closely at each step in the workflow:
- A developer pushes a new change in the application's source code repository.
- A webhook configured in the source code repository (GitHub, in this case) triggers the Tekton pipeline.
- Once the pipeline has started, the first task fetches the source code from the repository.
- A Maven task packages the application code as a JAR file and runs unit tests before building the container image.
- A buildah task builds and pushes the container image to the registry. The image is then pushed to the OpenShift internal registry.
- The pipeline fetches the repository that keeps the desired state of the example application's configuration and deployment descriptors. In GitOps methodology, we use a Git repository as the single source of truth for what is deployed and where it's deployed.
- Initially, the Git repository might be empty, so this task is smart enough to initialize the repository with all of the Kubernetes manifests (in this case, the Knative service and
ConfigMaps) that are required to run the application for the first time. The subsequent repository commits will only update the existing descriptors with the new application version, an independent route for canary testing, and related configurations. Once all the manifest files have been created or modified, this task pushes the changes to the repository. This step is the glue between the continuous integration performed by the Tekton pipeline and the continuous deployment managed by Argo CD. - Argo CD pulls from the configuration repository and synchronizes the existing Kubernetes manifests, which are specified using Kustomize files. This action creates the final Kubernetes objects in the
development,staging, andproductionnamespaces. The synchronization could be auto or manual based on the target namespace's requirements. - In this final part of the workflow, it might be necessary to pull images referenced in the deployment Kubernetes manifest from the OpenShift internal registry. The operations team might also push configuration changes, for instance, changing the URL of a target microservice or certain information that is unknown by the development team. This last step could also create an
OutOfSyncstate in Argo CD, which would lead to a new synchronization process (see Step 9 in Figure 1).
Next, we'll set up our cluster with the OpenShift Operators and services that we'll need.
Configuring the OpenShift cluster
We'll use a set of scripts to configure and install all of the components required for this demonstration. To get started with setting up the demonstration environment, clone the following source code repository:
$ git clone https://github.com/dsanchor/rh-developers-cicd.git
Next, ensure that you have all of the following tools installed in your system. You'll need these pre-installed when you run the scripts:
- Helm:
helm version - Git:
git version - oc:
oc version - Kustomize v 3.1.0 or higher:
customize version - envsubst (gettext):
envsubst --help - tkn (optional Tekton CLI):
tkn version
Once you've checked the above requirements, log in to your OpenShift cluster as a cluster-admin user:
$ oc login -u USERNAME -p PASSWORD https://api.YOUR_CLUSTER_DOMAIN:6443
Operators, namespaces, and role bindings
Initially, we will install the OpenShift Pipelines and OpenShift Serverless Operators in the openshift-operators namespace.
We'll also create four new namespaces: cicd, development, staging, and production. Images are pushed within the boundaries of the cicd namespace, so all of the other namespaces require system:image-puller privileges in order to pull the new images.
Finally, we'll add a new view role to the development, staging, and production default service accounts. This role provides access from our Quarkus application pods to ConfigMaps and Secrets. (I'll introduce the Quarkus application later.)
Here is the script, which basically uses three Helm charts for the required installations:
$ ./bootstrap.sh
---------------
Installing openshift-pipelines operator
Release "openshift-pipelines" does not exist. Installing it now.
NAME: openshift-pipelines
LAST DEPLOYED: Thu Sep 10 10:55:14 2020
NAMESPACE: default
STATUS: deployed
REVISION: 1
TEST SUITE: None

Installing openshift-serverless
Release "openshift-serverless" does not exist. Installing it now.
NAME: openshift-serverless
LAST DEPLOYED: Thu Sep 10 10:55:16 2020
NAMESPACE: default
STATUS: deployed
REVISION: 1
TEST SUITE: None

Creating cicd, development, staging and production namespaces
Added cicd system:image-puller role to default sa in development, staging and production namespaces
Added view role to default sa in development, staging and production namespaces
Release "bootstrap-projects" does not exist. Installing it now.
NAME: bootstrap-projects
LAST DEPLOYED: Thu Sep 10 10:55:18 2020
NAMESPACE: default
STATUS: deployed
REVISION: 1
TEST SUITE: None
You can execute the script as-is, or use the Helm charts independently, overriding any values that you wish. For instance, you could override the value of the channel subscription for each OpenShift Operator.
Figure 2 shows the installation so far, with both Operators installed under the openshift-operators namespace.

Verify that the OpenShift Pipelines Operator is installed at version 1.1.1 or greater.
Next, we'll complete the OpenShift Serverless components installation by installing the Knative Serving control plane.
Install a Knative Serving instance
We need to create a Knative Serving instance that will provide a set of serverless capabilities to our applications. Run the following to create the Knative Serving instance and install the control plane:
$ ./add-knative-serving.sh
------------------------------
Creating knative-serving namespace
namespace/knative-serving created
Installing basic knative serving control plane
knativeserving.operator.knative.dev/knative-serving created
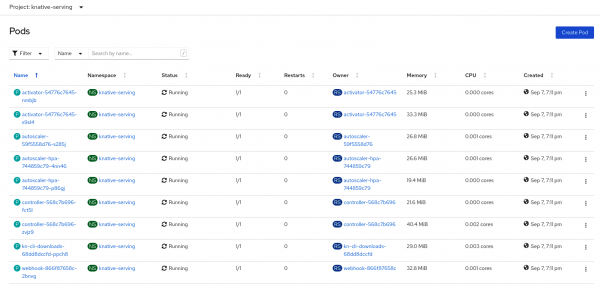
We've deployed a set of pods representing a basic Knative Serving control plane in the knative-serving namespace, as shown in Figure 3.
As shown in Figure 4, we've also created a new namespace, knative-serving-ingress, for the Knative installation's ingress gateways.

We've installed the OpenShift Operators and created the namespaces and the Knative Serving instance to manage our serverless workloads. We're now ready to create the Tekton resources that we'll need to run the continuous integration pipeline.
Configure the Tekton tasks and pipeline
When you install the OpenShift Pipelines Operator, it comes with an out-of-the-box set of cluster tasks that you can use to build your pipeline. In some situations, you will need other tasks to execute specific functionality. You can easily create these tasks in Tekton. You can also search the Tekton Hub for reusable tasks and pipelines that are ready to be consumed.
For our pipeline, we will use one task from the Tekton Hub and two custom tasks. To make these tasks available to our pipeline, we'll need to create them in the cicd namespace. (Note that you can create ClusterTasks if you think that you'll reuse them in different pipelines from different namespaces.) Run the following script to install the needed tasks and create the pipeline in the same namespace.
$ ./add-tekton-customs.sh cicd
------------------------------
Installing buildah task from https://hub-preview.tekton.dev/
task.tekton.dev/buildah created
Installing custom tasks
task.tekton.dev/push-knative-manifest created
task.tekton.dev/workspace-cleaner created
Installing knative-pipeline
pipeline.tekton.dev/knative-pipeline created
Navigate to the OpenShift console and open the Pipelines menu and project cicd. You will discover your new tasks, as shown in Figure 5.
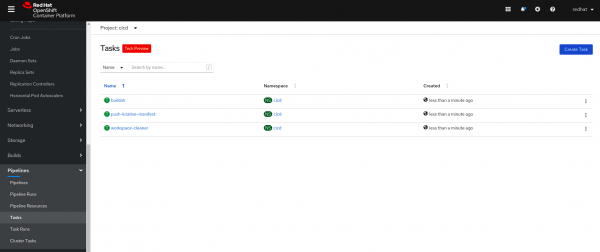
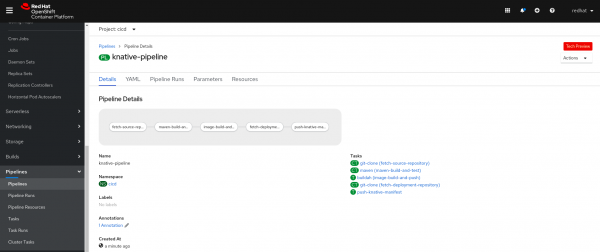
Figure 6 shows your new pipeline in the same namespace.
Tekton workspaces
Some of our tasks in the pipeline require either loading certain configurations from ConfigMaps or storing the state of the resulting execution to be shared with other tasks. For instance, the Maven task requires that we include a specific settings.xml in a ConfigMap. On the other hand, the first task fetches the application's source code repository. The Maven task, which follows, will need those files to build the application JAR. We're using an OpenShift PersistentVolume to share these source files.
Tekton provides the concept of workspaces for these purposes. Run the following script to add a set of ConfigMaps and a PersistentVolumeClaim to the cicd namespace:
$ ./add-tekton-workspaces.sh cicd
-----------------------------------
Creating knative-kustomize-base ConfigMap with base kustomize files for Knative services
configmap/knative-kustomize-base created
Creating knative-kustomize-environment ConfigMap with environment dependent kustomize files
configmap/knative-kustomize-environment created
Creating maven ConfigMap with settings.xml
configmap/maven created
Creating PVC using default storage class
persistentvolumeclaim/source-pvc created
Notice that this script creates a PersistentVolumeClaim with no StorageClass defined. Unless you choose to specify one, the default StorageClass will be used. Feel free to uncomment any lines in the provided script to fit your needs.
The demo application
Until now, I've said almost nothing about the demo application. The application is based on Quarkus, which is a perfect match for serverless applications due to its fast boot time and low memory consumption. The application itself is a simple "Hello, world" REST API that greets users when the /hello URI is hit.
The application uses the kubernetes-config extension to facilitate the consumption of ConfigMaps and Secrets in Kubernetes. The "Hello, world" application reads a list of ConfigMaps, which gives us the chance to manage configuration at different levels, overriding duplicated properties.
Figure 7 shows an extract of the application.yaml that defines the list of ConfigMaps.

You can find the complete application source code in the GitHub repository for this article. Note that the pipeline also initializes and continuously updates a different repository that contains, in a declarative way, all of the Kubernetes manifest for our application deployments and configurations. Later in the article, we'll use Kustomize to declaratively customize the application configuration and deployment.
Create your own repository
At this stage, you must create a GitHub repository that you will use to store the customization files required for the demonstration. My repository is named quarkus-hello-world-deployment, and I'll use that name to reference the repository in the upcoming scripts. You can use the same name or a different one for your repository.
GitHub has changed the default name to main, as shown in Figure 8.

Ensure you create a master branch instead, either by changing your default settings or by creating a new branch manually. After you have created and named the repository, leave it empty and initialized.
In order to allow the Tekton pipeline to push changes into the new repository, you will have to provide a valid set of GitHub credentials. You'll store the credentials in a Secret and link them to the ServiceAccount pipeline, which was automatically created in the cicd namespace.
Execute the following script:
$ ./add-github-credentials.sh cicd YOUR_GITHUB_USER YOUR_GITHUB_PASSWORD
---------------------------------------------------------------------------
Creating secret with github credentials for user dsanchor
secret/github-credentials created
Linking pipeline sa in namespace cicd with your github credentials
serviceaccount/pipeline patched
A manual pipeline run
We are now ready to manually test the pipeline's execution and see the results. The pipeline workflow includes a webhook setup that triggers the pipeline automatically. We'll leave that part for the end of this article (in Part 2); for now, we'll just test the workflow by triggering the pipeline manually.
I've provided two options to trigger the pipeline manually:
- Create a pipeline run from a YAML file.
- Start the pipeline using the Tekton CLI: tkn.
In both cases, we'll use a given commit from the application repository. Also, we need to provide the repository that keeps all of our config and deployment manifests. In the script below, I reference my deployment repository—you should replace that reference with the name of your repository. When you are ready, execute the following:
$ cat tekton/pipelines/knative-pipeline-run.yaml | \
  SOURCE_REPO=https://github.com/dsanchor/quarkus-hello-world.git \
  COMMIT=9ce90240f96a9906b59225fec16d830ab4f3fe12 \
  SHORT_COMMIT=9ce9024 \
  DEPLOYMENT_REPO=https://github.com/dsanchor/quarkus-hello-world-deployment.git \
  IMAGES_NS=cicd envsubst | \
  oc create -f - -n cicd
------------------------------------------------------------------------------------------
pipelinerun.tekton.dev/knative-pipeline-run-54kpq created
If you prefer to, you can start the pipeline using the tkn CLI:
$ tkn pipeline start knative-pipeline -p application=quarkus-hello-world \
  -p source-repo-url=https://github.com/dsanchor/quarkus-hello-world.git \
  -p source-revision=9ce90240f96a9906b59225fec16d830ab4f3fe12 \
  -p short-source-revision=9ce9024 \
  -p deployment-repo-url=https://github.com/dsanchor/quarkus-hello-world-deployment.git \
  -p deployment-revision=master \
  -p dockerfile=./src/main/docker/Dockerfile.jvm \
  -p image-registry=image-registry.openshift-image-registry.svc.cluster.local:5000 \
  -p image-repository=cicd \
  -w name=source,claimName=source-pvc \
  -w name=maven-settings,config=maven \
  -w name=knative-kustomize-base,config=knative-kustomize-base \
  -w name=knative-kustomize-environment,config=knative-kustomize-environment \
  -n cicd
Another option is to trigger the pipeline from the OpenShift console.
Monitor the pipeline's execution
To check the execution progress, visit the Pipeline Runs dashboard in the OpenShift console, as shown in Figure 9.

If you want to see all the details of each pipeline task, click in the name of the pipeline run. You will get the logs for each task, as shown in Figure 10:
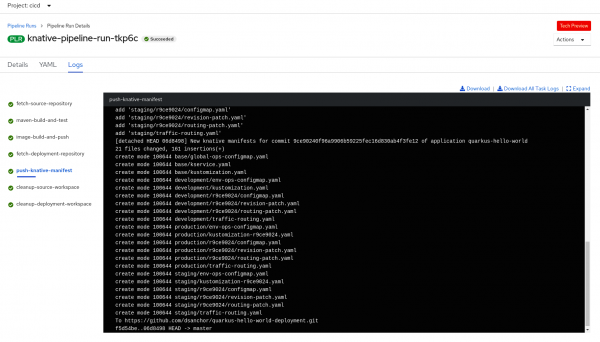
If you trigger the pipeline with exactly the same parameters twice (for instance, using both examples that I have provided) you will see that the second run fails when pushing the Kustomization manifests. The failure happens because there is nothing new to commit—awesome!
Outcomes of the pipeline execution
The diagram in Figure 11 shows what we've achieved so far:
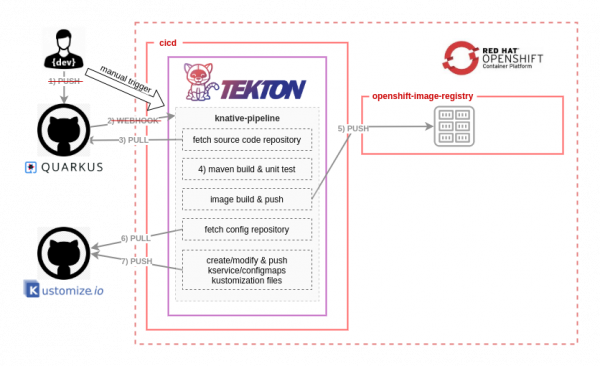
Note that we replaced the steps related to "Push code" and "repository webhook" with a manual pipeline trigger based on a given commit ID.
At this point, we've pushed a new image to the OpenShift internal registry. We've also initialized the repository that will contain all of the config and deployment manifests, along with all of the Kubernetes manifests that are required to run the first version of our serverless application.
Reviewing the deployment repository structure
Now is a good time to review the structure of the deployment repository and what will eventually be the final manifests that we'll generate with Kustomize. If you are not familiar with Kustomize and its capabilities, feel free to learn more about it. Understanding Kustomize could help you to better understand the structure of the repository.
Update your deployment repository (git pull) and you should see similar output to this:
├── base
│   ├── global-ops-configmap.yaml
│   ├── kservice.yaml
│   └── kustomization.yaml
├── development
│   ├── env-ops-configmap.yaml
│   ├── kustomization.yaml
│   ├── r9ce9024
│   │   ├── configmap.yaml
│   │   ├── revision-patch.yaml
│   │   └── routing-patch.yaml
│   └── traffic-routing.yaml
├── production
│   ├── env-ops-configmap.yaml
│   ├── kustomization-r9ce9024.yaml
│   ├── r9ce9024
│   │   ├── configmap.yaml
│   │   ├── revision-patch.yaml
│   │   └── routing-patch.yaml
│   └── traffic-routing.yaml
├── README.md
└── staging
├── env-ops-configmap.yaml
├── kustomization-r9ce9024.yaml
├── r9ce9024
│   ├── configmap.yaml
│   ├── revision-patch.yaml
│   └── routing-patch.yaml
└── traffic-routing.yaml
For simplicity, I will only focus on the base and development folders for now:
- The
basefolder has all of the shared resources between the three environments. It holds the basic structure of a Knative service and a global config map. - The
developmentfolder contains the overlays to complete the Knative service manifest generation for a given application version (an example is ther9ce9024folder) and two config maps that are related to the environment and developer configuration levels or ownership. The one under the revision folder has been copied from the application source code, letting the developer provide a set of configuration properties for the application.
We are taking advantage of the simplicity of Knative services to define independent routes for each service revision and to split traffic between revisions. Thus, the traffic-routing.yaml and the routing-patch.yaml form the final traffic-routing section of a Knative service.
Each time a new revision is available in development, an independent route is created for it, to ensure that it is accessible for testing. The main route remains the same (for instance, targeting the other two previous revisions). We achieve this behavior by not modifying the main traffic-routing.yaml automatically from the pipeline but only adding the new route (routing-patch.yaml) for the new revision.
These details will be easier to understand when we run additional tests in Part 2. For now, just note a significant difference between the staging and production namespaces and development: The CI pipeline does not create a kustomization.yaml file (with that exact name) for them. There will always be one with an additional revision prefix: kustomization-r9ce9024.yaml. Those changes will not be considered during the synchronization process unless this new revision is referenced in the kustomization.yaml. A manual action is required to make the changes visible to Kustomize.
Note: The point of the file-name difference is to differentiate the demonstration: I wanted those two environments to behave differently so that they would require someone to approve the changes. Renaming the file is a simple approach to approval that does not overcomplicate the demonstration. I would prefer to create a different branch for every new revision, then generate a pull request once it's ready to be promoted.
Kustomize: Put all the pieces together
We've reviewed the content and structure of the deployment repository, but we still don't have the final composition of the Knative service and ConfigMaps. The following script uses kustomize to build the final manifests so that we can see how they look:
$ kustomize build development
------------------------------
apiVersion: v1
kind: ConfigMap
metadata:
  name: env-ops-quarkus-hello-world
---
apiVersion: v1
kind: ConfigMap
metadata:
  name: global-ops-quarkus-hello-world
---
apiVersion: v1
data:
  application.yaml: |-
    message: hola
    environment:
      name: dev
kind: ConfigMap
metadata:
  name: quarkus-hello-world
---
apiVersion: serving.knative.dev/v1
kind: Service
metadata:
  name: quarkus-hello-world
spec:
  template:
    metadata:
      name: quarkus-hello-world-r9ce9024
    spec:
      containers:
      - image: image-registry.openshift-image-registry.svc.cluster.local:5000/cicd/quarkus-hello-world:9ce90240f96a9906b59225fec16d830ab4f3fe12
        livenessProbe:
          httpGet:
            path: /health/live
        readinessProbe:
          httpGet:
            path: /health/ready
  traffic:
  - percent: 100
    revisionName: quarkus-hello-world-r9ce9024
  - revisionName: quarkus-hello-world-r9ce9024
    tag: r9ce9024
Conclusion for Part 1
At this point, we could apply our set of objects into the development namespace to get a serverless application running, but we don't want to do the deployment step manually. In the second half of this article, I will show you how to integrate Argo CD into the CI/CD pipeline that we've developed so far.
